Drone Show Setup
Mazzy Star Drone Introduction
Mazzy Star Drone is designed for drone light show, featuring a full-color RGB LED, intelligent flight mode and high precision positioning system. It equips with RTK GPS positioning system and multiple control channels communication system to ensure a stable and safe formation flight. Mazzy Star Drone has full size propeller guard and only 0.48kg armed weight. The maximum time hover time is up to 18 minutes. For the revolutionary design, Mazzy Star Drone significantly reduce safety risks compared to other drones on the market.
Feature Highlights
- Compact, durable and light airframe, full-size propeller guard
- Only 0.48kg armed weight, up to 18-min flight time
- Full-color RGB LED in high brightness, up to 640LM
- Ground control software with Realtime 3D video preview
- High precision RTK GPS, centimeter-level accuracy with RTK fixed
- Radio transmit, 915MHz/2.4GHz, 3km/1.2km Long Range Control
- WIFI transmit, 2.4G, 120m Long Range Control
- Remote Control, 2.4G, 1km distance
- Drone light show Ground Control Station Software “Vimdrones GCS” --with efficient drone dashboard, Realtime 2D&3D video preview, enables flexible configuration and development
- Drone light show design software “Vimdrones Designer”--Blender Add-on
Aircraft Diagram
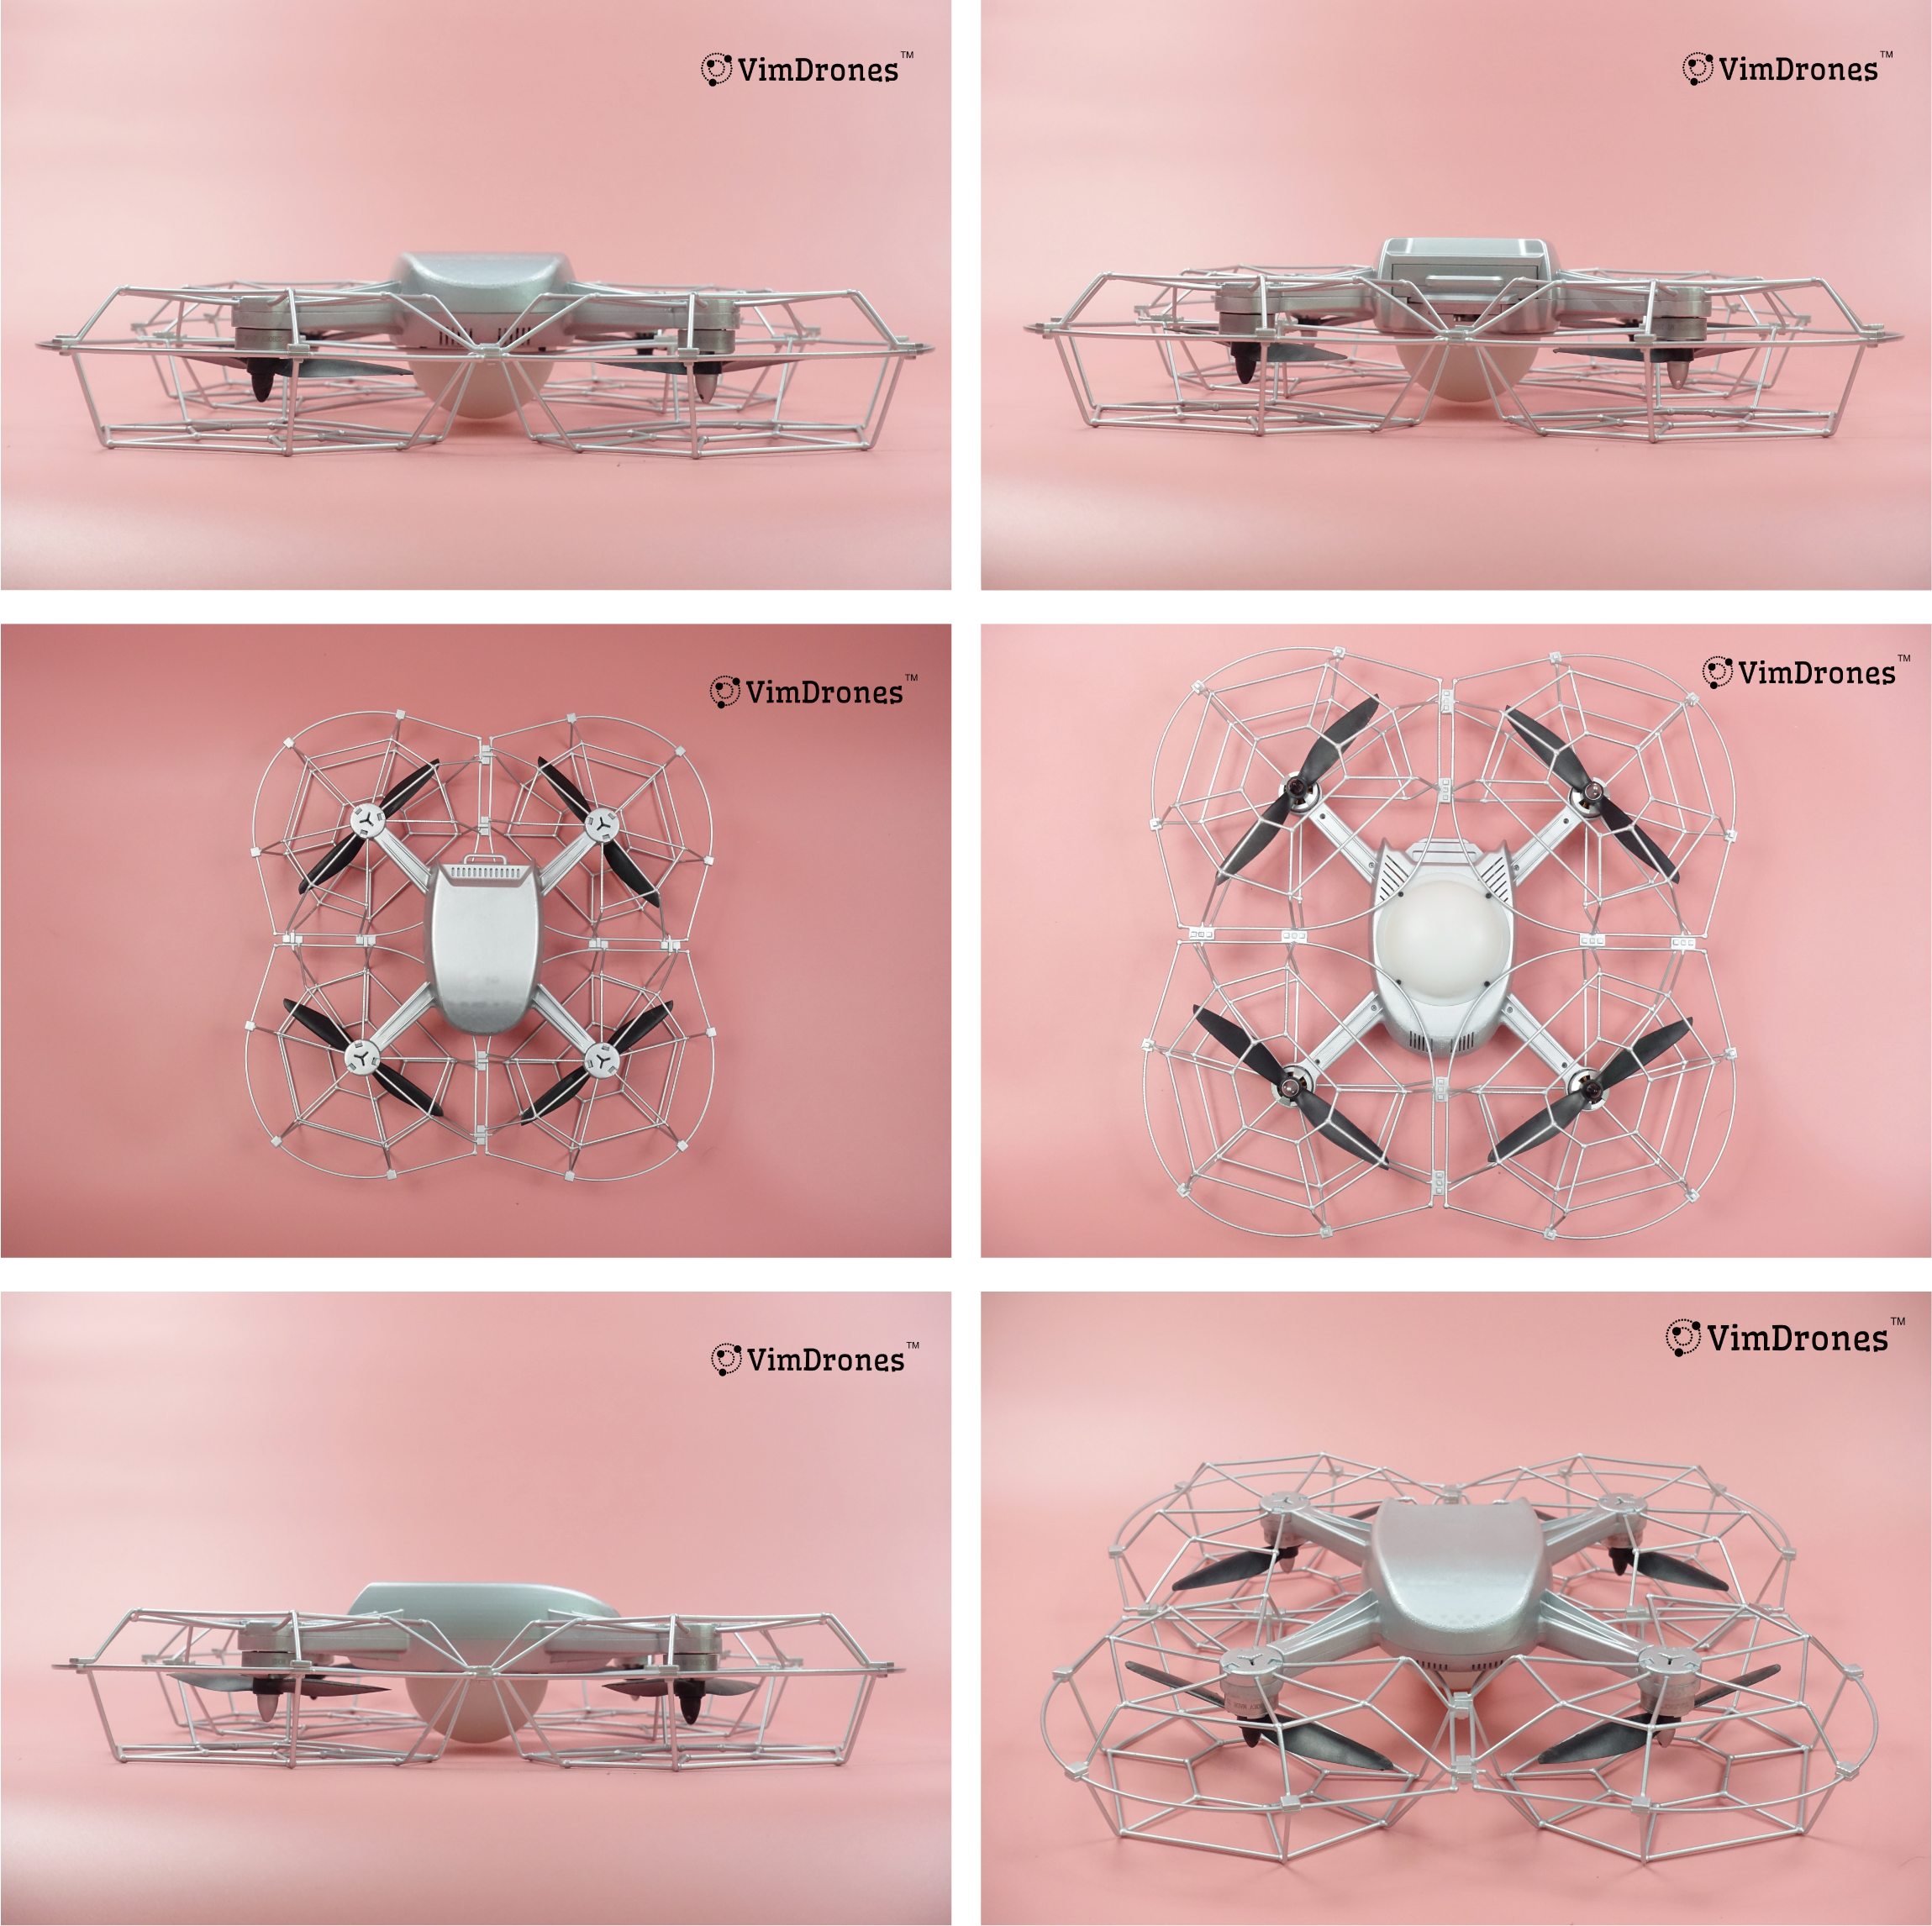
Technical Specifications
| Drone Specs | Details |
|---|---|
| Airframe | Compact, durable and light airframe, full size propeller guard |
| Weight | 480± g with 2S 3000mAh battery |
| Body Dimension | 340x340x80 mm |
| Motor and Prop | 2300 kV brushless motors; 6 inch propeller |
| Max Hover Time | 18mins |
| Wind Resistibility | < 7 m/s |
| Positioning System | RTK GPS (GPS+GLONASS+Galileo+BeiDou) Centimeter-level accuracy with RTK fixed |
| Battery | LiPo2S, 7.6V, 3000-mAh |
| Remote Control | 7-channel 2.4G radio remote controller (1km distance, optional) |
| Ground Antenna | 915MHz/2.4GHz 1000 mW, communication range 3km/1.2km |
| Drone Antenna | 915MHz/2.4GHz 20 mW, communication range, 2km 2.4G WiFi, communication range, 120m |
| LED | Integrated full-color RGB LED, 4W |
| Charger | high-power 2S LiPo battery balance charger 10 charging holes Input: AC100~240V 50/60Hz, 3A(Max) Output: DC8.7 V 1.5A 10 groups |
| Accessory | Foam box (420x420x148mm) |
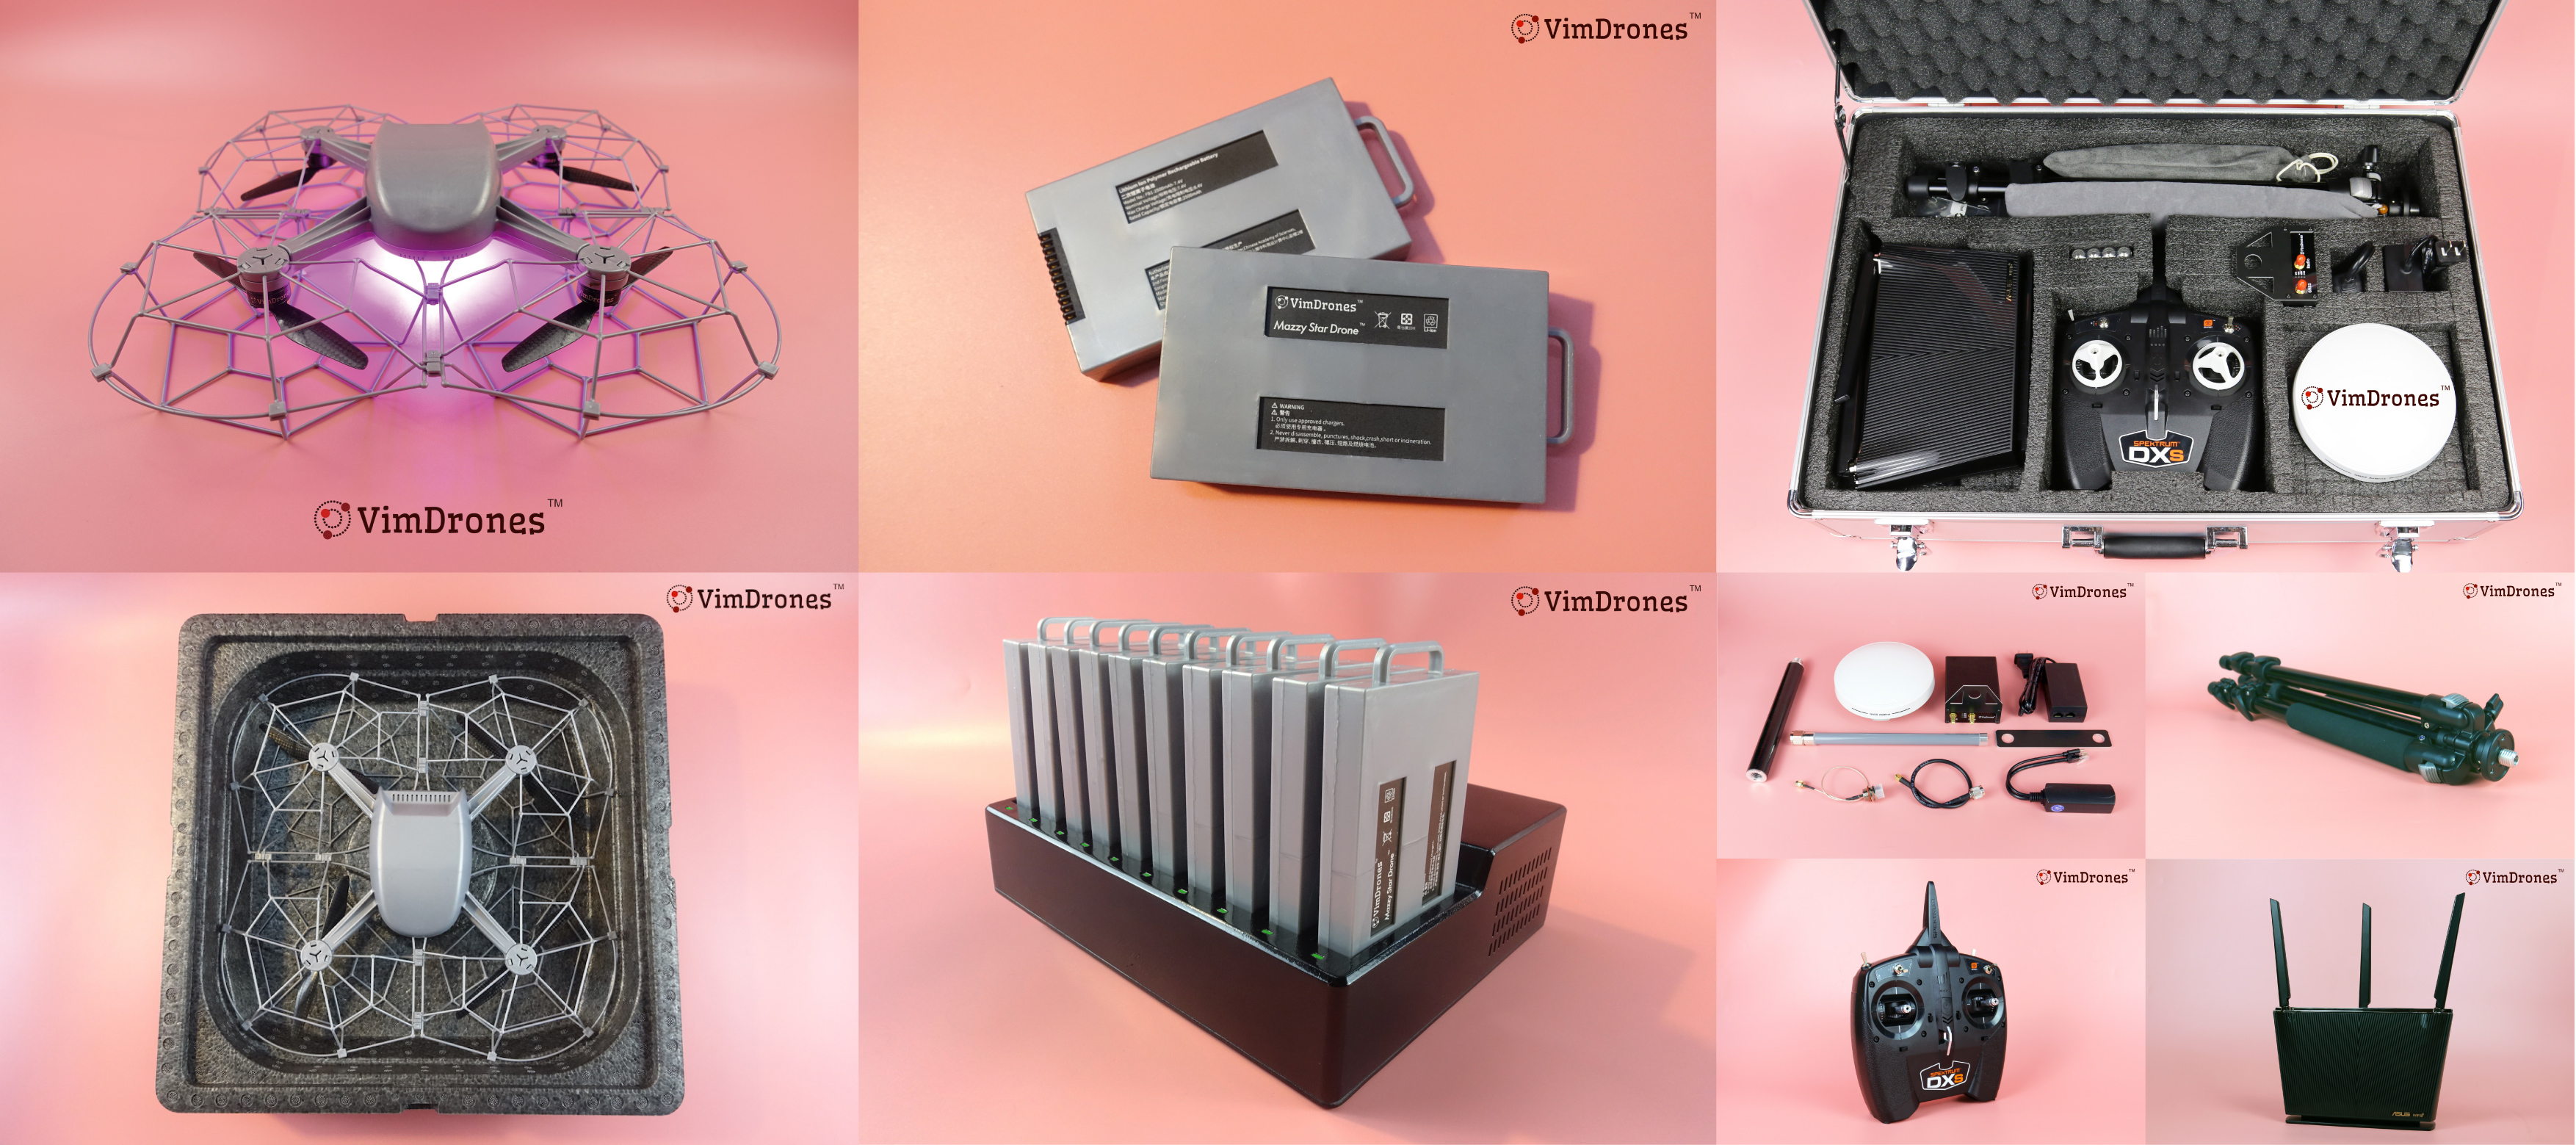
Ready To Fly List
- Mazzy Star Drone
- Mazzy Star Drone Battery
- Mazzy Star Drone Battery Charger
- Vimdrones Drone Light Show Device
- 1 Vimdrones Smart RTK Base Station, 5V/3A
- 1 Wifi Router, 100-220V
- 1 Spektrum Transmitter, 4*1.5V AA 300mA
- 1 915MHz/2.4GHz Antenna & 2 Feeders
- 1 GNSS Antenna & 1 Feeder
- 1 PoE Splitter
- 1 PoE power supply, 220V
- 1 Tripod
- 3 Network Cables, 1&2&5 meters
- Vimdrones Designer Software
- Vimdrones Ground Station Software
Other Additional Equipment
- May need 220V power supply from mobile power bank
- Some of the Power Strips
- A set of foldable desk and chair (would be very good)
Pre-Flight Preparation
Software & Firmware Updates
- Please check if the Software, Firmware of drones and RTK base station update to the latest version.
Drone
- Please check the number the drones
- Please check the airframe of the drones, especially for the propeller guard, propeller and the motor. If there is any visible damage, please repair the parts
- Please check whether the LED lamp beads are working properly
Battery
- Please prepare a sufficient number of batteries(more than the number of drones)
- Please charge the battery fully(according to the flight time, the voltage is at less 8.2V)
-
Please check if the battery is inflate, scratched, or leaked. Please do not use these batteries if have these issues
-
Here are some tips for using batteries at low temperatures
- Make sure the battery is fully charged before the flight.
- Fully preheat the battery to over 20 degrees.
- Battery preheaters are recommended.
Note
Cold temperatures can affect flight life of the drones.
More details please jump to Battery
Design Project
-
Export [Vimdrones GCS] flight project
Use Vimdrones Designer to design the Flight Trajectory, save the .blend file and export the [Vimdrones GCS] flight data -
Usage Warming
Do not let the drone collide when design the flight path
It is recommended that the distance between drones is above 2m. If the distance is larger, the formation looks more stable. If the distance is close, the airflow generated by the drone will affect each other.Do not let the drone exceed the speed limit when design the flight path
1. Max Horizontal Velocity (Up To) is 4m/s
2. Maximum Descent Speed (Up To) is 3m/s
3. Maximum Ascent Speed (Up To) is 5m/s
4. It is recommended that the flying speed of the drone is below 5m/s
5. It is recommended that the takeoff/landing speed of the drone is below 2m/sDo not fly obliquely to land when the drones landing to the ground
Please keep descending vertically.Do not let the drone beyond the fence when design the flight path
1. Height: 120m
2. Radius: 500m
Note
When the drone takes off at an altitude of about 3 meters, it will start to execute the flight path and quickly fill in the altitude. It is recommended to vertical take off as a whole, in rows,or in batches. Of course, it’s not a problem to turn into graphics after takeoff, as long as it doesn’t reach the restricted speed and distance after 3 meters high.
Weather and Environment Checks
-
It's not recommended to fly drones in rain, mist, high humidity, or over water bodies with strong winds. Mazzy Star Drone has venting holes that can expose the electronics inside to moisture. Once water gets inside, short circuits can occur and possibly damage the drone.
-
Try to find an open area to perform the drone flight. Avoid flying over potential obstructions such as tall buildings, trees or power lines.
-
It's not recommended to fly drones when meet Space weather events, such as solar flares, coronal mass ejections (CMEs), and geomagnetic storms, which can significantly impact the performance and safety of drone swarming operations. It is crucial to stay informed about current and upcoming space weather conditions.
Pre-Flight Setup Procedure
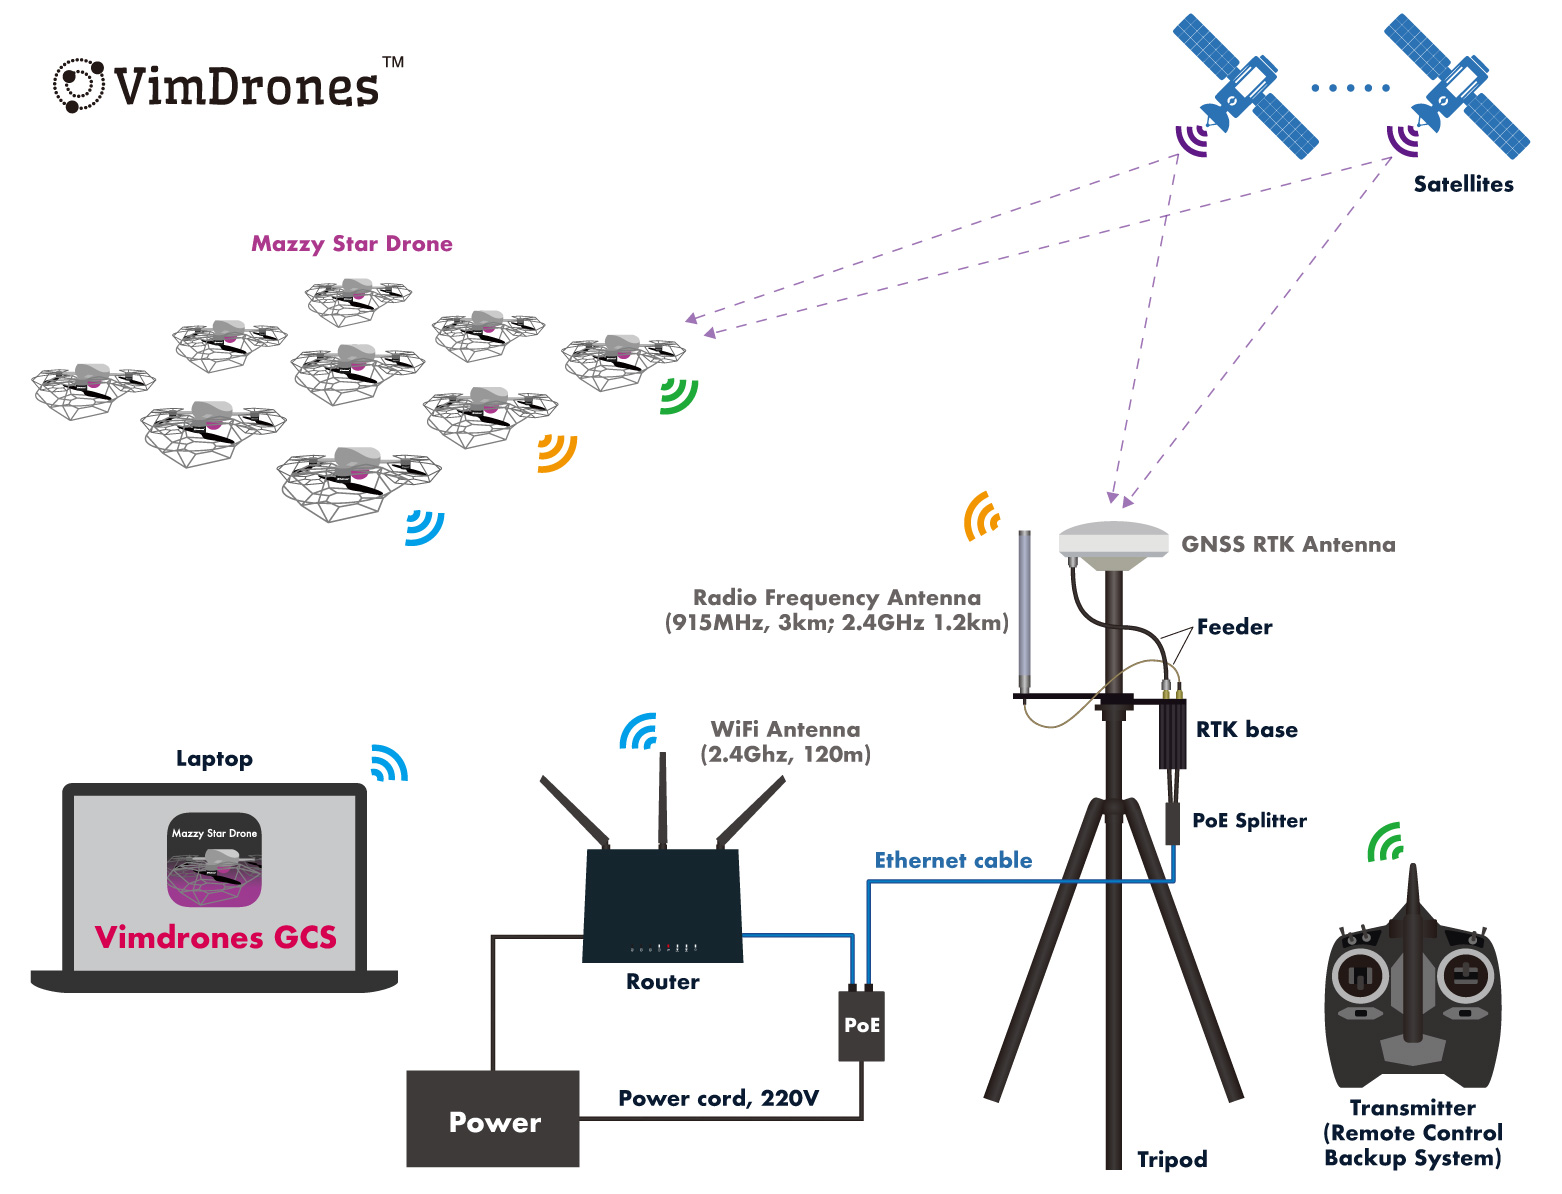
Drone Light Show System layout
- Place the tripod,setup the RTK Base and the antennas, use the feeders to connect the RTK Base from the radio antenna and GNSS antenna
- Use a network cable to connect the yellow area of the router to the LAN port of the PoE power supply
- Use another network cable to connect the PoE splitter to the PoE port of the PoE power supply
- Power on the router
- Power the RTK Base through the PoE splitter connection
- Place the Remote Controller (as the Backup System)
Tips
- Please first power the wifi router, then turn on the RTK Base. It will make sure the GCS works properly on the computer.
- The RTK base station cannot be moved after survey in success, otherwise you need to survey in again.
Operation Video
Drone layout
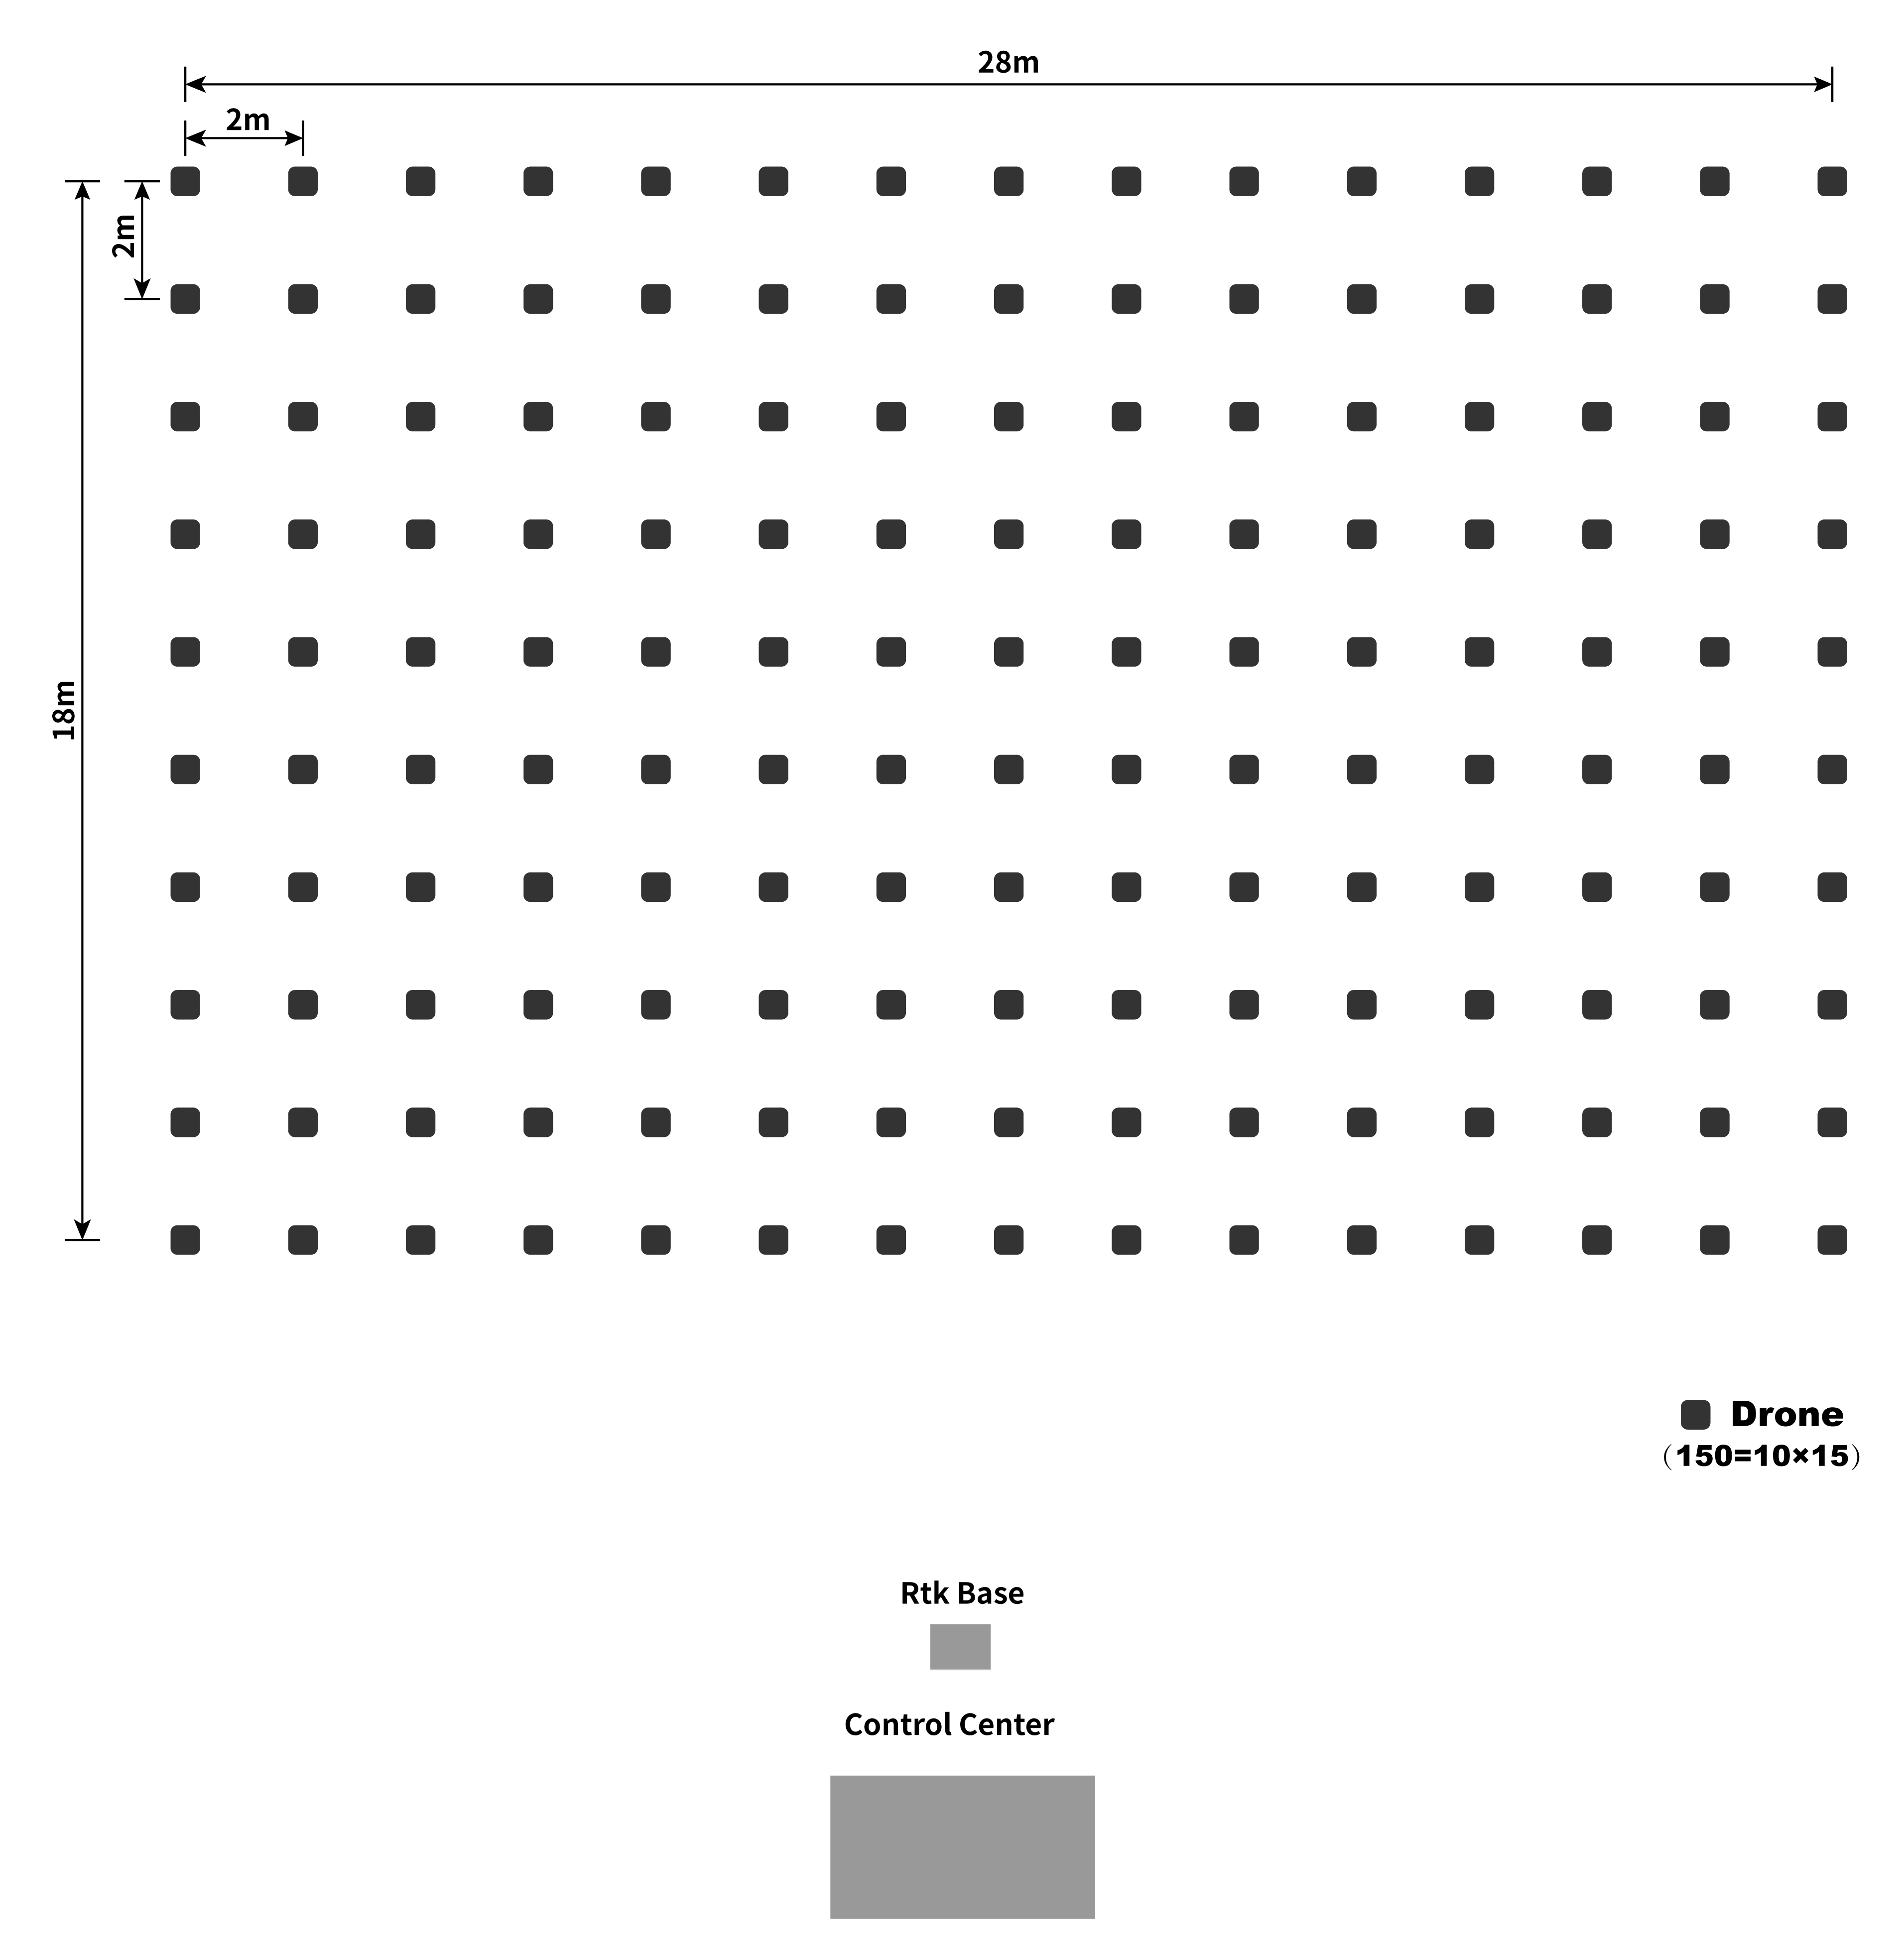
- According the design to place and locate drones
- Insert the batteries to the drones, but not power the drones
Warning
- Do not have the show near people too close or hovering above the heads of persons
- Should have the show in an open space without high obstacles
- Should make sure of good order inside the venue without any interference or disruption when having the show
When change in Z Axis Rotate in Vimdrones Designer(Real world layout)
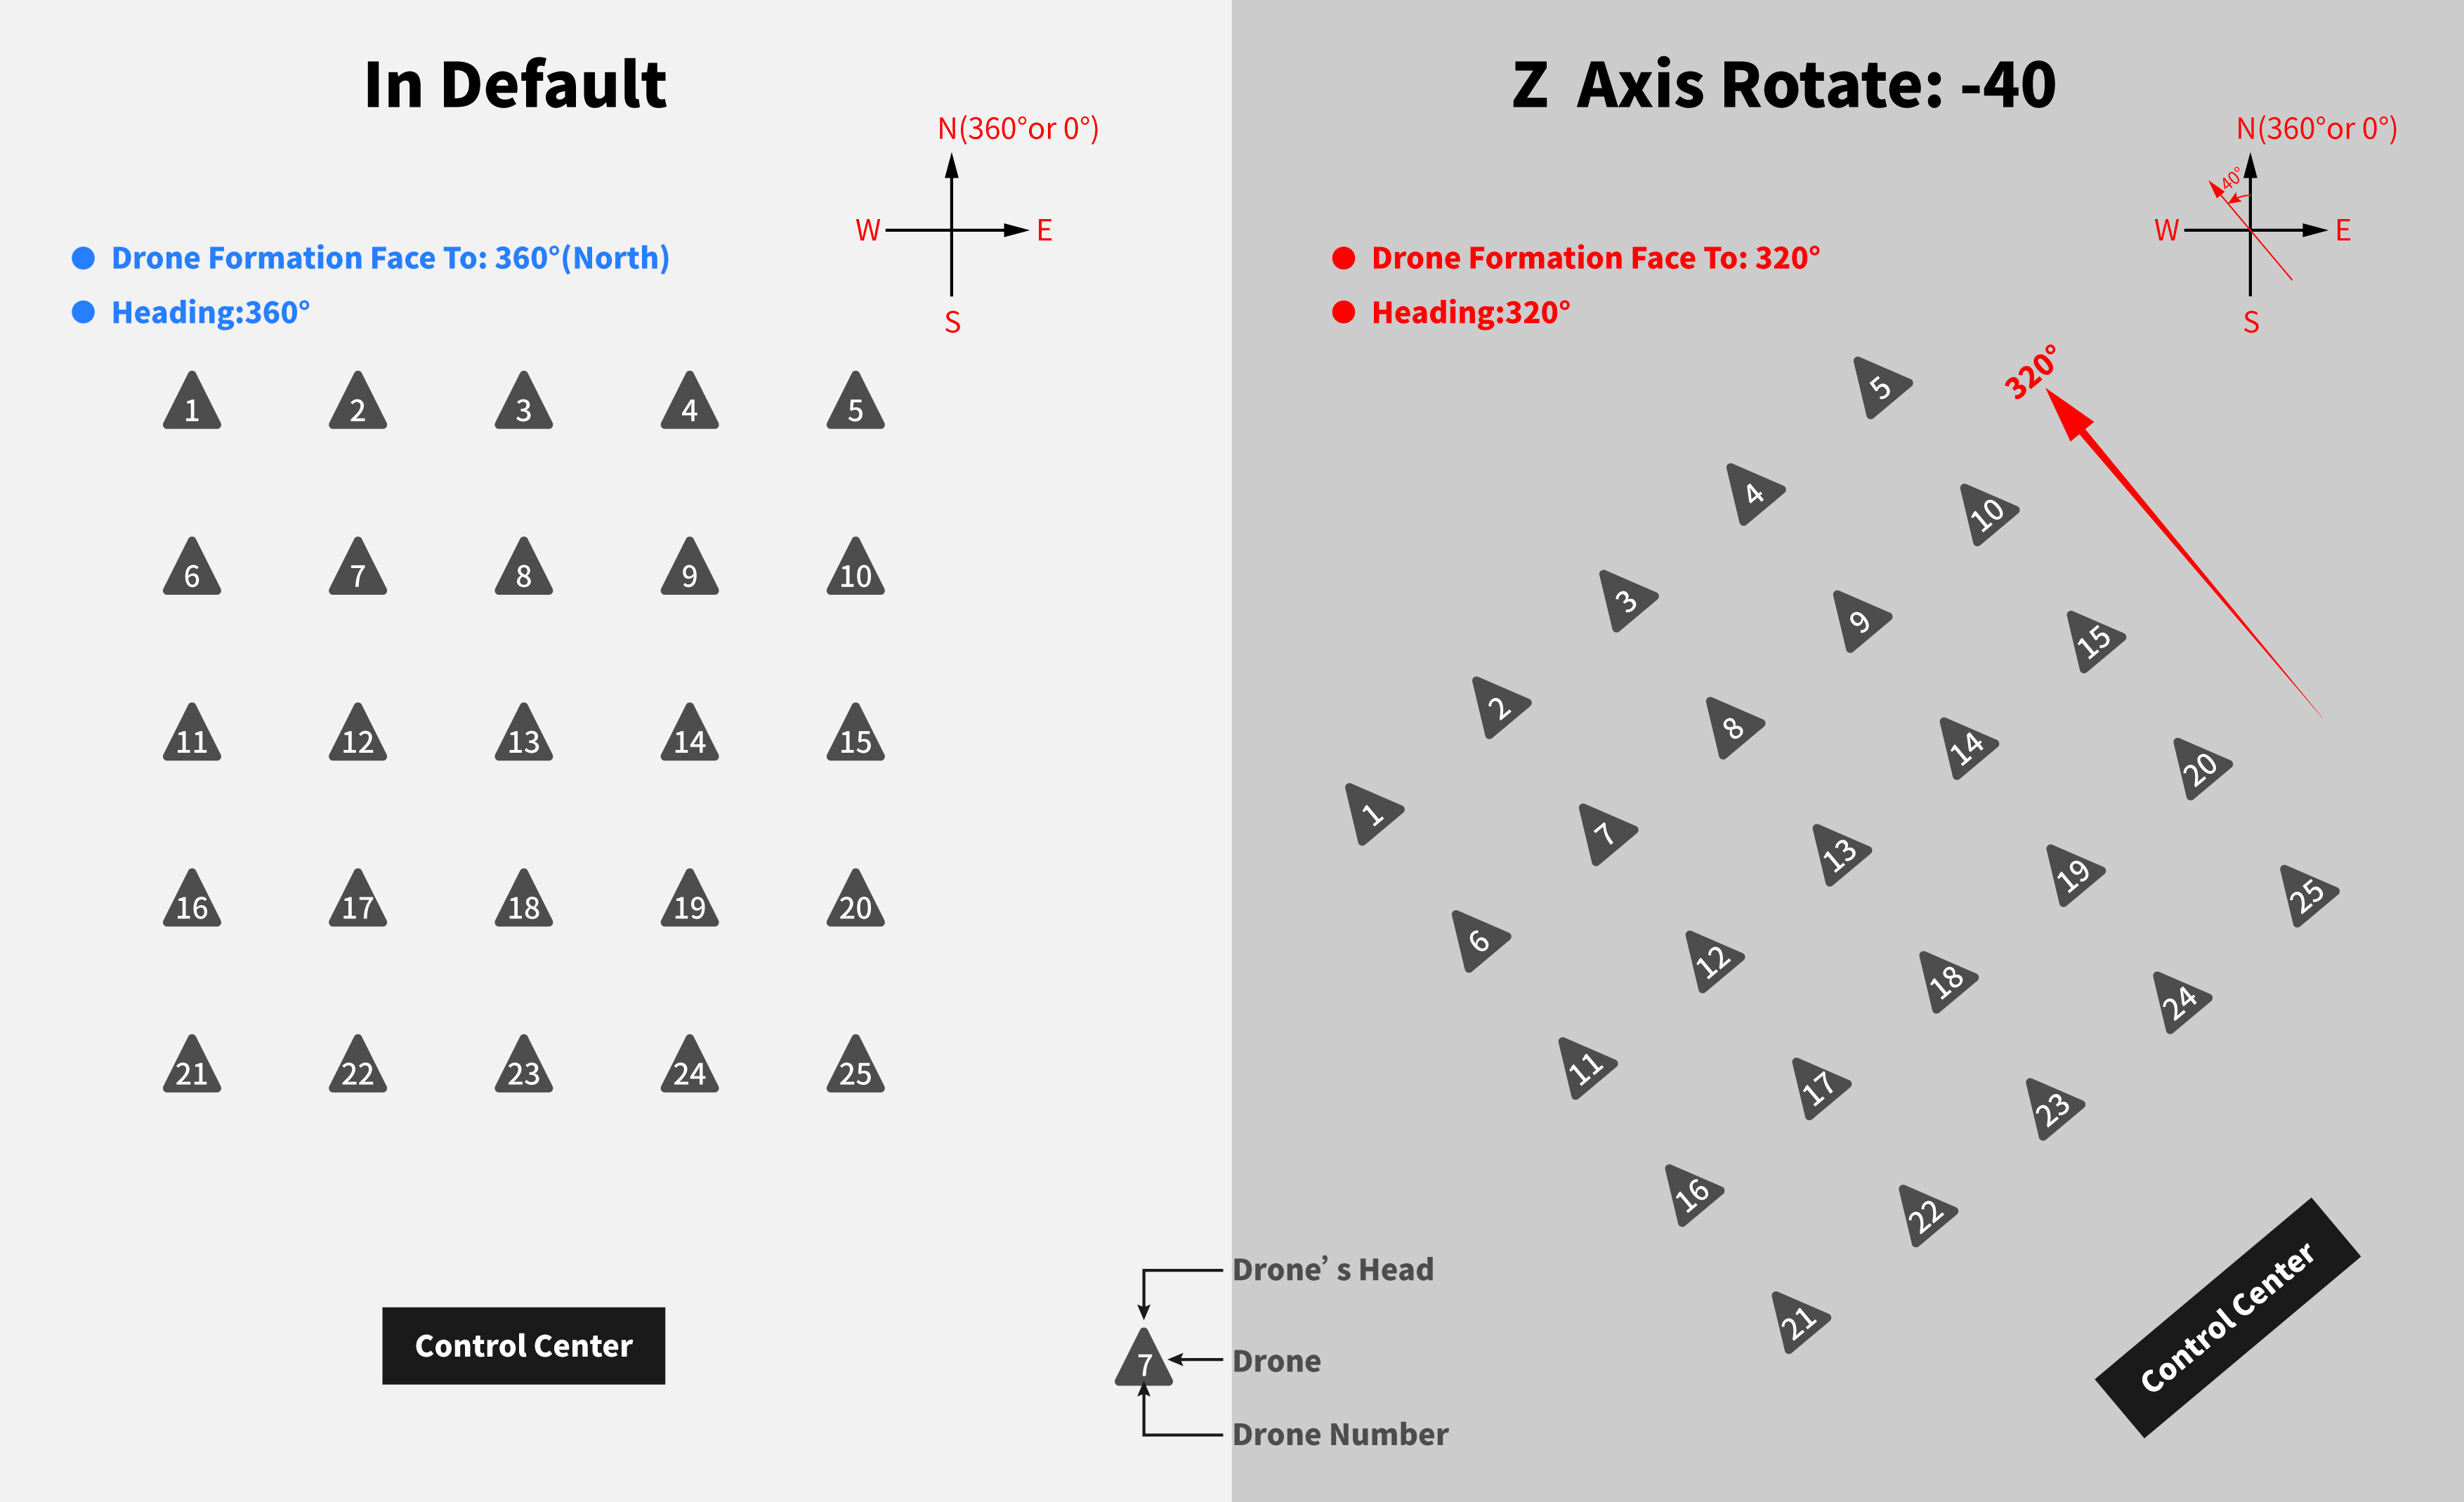
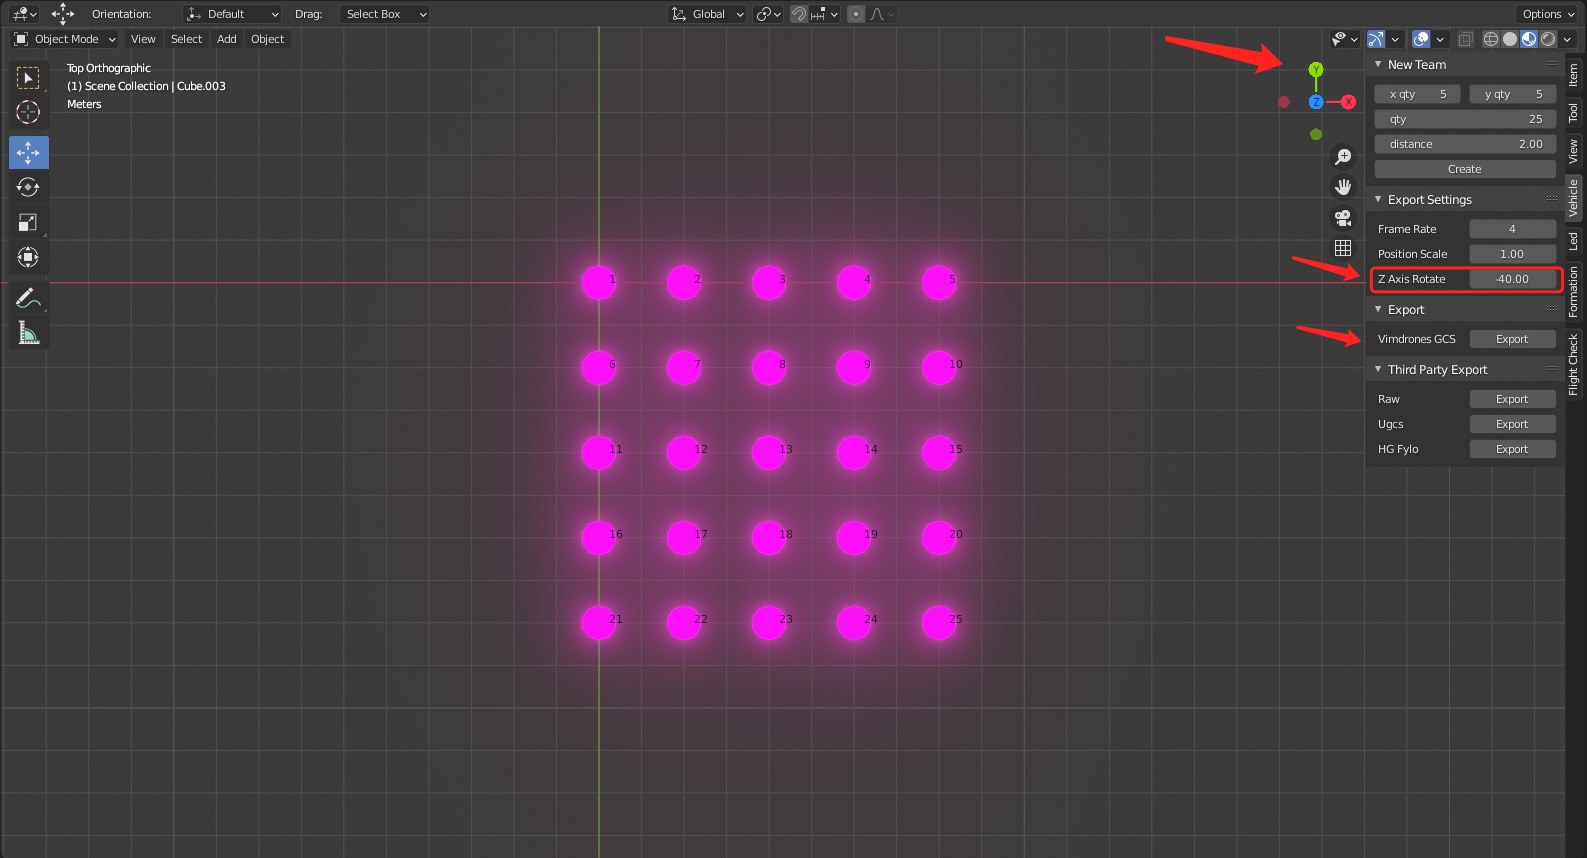
- In default, the orientation of the formation is North. The GCS couldn't change the orientation of the drone formation. The drone will totally fly according to the designed path. If you want to change the orientation. It needs to be set in the designer software before you export the data.
- Vehicle -> Export Setting -> Z Axis Rotate(degree in clockwise).
- Z Axis Rotate: rotate degree in clockwise to coordinate, default is 0, if your flight field direction is different from your design, this would help.
!!! Note If you change the Z Axis Rotate, the drone' head could be the same degree. After take off, the drone' head will always face North.
Operation Video
Flight Procedure
- Connect the wifi on computer, run Vimdrones GCS
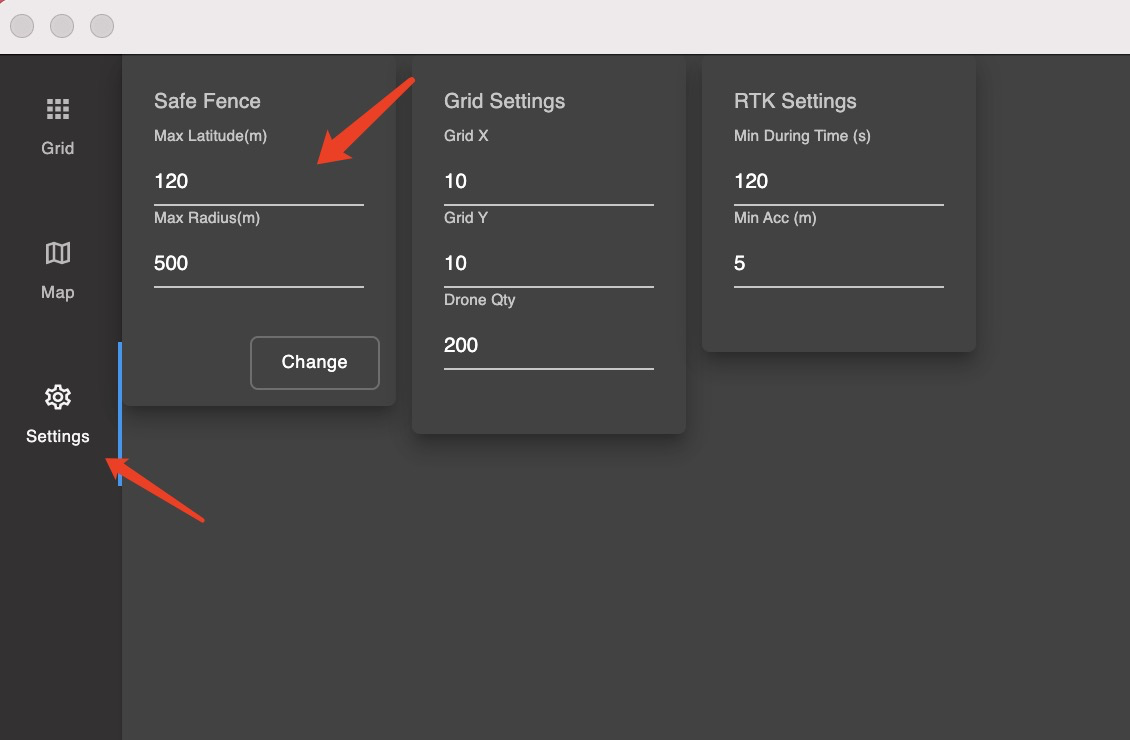
- Click Settings icon, set the Grid X, Y, and Drone Qty to match the drone display
- When the RTK Base is enter, click Survey In button
- Waiting for Survey In ready, Survey in(Success)
- Power on Mazzy Star Drones, white light fast flashing -> red light flashing
- Mazzy Star Drone online, we can see the Drone Status on GCS
- Click Open button, Select Design Project
- Click Upload button, upload trajectory Design to the drones, white light fast flashing
- Drone Status Check Pass (check overview and log system), yellow light flashing (have been RTK fixed)
- Select Drone 1, click Copy From Drone button, copy drone 1 position
- Click Set Home button, set home location to all drones, green light
- Click Takeoff button, start your Drone Light Show
Note
- We recommend you make a flight test on 4 corner drones before the swarm fly. In this way, you can check whether drones are in the right position & angle after take-off, check whether the design file is correct, and also make sure the whole flight process is correct.
- If the design project is the same for the drone light show from last flight, it doesn't need to upload the project again to the drones.
- You could click the Map icon to check the order and position of the drones.
- Please check the overview and log system carefully before takeoff the drones.
- Support multiple devices to check the drone status in Vimdrones GCS. It is recommended to select the main computer to operate.
- Exchange the SD card will change the drone ID. Please make a mark when you exchanged.
Mazzy Star Drone Led Indicate
| Name | LED |
|---|---|
| Power on the drone | White Quick Flash for a while |
| Uploading the Design Project to the drone | White Quick Flash |
| The flight controller is checking | Blue Flash |
| The drone is waiting for RTK fix | Red Flash |
| The drone has been RTK fix | Yellow Breath |
| Set home success, ready to take off | Green |
| The Design Project is end the drone is landing | Purple Flash |
LED Mode
- Breath: The LED's brightness smoothly changes from dark to bright and back to dark
- Flash: The LED regularly on and off
- Quick: The LED flash fast
Operation Video
Post-Flight Setup Procedure
- Unplug the batteries of the drones to the package. No need to fully charge the battery until the next flight
- Put the drones into the packages, then stack up the packages and tie them up with a buckle
- Pack up the Drone Light Show System into the package
- Pack up the remaining equipment
- When you exit the GCS software, please save the log file as record.
Warning
- The battery should not be stored in fully charged condition. Otherwise the battery is easily damaged
- If there are batteries in full charged, please use the drone to discharge the battery
Remote Control
Remote Control(RC) is the backup control system(another two are: 915HMz/2.4GHz radio & 2.4G WIFI). By default, we will not use the remote control in the drone light show.
-
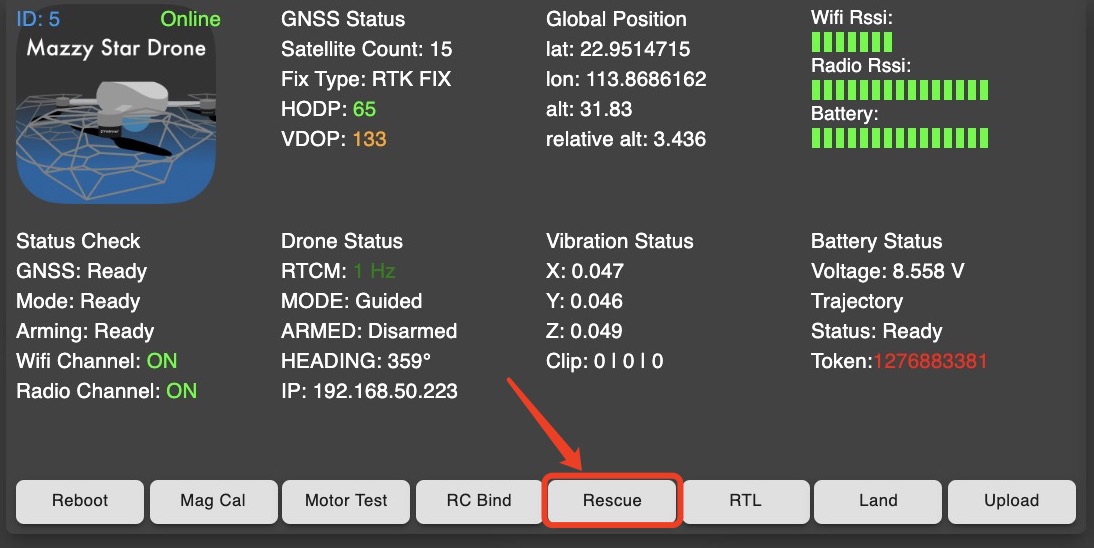
In some emergency situations, we could use the remote control to control the drone to Land/RTL during the show. Please select the drone you want to manual control by RC controller in the GCS software, then click Rescue button.
Rescue: Enable drone's RC control to manual control by RC controller. During the flight, the RC control channel is closed. When we click the Rescue button, the channel is opened.
-
Also, remote control could test the drone after the repaired.
Note
Generally, we control one drone at a time by RC.
How to manually control a Drone?
Please set up the drone light show equipment at first, we could check the statues on Vimdrones GCS.
Take Off
- Align the heading of the drone with your heading
- Power the drone
- Power the remote control and check the switch
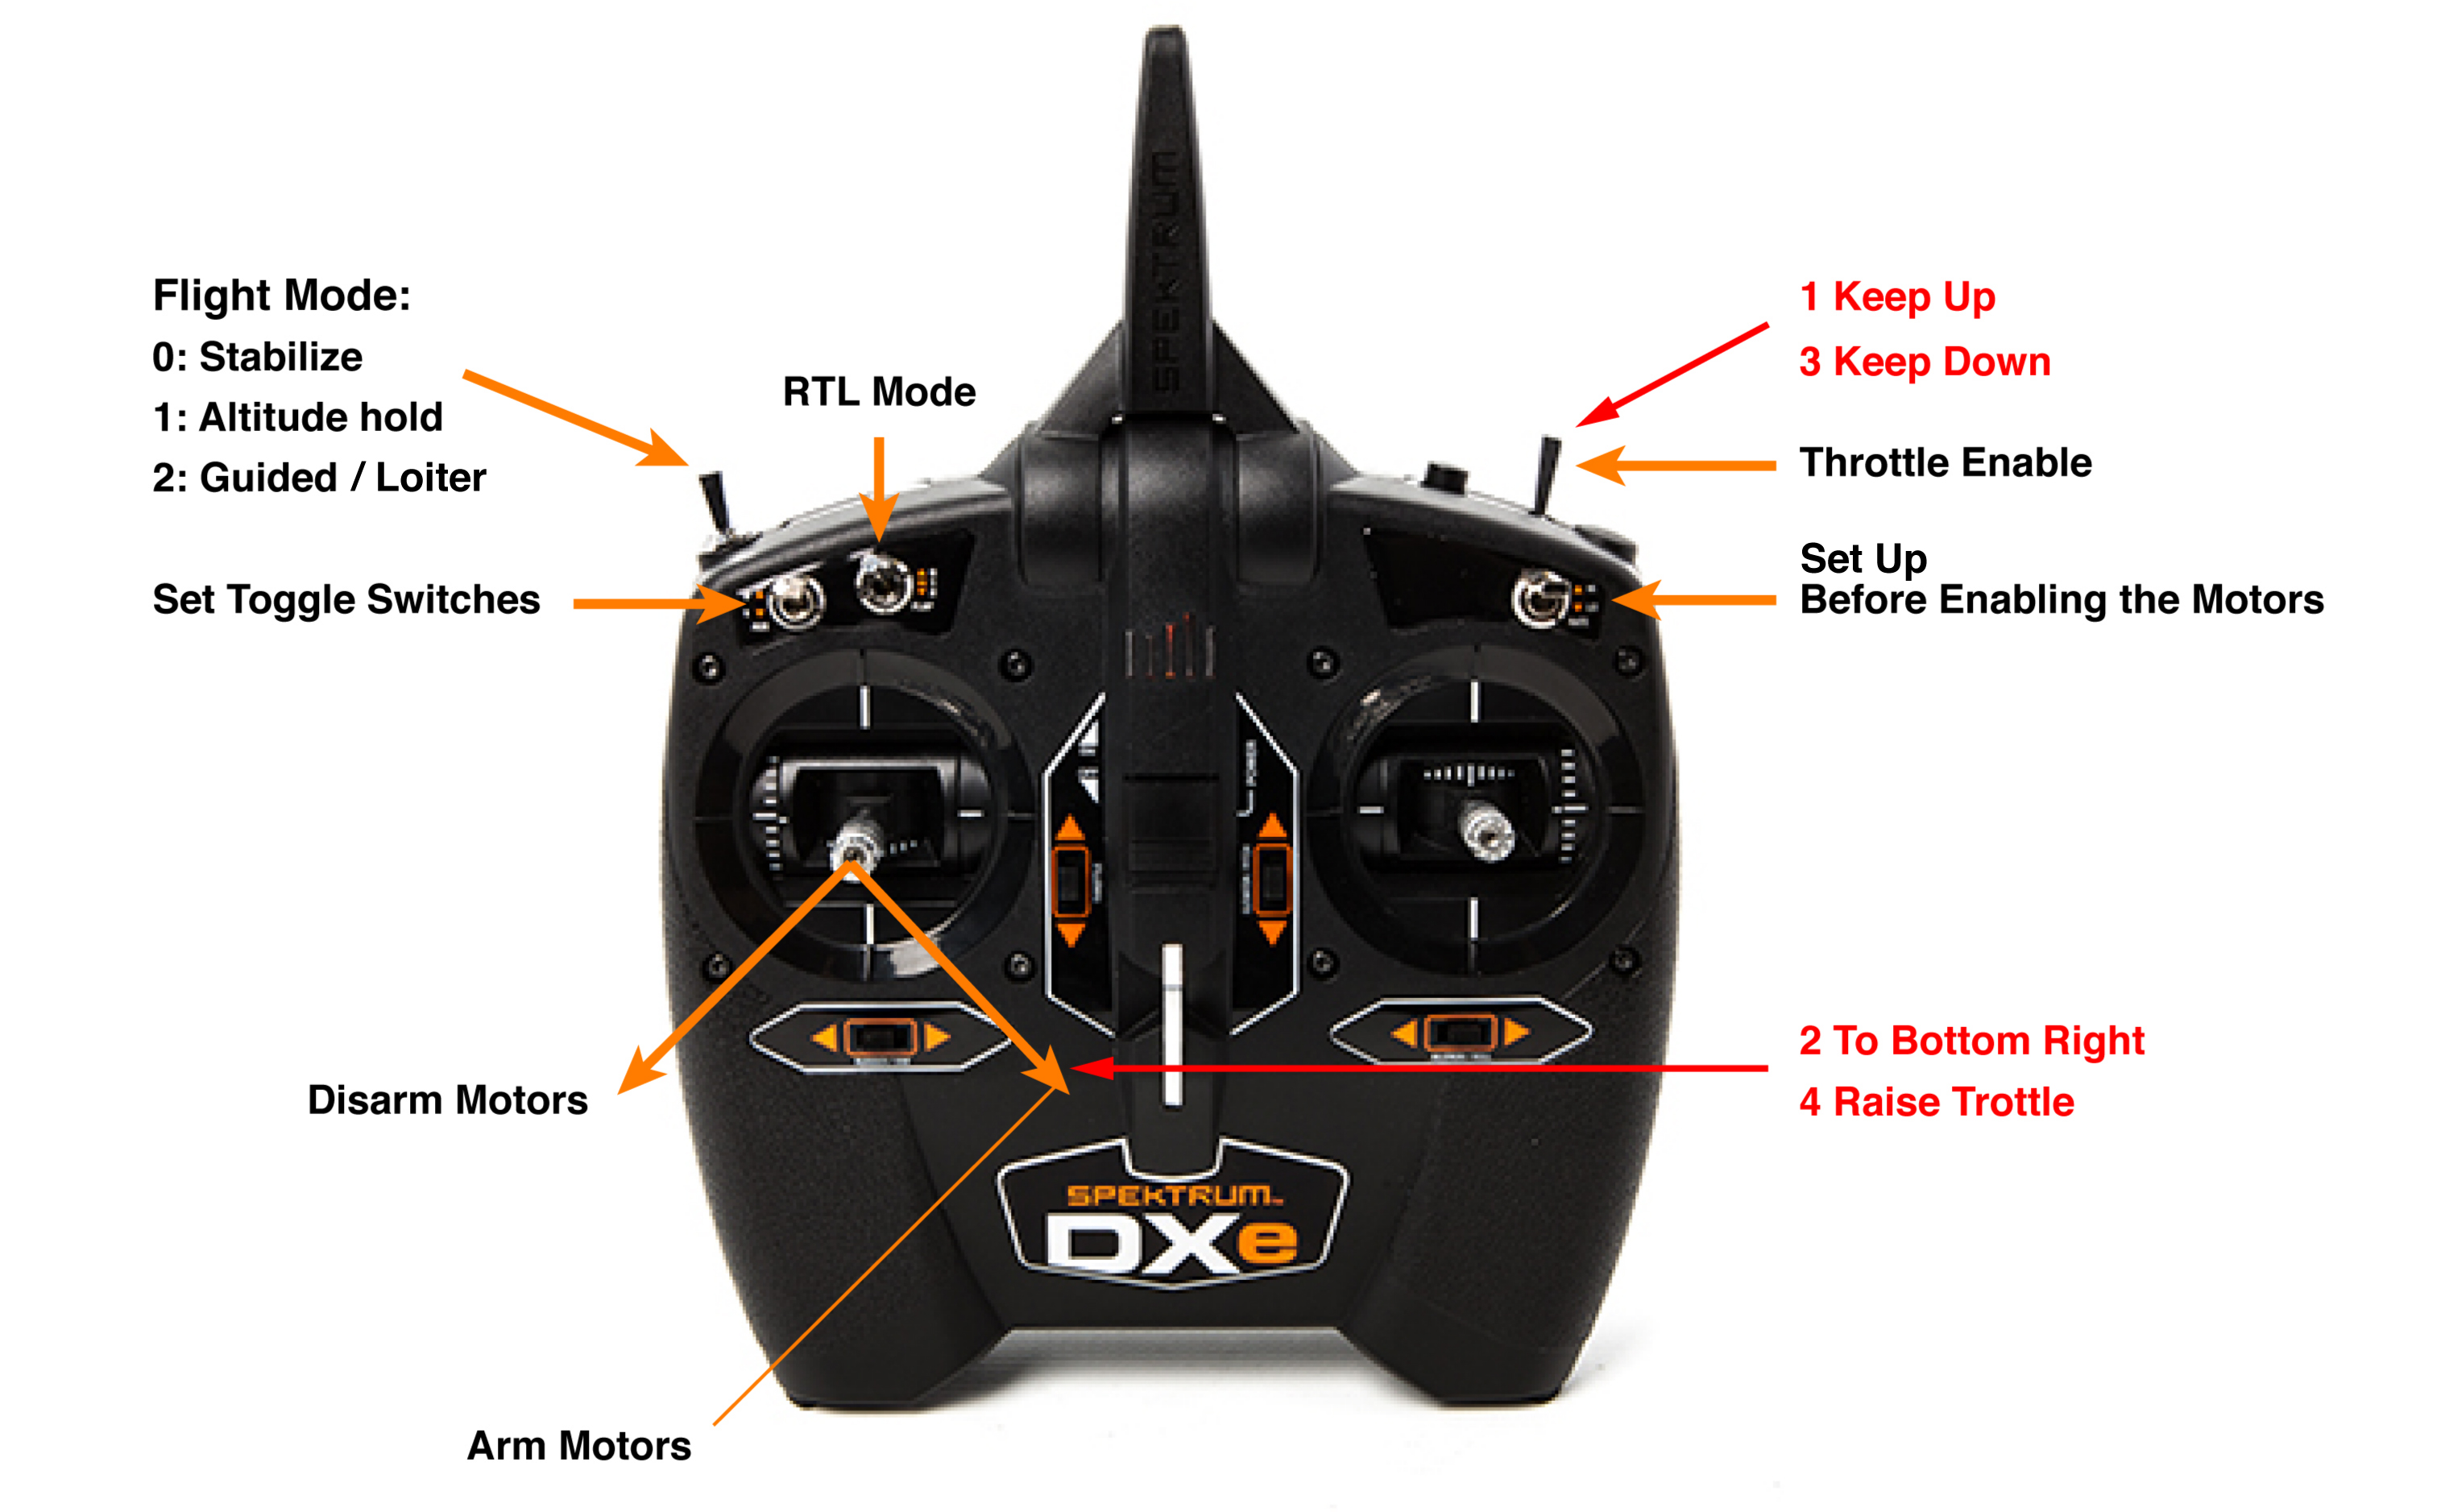
Flight Mode - 0: Stabilize (we could check the MODE in GCS)
FLAP - RTL Mode - set down - 2
Disarm - 1 Keep Up - The throttle is locked
RATE - Hi - Set Up before enabling the motors - Wait for the drone to enter the positioning state - RTK Fix / Float
- Push the throttle stick to the low position to the right - 2 To Bottom Right.
- Arm - 3 Keep Down
- The propellers start to turn
- Slowly raise the throttle to make the drone take off - 4 Raise Throttle
- We could change other Flight Mode for flight
Landing
- RTL Mode
Set up the RTL Mode stick.
The drone will return home automatically. (we could check the MODE in GCS)
Disarm - 1 Keep Up - Manually control Landing
Change Flight Mode - 1: Altitude hold
Push the throttle stick to the low position
Disarm - 1 Keep Up
Push the throttle stick to Bottom Left
We can choose one of the ways to land, generally for RTL.
Warning
- Do not arm the drone near people too close
- Do not arm the drone hovering above the heads of persons
Operation Video
Battery

Lithium lon Polymer Rechargeable Battery
- Rated Capacity: 3000mAh
- Max Charge Voltage: 8.7V
- Standard Voltage: 7.6V
- Discharge Cutoff Voltage: 6.0V
- Recharging current:
- Standard: 600mA, 0.2C
- Fast: 3000mA, 1C
- Discharge current:
- Standard discharge current: 600mA, continuous discharge
- Continuous Max discharge current: 14A, continuous discharge
- Instant Max discharge current: 30C, less than 1 second
- Max charging current: 3000mA
- Power: 22.8Wh
- Weight: ≈137g
- Operating temperature:
- Charging: 0 ~ +45°C
- Discharge: -10 ~+ 60°C
- Storage temperature: 0 ~ +45°C
Storage and Shipping Requirements
- Storage temperature
- Short-term storage of less than one year: 0°C~+25°C
- Short-term storage of less than three months: 0°C~+35°C
- Short-term storage of less than one month: 0°C~+45°C
- Humidity: 60±15%RH
- Care instructions:
- The battery should be charged and discharged at least every 3 months (the battery is fully charged, discharged to the cutoff voltage, and then recharged to 50% capacity)
- For long-term storage, the battery should be fully charged and discharged at least every 3 months, and then recharged to 40%~60% capacity
- Voltage: ≈7.4V
Operating Instructions and Guidelines
- Charger: Please use the dedicated Vimdrones charger.
- Charging temperature: The battery must be charged within the ambient temperature range of 0°C~45°C.
- Overdischarge
Short-term over-discharge will not affect the use of the battery, but long-term over-discharge will affect the function of the battery and make the battery permanently unusable. The way to prevent the battery from over-discharging is to keep a certain amount of power in the battery. It should be noted that during the long period of non-use of the battery, it may be in some kind of over-discharge state due to its self-discharge characteristics. To prevent over-discharge, the battery should be charged regularly to maintain its voltage between 7.4V and 7.8V. - Battery storage
The battery should be stored within the specified temperature range. If the battery is stored for more than 3 months, it is recommended that you recharge the battery.
Warning
- Keep cool and dry environment. Forbidden to immerse the battery in seawater or water
- Forbidden to use and leave the battery next to high-temperature heat sources, such as fire and heaters
- Do not heat the battery, expose it to the sun or throw it in fire
- Do not store batteries at high temperatures
- Do not disassemble, crush and incinerate, drop or leave high pressure on the battery
- Do not short circuit the battery
- Do not charge the battery continuously for more than 24 hours
How to measure battery voltage?
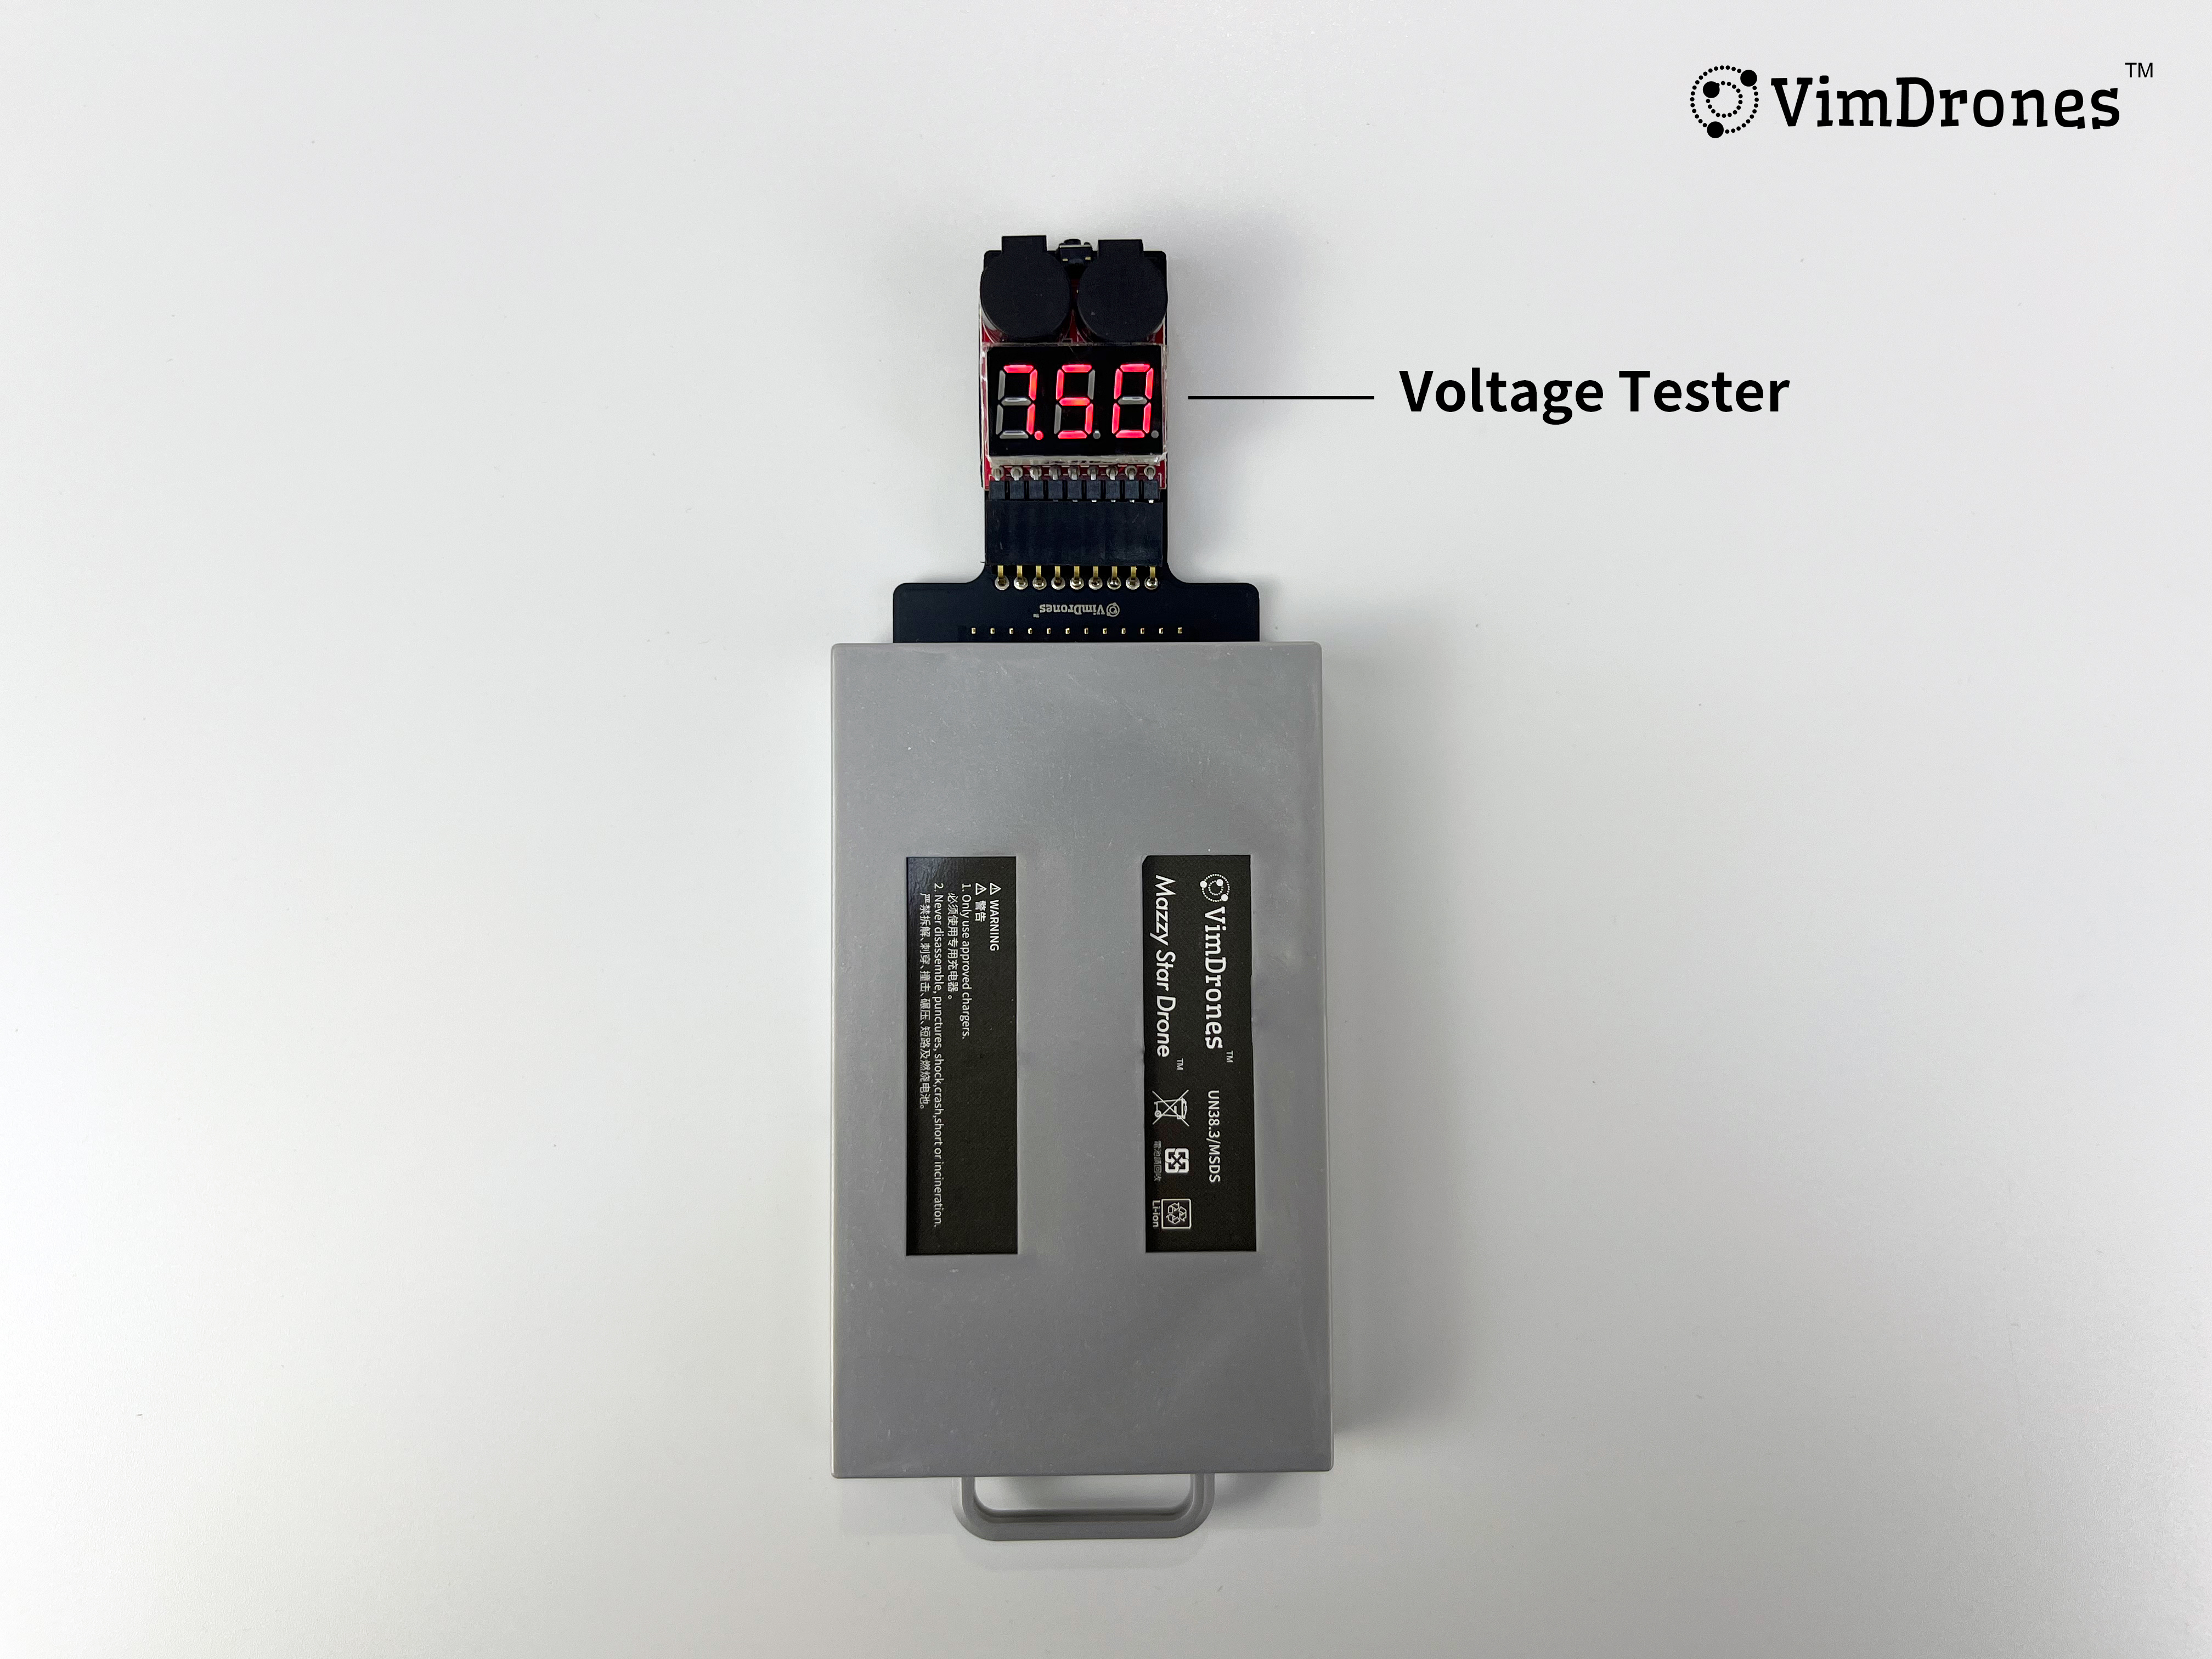
Use Battery Voltage Tester connect to the battery(Pay attention to the orientation of the tester).
The Battery Voltage Tester will show:
-1- The actual measured voltage of the first cell
-2-The actual measured voltage of the second cell
All The voltage of the battery
Battery Charger

2S Li-ion HV Battery Charger
- Input: AC100~240V 50/60Hz 3A(Max)
- Output: DC8.7V/1.5A*10Channel
- View size:220x170x64(±2mm)
- Weight: ≈800g
- Work Conditions: -10°C~+40°C
- Storage Conditions: -40°C~+70°C
- Relative Humidity: ≤90% ,(NO dew)
- LED:
- Green: Full <250mA
- Red: Charging >250mA
- Note: The charger has hysteresis current. The red light is displayed when the charging current of the reinserted battery is greater than 60% of the set current.
Instruction
- Connecting battery with charger, making sure the positive of battery connecting with the positive of charger, the negative of battery connecting with the negative of charger.
- Plug charger in DC power outlet, LED turns to RED, the charging is starting.
- The charging finish once LED turns to GREEN.
After charging, make sure unplug charger from DC power outlet. - Disconnecting battery with charger. Battery may become hot after charging.
Warning
- Don't short circuit charger
- Use the charger to charge correct battery
- Don't cover charger and battery during charging
- Don't charge battery unattended
Fail Safe Process
Fail Safe Automatic Activation:
- If the drone battery is low, it will automatically return to home.
- If the drone flies out of the range(geo-fence), it will automatically return to home.
- If the drone loses the GPS signal, it will automatically land slowly.
Fail Safe Manual Control:
- We could click the Land button in the GCS software to land all the drones.
- We could select one drone and click the Land or RTL button in the GCS, it will land or return to home.
- We could click the Rescue button in the GCS software and control it manually by Remote Control.
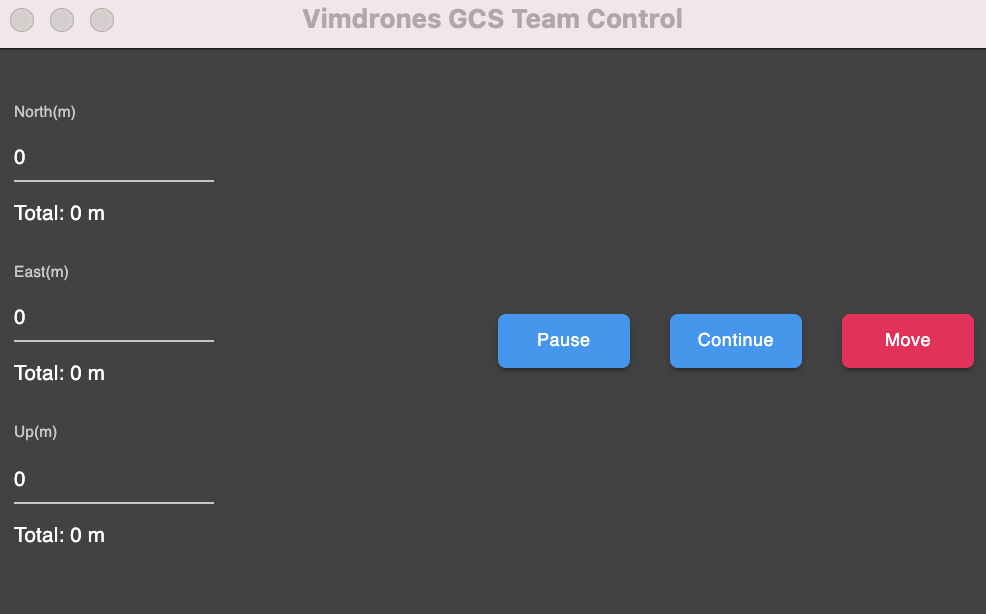
- We could realtime control the drones to Pause or Continue in the GCS software.
Tool -> Team Control
Safety
- Preflight Check Only the drone passes the Preflight Check, it can fly. It will show the message in the LOG SYSTEM
- Red Button
Select one drone and click the Stop button to stop the motor of the drone - Safe Fence Setting
We could set the Geo-Fence of the drones
Get Log
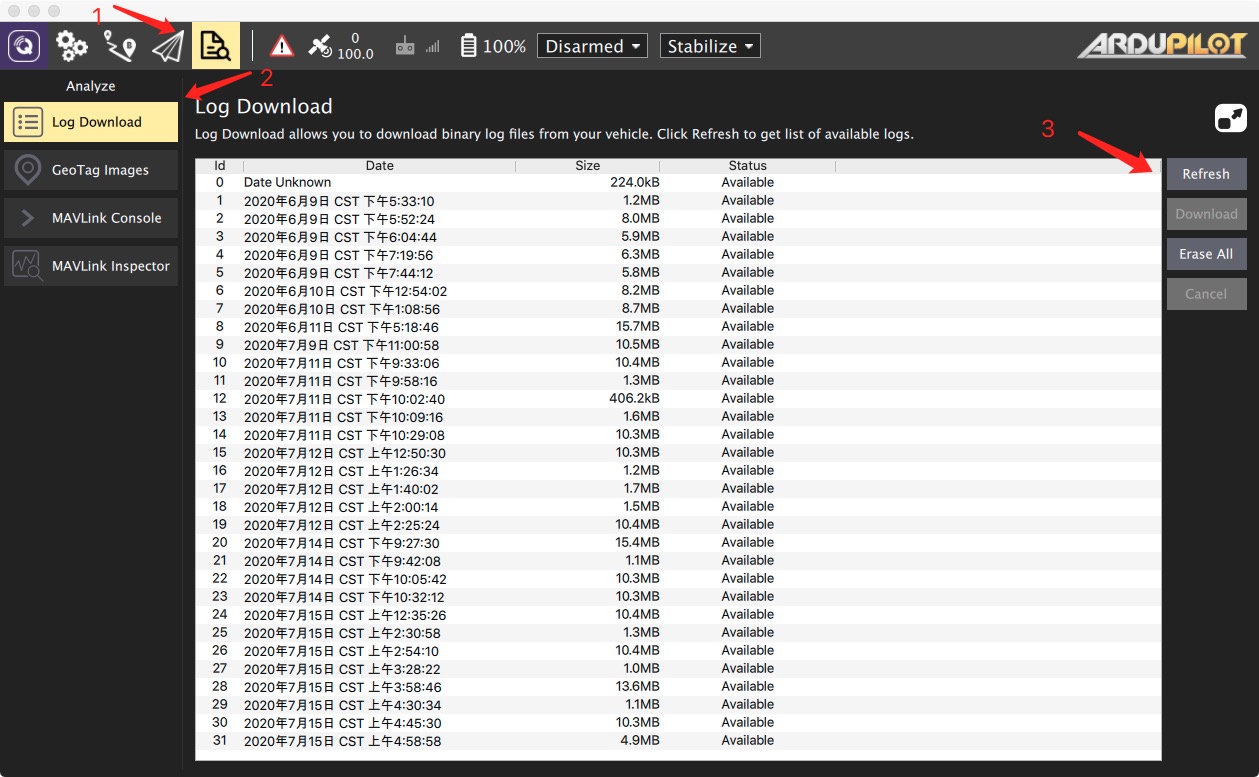
Download Log
- Please download the QGC software.
- Open QGC, use a micro USB cable to connect the computer to the right USB port of the drone.
- Click Log Download. It may need to click Refresh button.
- Select the log and click Download button.
Check Log
- Use UVA Log Viewer view the log download from QGC.
- Downloading and Analyzing Data Logs in Mission Planner
- Please send us file to analyze the log if you need technical support.
Repair
Tool preparation
- A solder
- A tweezers
- A screwdriver
- A Micro USB cable
- A Tin roll
- A drone battery
- A 3M Double Sided Foam
- A laptop/computer with QGC installed
Repair the Body Frame
-
Unlock the propellers with H1.5 screwdriver
-
Remove the propeller guard from 4 arms of the drone body
-
Move the drone outside the propeller guard
-
Remove 8 screws from 4 arms of the drone body with PH1 screwdriver
-
Remove the top cap of the drone. Pay attention there is an cable connect with GPS and the motherboard
-
Unsolder the motor cables connect with the ECS
-
Remove 3 screws of the battery plug
-
Remove 2 screws of the battery case
-
Remove 4 screws of the LED cover
-
Remove 4 screws of motherboard
-
Unlock the 2 connectors of motherboard
-
Remove the motherboard, LED board, receiver
-
Remove the motors
-
Change the new frame
-
Install the motors
-
Attach the receiver with the Foam
-
Install the LED board and motherboard, connect the LED board & receiver to the motherboard
-
Solder the motor cables connect with the ECS. Pay attention to the order od the cables
-
Install battery case and battery plug
-
Do the motor test
-
Install the the top cap of the drone. Pay attention there is an cable connect with GPS and the motherboard
-
Install 8 screws from 4 arms of the drone body with PH1 screwdriver
-
Install the LED cover
-
Install the propeller guard
-
Install the 4 propellers. Pay attention the direction of the propellers
-
Manually fly the drone for the test
How to Manually Fly a Drone?
Operation Video