Ground Station Software
Introduction
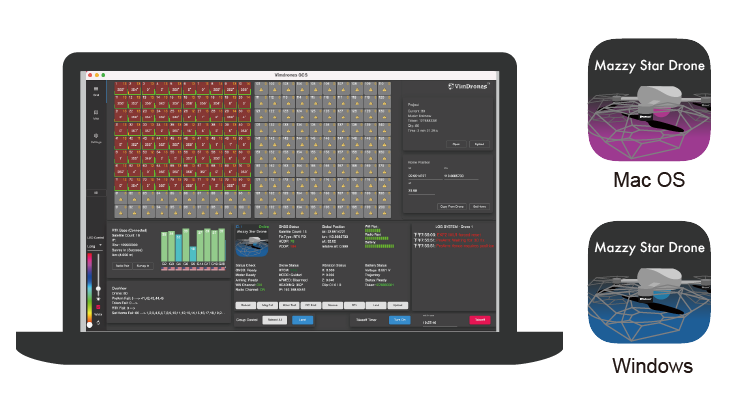
Vimdrones Ground Control Station(GCS) Software is the drone light show control center that allows the operators to execute the drone light show and control thousands of drones.
Vimdrones GCS is easy to use with an efficient dashboard that displays the real-time status of all drones & the RTK base. In the meantime, it can be worked on multi-PC for teamwork, allowing the operators to check the drone status and control single or all drones.
It also features intuitive 2D and 3D views that are more intuitive to observe the position of the drone in real time. Moreover, it supports the addition of music & video, which can be played synchronously with the light show.
Vimdrones GCS makes it easier to ly a brighten up drone show in just when you get it!
Feature Highlights
- Easy Usage - Control thousands of drones just need one person
- Efficient Drone Dashboard
- Run on multi PC for teamwork
- Play in sync with music
- One click to take off and land
- Red Button
- Flight check overview
- Real Time 2D&3D position view
- Takeoff Countdown
System requirements
System requirements
- Operating system: Windows 10/11; Mac OS
- CPU: Intel Core i7 or better
- Memory: Minimum 8 GB of RAM or more
- Hard drive: SSD 120GB. Recommended 256GB or more
- Graphics hardware: Graphics card
- Network: TCP/IPv4 network stack, WiFi, or Ethernet. Recommended Ethernet
- Screen resolution: Full HD screen
Hardware requirements
- Display Size at least 1280*800 pxl(at least 11 inch display)
Installation
Install Vimdrones GCS on your computer, Mac OS or Windows
Download
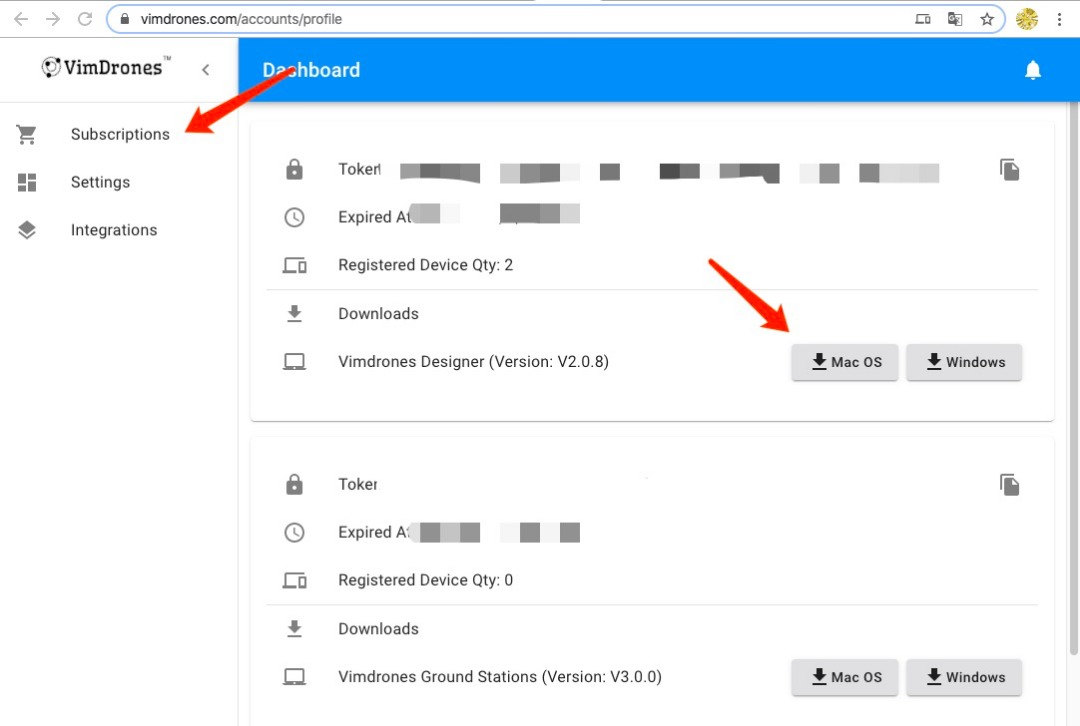
- Open our website Vimdrones,click Login
-
Already has an account, please Sign In
Don't have an account, please Sign Up and then Sign In

-
Select the version Mac Os or Windows to download the software
Mac
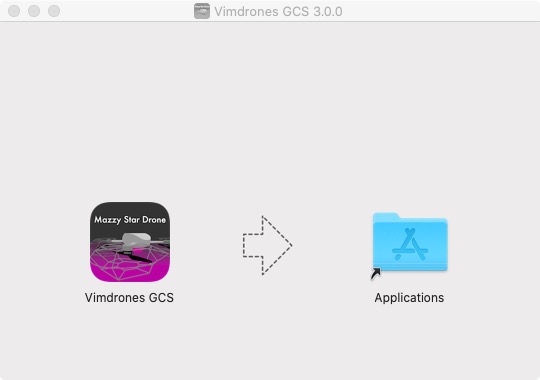
- Double click the [Vimdrones_GCS-x.x.x.dmg], pull the Vimdrones GCS icon to the Applications file
- Double click the icon to open the Vimdrones GCS
Adding new Mazzy Star Drone™ to the system
By default the system shipped with pre config Mazzy Star Drone™, when you bought new Mazzy Star Drone™ in later orders to extend the business show scale, you will need to follow these steps to add it to current system.
Prepare
- SD card (comes with drone, in the back position)
- SD card reader
Make Drone Identification SD Card
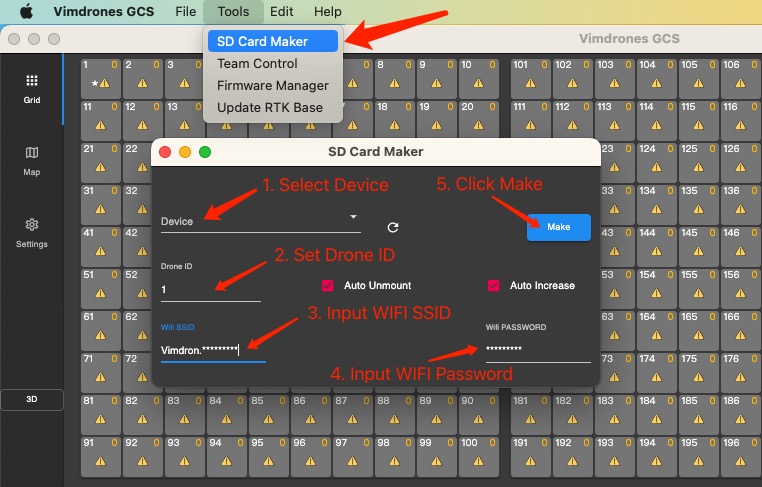
- Open SD Card Maker from Tools
- Select SD card Device (click refresh, if you can not find it, also check whether it's mounted on your computer)
- Set Drone ID
- Set Wifi SSID (come with system document)
- Set Wifi Password (come with system document)
- Click Make button and pop up SD card
Pair RC Transmitter
- Click RC Bind button in Drone panel and see orange light flash inside the drone, press RC Transmitter bind button and power on the Transmitter, when heard a happy voice means it success
Pair 915MHz or 2.4GHz Radio Channel
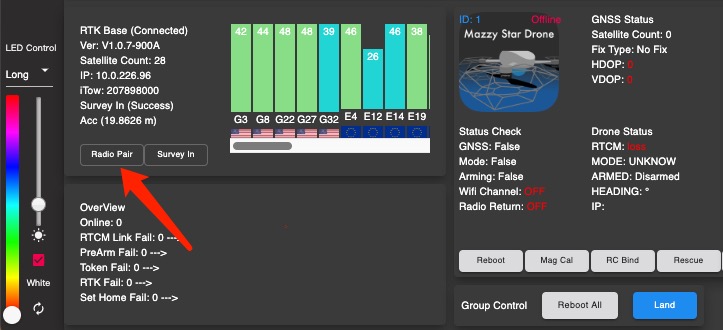
- Insert SD card back to the drone
- Power up the drone, click Radio Pair button in Base panel and get "Drone X radio Pair Success" Notification
Grid View
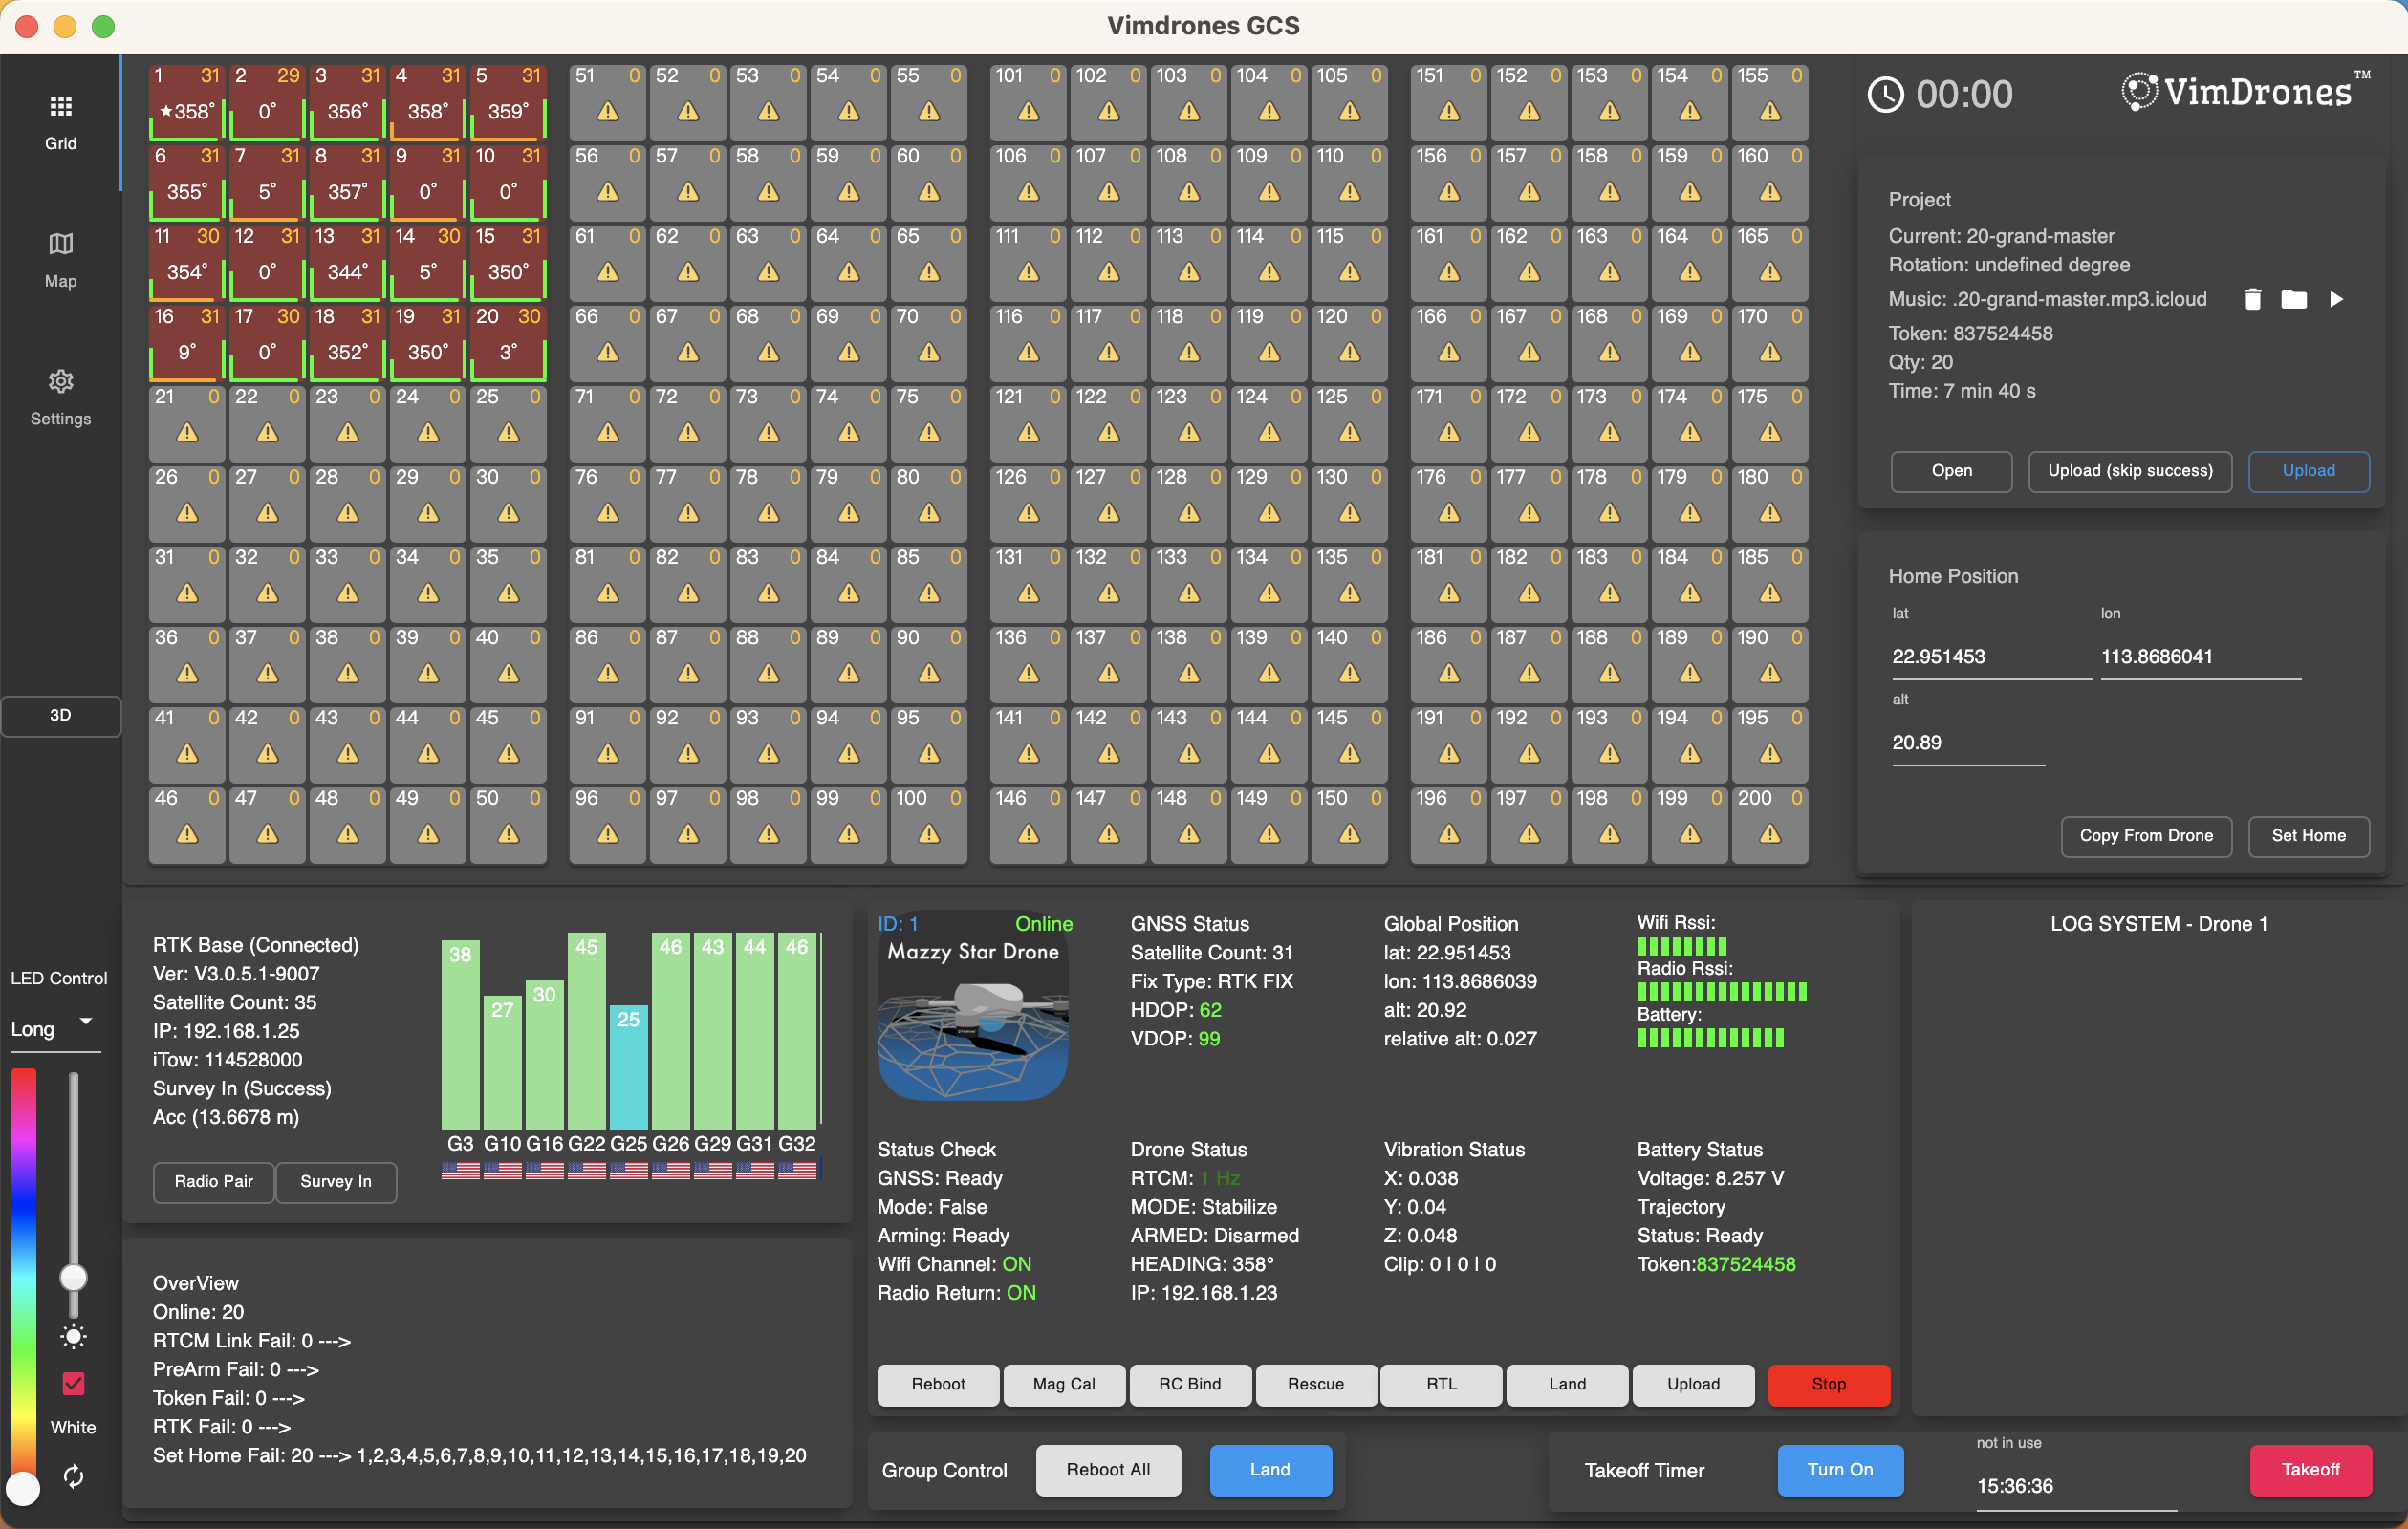
- Top left number: Drone ID
- Top right number: Satellite Count
- Middle number: Drone's Heading Angle
- Left bar: Wifi Rssi
- High -> Low: Green -> Orange -> Red
- Right bar: Radio Rssi
- High -> Low: Green -> Orange -> Red
- Bottom bar: Battery Voltage
- High -> Low: Green -> Orange -> Red
- Background color:
- Red: Not ready to fly
- Green: Ready to fly
- Gay: The drone offline
Map view
Click Map icon to view the real-time 2D position of the drones and the RTK base.
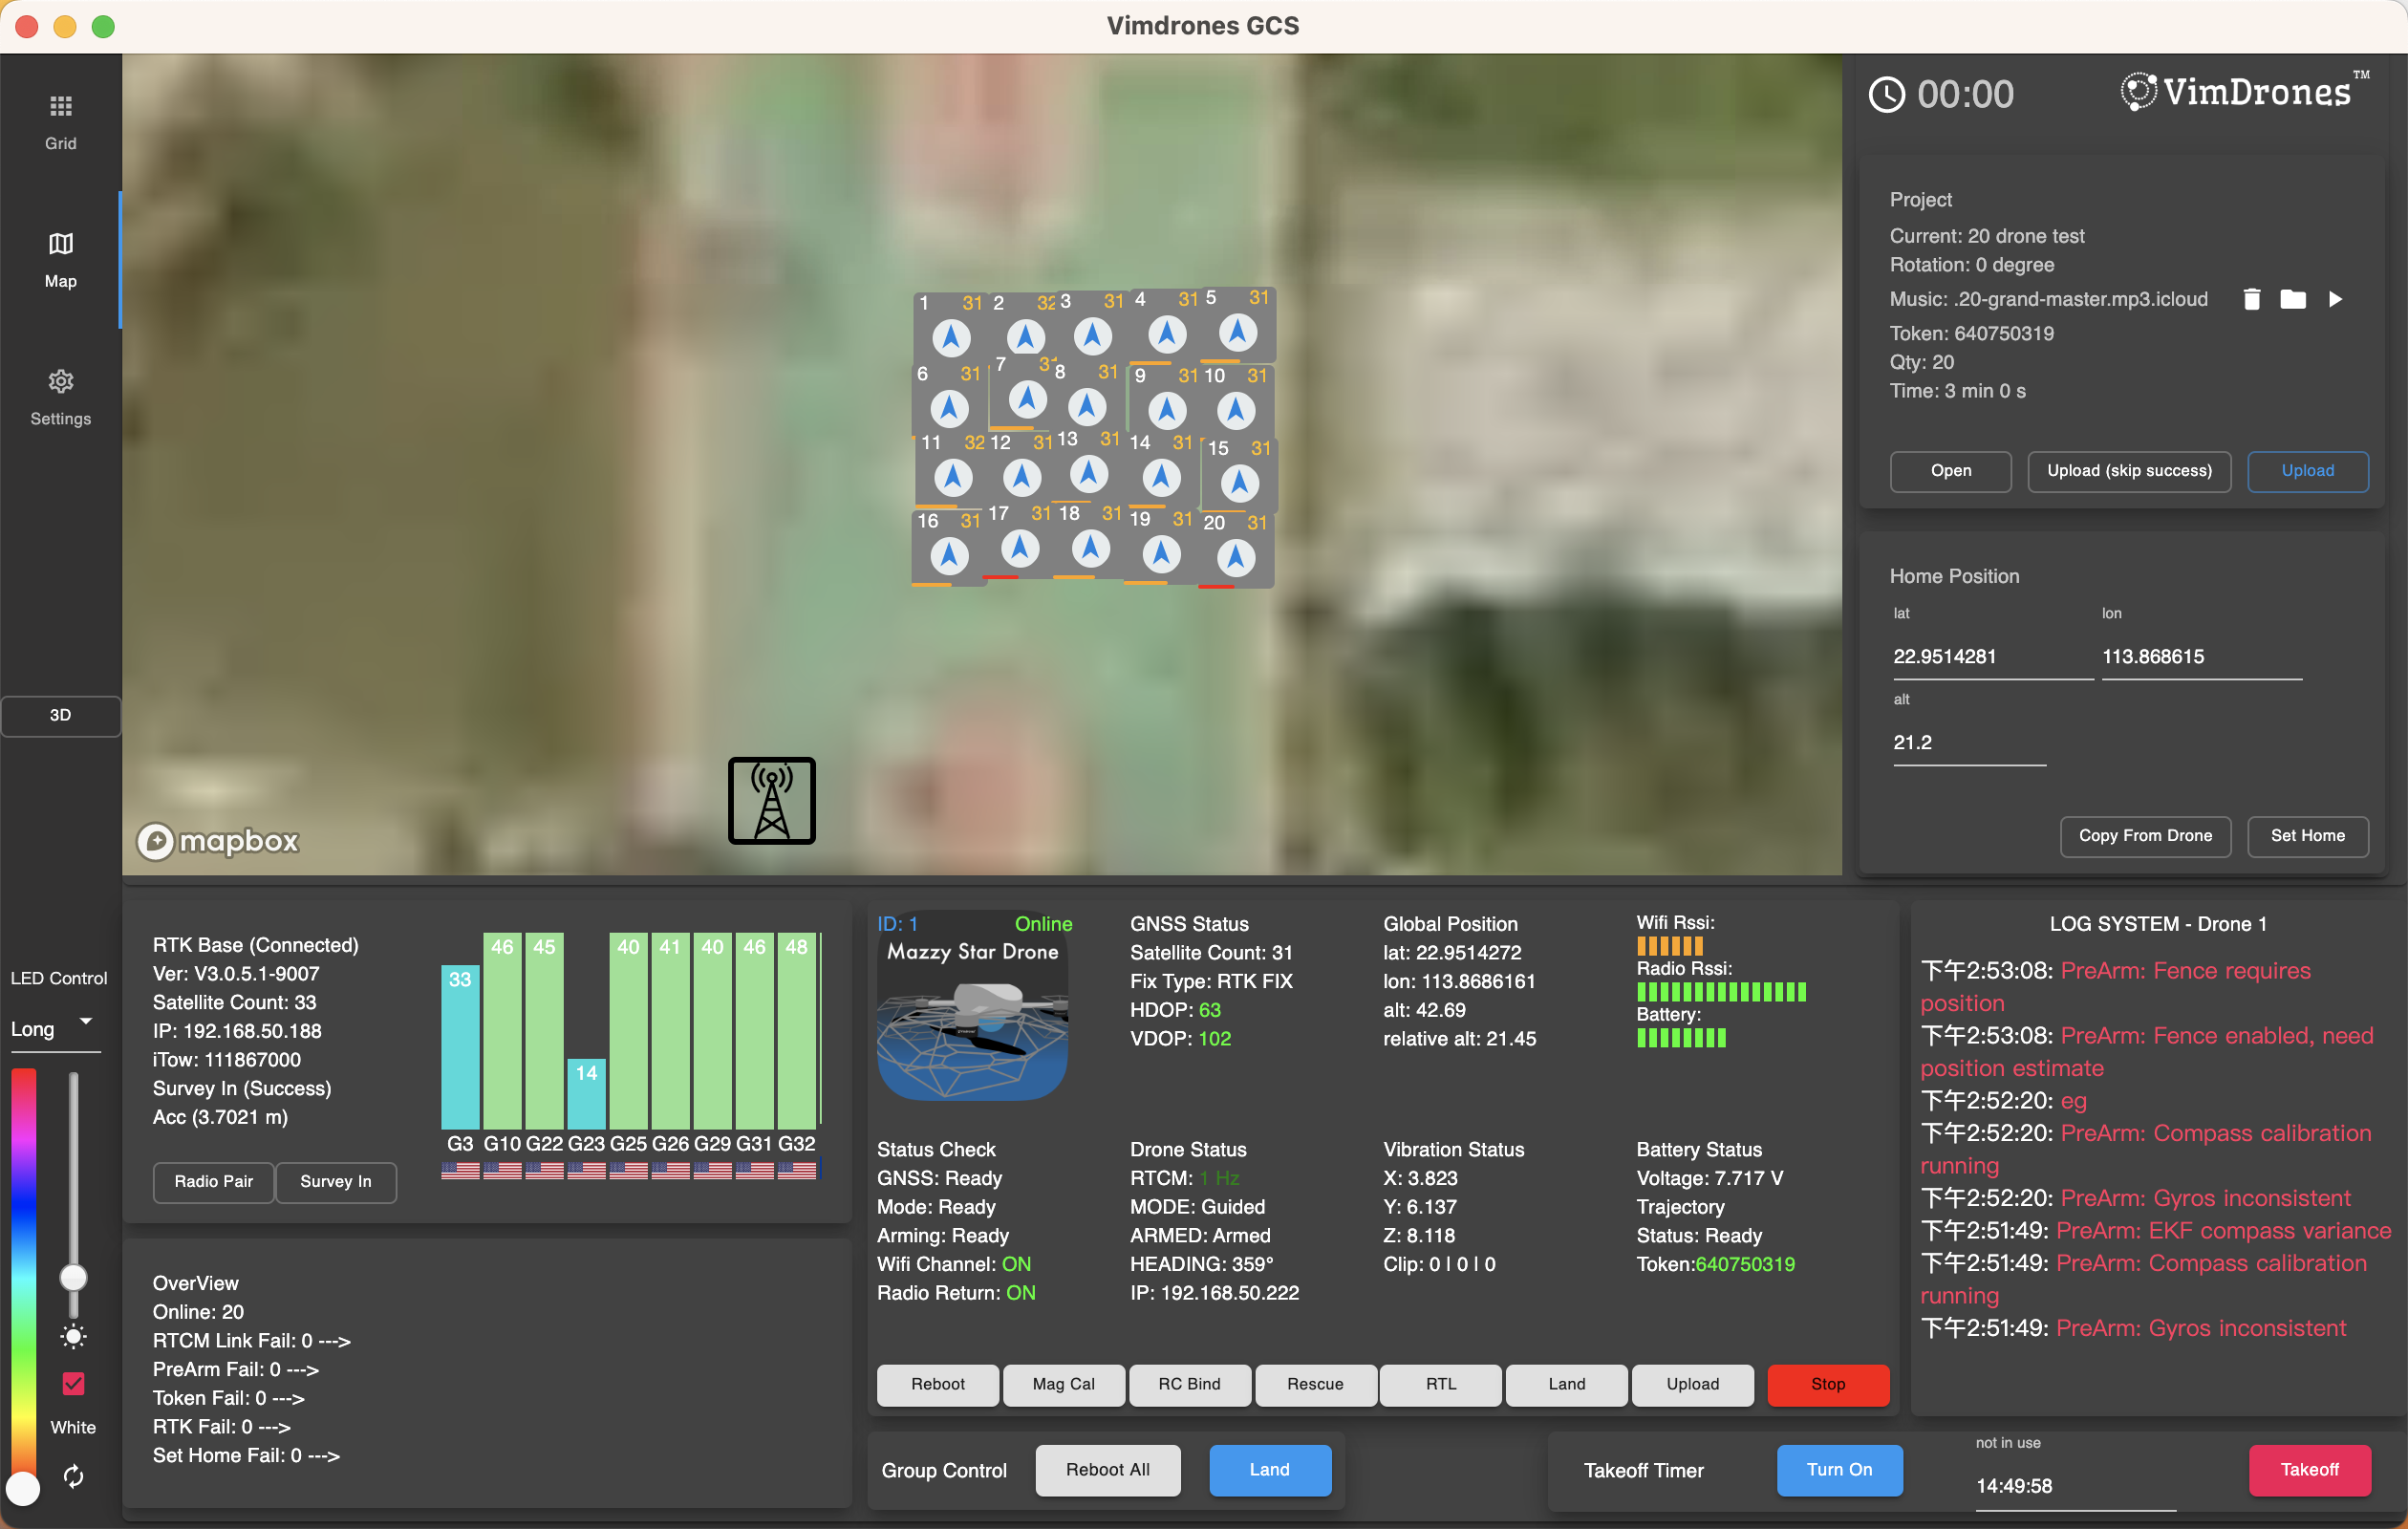 When you click the drone icon in the map, it will show this drone's status in the Dashboard
- Top left number: Drone ID
- Top right number: Satellite Count
- Middle arrow: Drone head towards
- Button bar: Battery Voltage
- High -> Low: Green -> Orange -> Red
List View
Click List icon to view all drones' Status in list
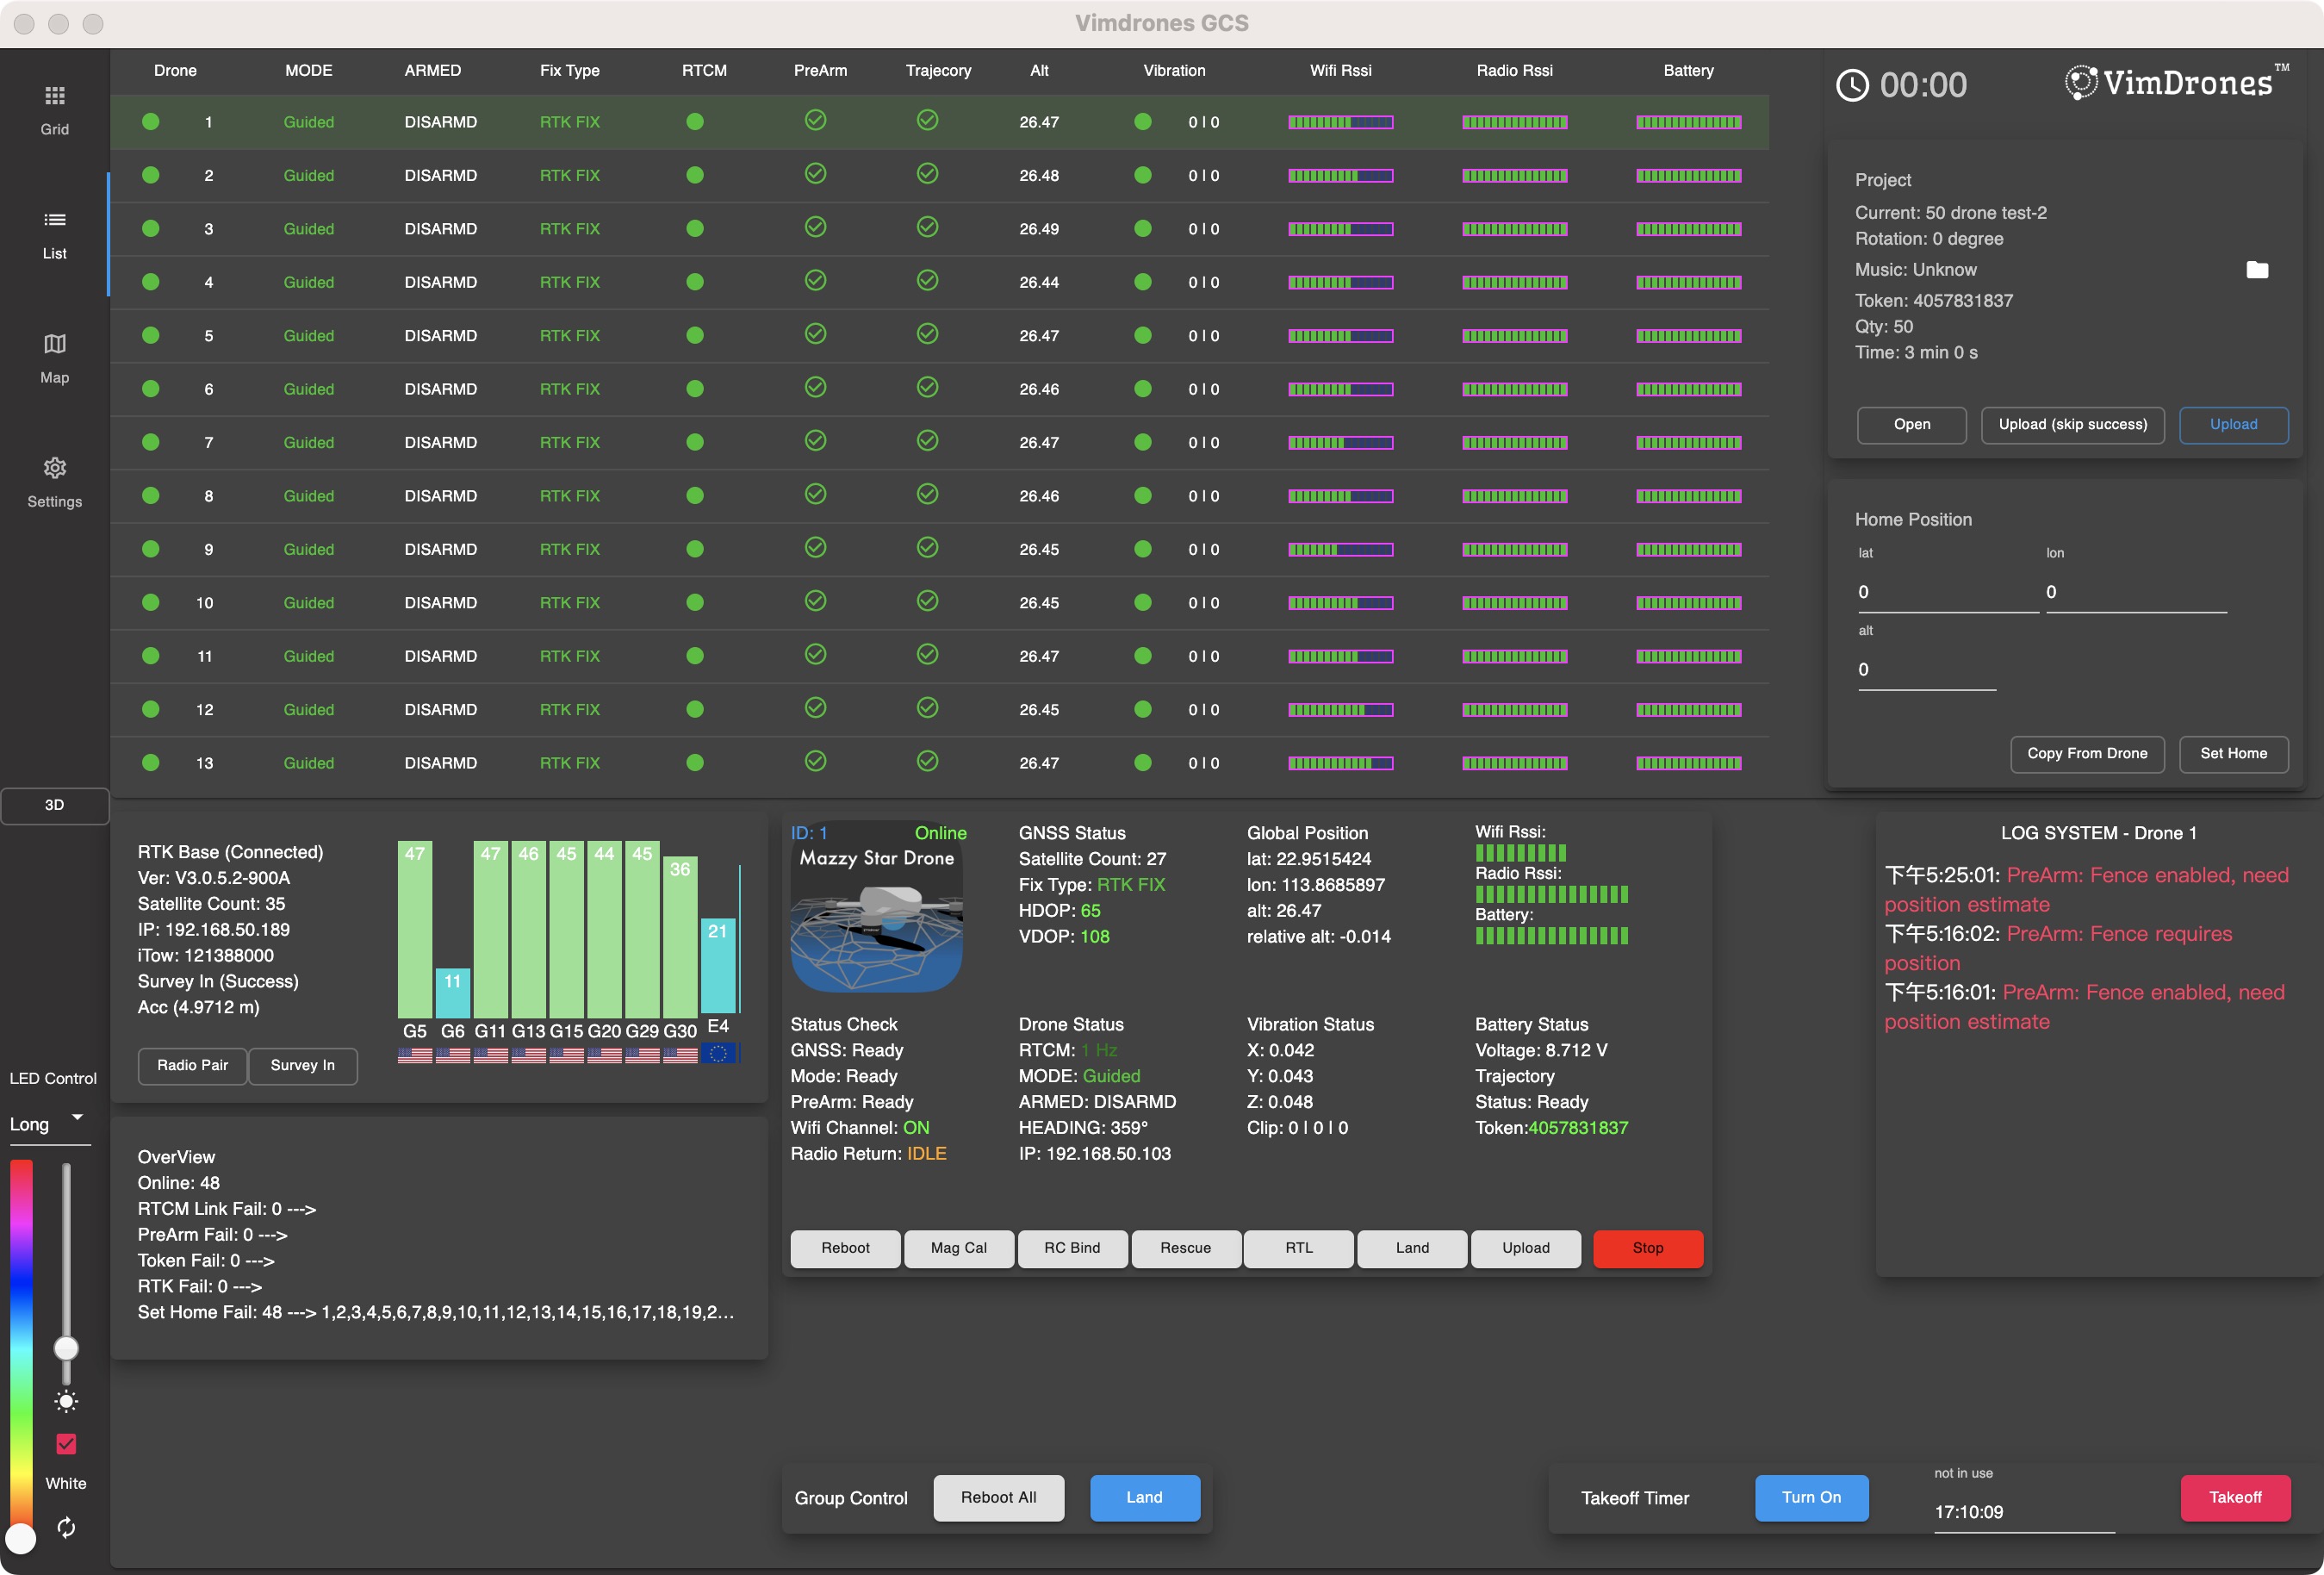
- A green dot in the drone column means the drone online, a red dot means offline
RTK Base Status
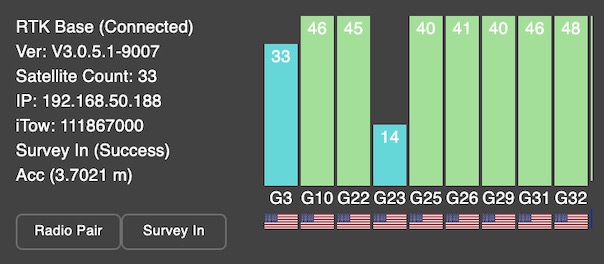
- RTK Base:
Error -> The RTK base doesn't connect to the system
Connected -> The RTK base has connected to the system - Ver: The version of the RTK base
- Satellite Count: Number of satellites received by RTK base
- iTow: Time value that GNSS receiver use internally
- Survey In: A locating method that the RTK base acquire its precise coordinate
Not Start Yet -> The RTK base not start Survey In
Process -> The RTK base is Survey In Process
Success -> The RTK base has completed Survey In - Acc: Accuracy
When Acc less than the setting Min Acc(m) value -> Survey In(Success)
The smaller ACC value, the closer RTK base to the GLOBAL coordinate. Larger ACC value, the easier for survey in succeed. Since the drones and RTK base form a LOCAL RTK correction relationship, generally setting ACC to 5 meters is sufficient for centimeter positioning and for easy survey in.
Satellite Status
- Cylindrical bar: Satellite signal, the unit is DB
- Satellite name
- Satellite country
Button
- Radio Pair: Pair the drone Radio Channel to the RTK base
Only when you add drones to the current RTK base system, you need to do the Radio Pair. - Survey In: When the RTK Base is enter for a while, click this button to process Survey In
What is RTK and why is it important?
Overview
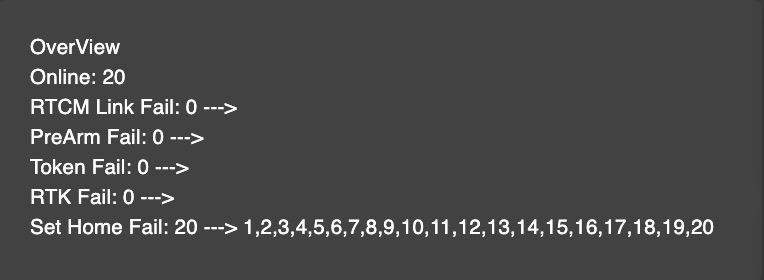
Issue Fail: Drone Quantity —> Drone ID
- Online: The quantity of drones online
- RTCM Link Fail: The drone loss the RTCM.
- PreArm Fail: The drone fail to PreArm(takeoff). Please check LOG system of the drone.
- Token Fail: The drone'project upload fail or Empty. Please try to upload(skip success) again.
- RTK Fail: The drone is not RTK fixed yet. Please wait for RTK fixed.
- Set Home Fail: The drone set home unsuccessful. Please set home again.
Drone Dashboard
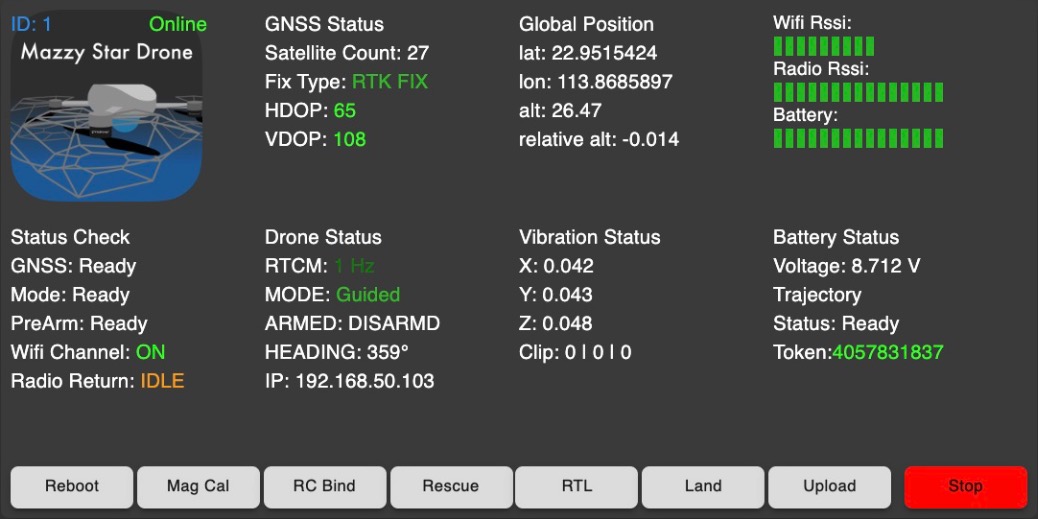
When we click Drone ID in the Drone Grid, we could see the status of this drone. It shows the ID No. and Online/Offline on the Drone Icon.
GNSS Status (Global Navigation Satellite System)
- Satellite Count: Number of satellites received by RTK base
- Fix Type:
No Fix: Not ready
Normal: Not ready
DGPS: Not ready
RTK Float: Has not been solved (yet) and can not produce an acceptable FIX solution (yet)
RTK Fix: Have a certain accuracy with corresponding dilution, with an accuracy between 1 to 3 centimeters in regular conditions
How to get RTK Fix?
At first, the Fix Type will always start in a Float status. If you have good sky conditions, you only have to wait for the algorithm to resolve. We suggest you wait or follow the tips above to obtain a FIX solution.
1. Place the drone in good sky view conditions.
2. Make sure the drone is not hindered by buildings or trees.
3. In case you need to place in less clear sky view areas and/or are obstructed by trees or buildings, firstly take the drone to a more open place until a FIX solution is obtained. Then walk slowly to the area you want to place the drone, this helps the algorithm to maintain a stable FIX solution.
- HDOP: Horizontal dilution of precision
Poor -> Good: Red -> Orange -> Green - VDOP: Vertical dilution of precision
Poor -> Good: Red -> Orange -> Green
Note
The smaller the value of HDOP and VDOP, the more accurate the drone's position.
Global Position
- lat: Latitude
- lon: Longitude
- alt: Altitude
- relative alt: Relative Altitude
Status Check
- GNSS: False -> Ready (It should be Ready when the drone online)
- Mode: False -> Ready (It should be Ready when the drone online)
- Arming: False -> Ready (It should be Ready when the drone online)
- Wifi Channel: OFF/ON (It should be ON when the drone online)
- Radio Return: IDLE/ACTIVE (It should be IDLE when the wifi is working, or it will be radio ACTIVE)
Drone Status
- RTCM: Sending Frequency
RTCM Version V3 , provide broadcasted GNSS real-time differential corrections and raw data - Mode:
- Stabilize: The drone maintains a consistent altitude while allowing roll, pitch, and yaw to be controlled normally
- Altitude hold: Allows you to fly the drone manually, but self-levels the roll and pitch axis
- Loiter: Automatically attempts to maintain the current location, heading and altitude in the manual flight mode
- Guided: The drone is control by Vimdrones GCS
- RTL: The drone return to home position
- LAND: The drone is slowly landing vertically
- HEADING: Drone's heading angle degrees against north
- IP: Drone's IP address
Vibration Status
- When in the guided mode or manual control by RC, please check the Vibration Status in the GCS
- Drone X/Y/Z axis Vibration value should be under 30
- Clip value should be under 50 | 200 |
- Otherwise may have propeller/motor broken issue!
Battery Status
- Voltage: When the voltage drops to 7.2V, the drone will automatically return to launch (RTL)
Trajectory
- Status: False -> Ready
- Token: The project token of the drone
If the token number is red, it means the drone's Trajectory doesn't match the Project.
If the token number is green, it means the drone's Trajectory matches the Project.
Button
- Reboot: Reboot the drone
- Mag Cal: Drone mag calibration
- RC Bind: Binding drone to the RC controller
- Rescue: Enable drone's RC control to manual control by RC controller
- RTL: Set drone to RTL mode
- Land: Set drone to LAND mode
- Upload: Upload the trajectory of the project to the drone individually
Project
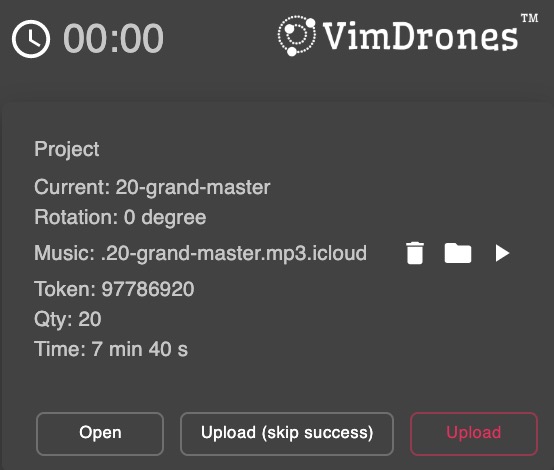
-
Time icon: Record the time when click take off button
-
Current: The current project name
- Rotation: The current project Z Axis Rotate degree (Export Setting in the Vimdrones Designer while export the Vimdrones GCS files)
- Music: The current project music name
Trash can icon: Delete the current music
File icon: Open a media file (.mp3 / .mp4)
Play icon: Play the music file for test - Token: The project token
- Qty: The quantity of the drones in the design project
- Time: The drone light show project duration
Button
- Open: Click Open button, Select Design Project
- Upload(skip success): Click Upload(skip success) button, upload trajectory Design to the drones which
- Upload: Click Upload button, upload trajectory Design to the drones (white light flashing)
Note
- It will keep the automatic selection of media file while open the Project folder.
- It needs the media player have an auto-play function when you want play the media after click Takeoff button.
- You could also open a media file (.mp3 / .mp4) in the from other file.
Set Home
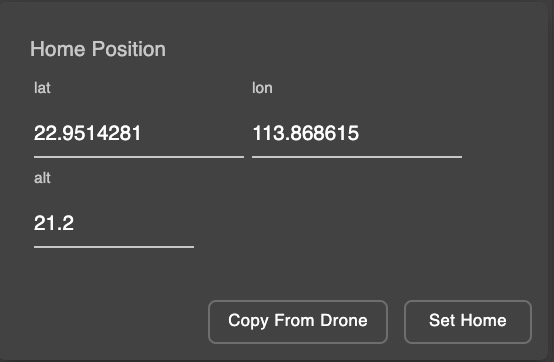
- lat: Latitude
- lon: Longitude
- alt: Altitude
Button
- Copy From Drone: When all drones status Check Pass, select Drone 1. Click Copy From Drone button, it will shows the latitude(lat), longitude(lon) and altitude(alt) of Drone 1.
- Set Home: Click Set Home button, set home position to all drones (LED lights change to green).
Note
In general, the drone chosen as copy from home should correspond to the position of the world origin [x, y, z(0, 0, 0)] in Blender.
Log System
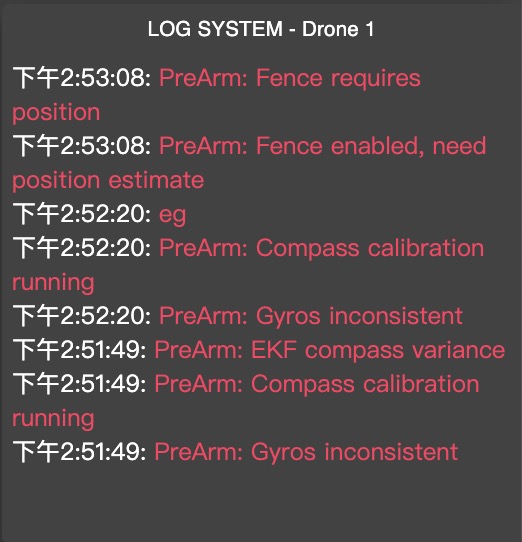
- When deselect the drone, it shows the drone's log system.
- When deselect the drone, it shows all drones log system.
LED Control

We could control the drone LED realtime when having the drone light show.
- Select the color, set the LED mode and diffuse color & brightness, click Update icon.
- If want to set LED White, make a "✓" and click Update icon.
LED Mode
1. Long: The LED always on
2. Breath: The LED's brightness smoothly changes from dark to bright and back to dark
3. Flash: The LED regularly on and off
4. Quick: The LED flash fast
Group Control

- Reboot All: Reboot all the drones
- Land: The drone will automatically land vertically and slowly at the current position (do not click it unless you know what it is!)
Takeoff Control

- Takeoff: When everything is Ok, Click the Takeoff button to begin your drone light show
Takeoff Countdown
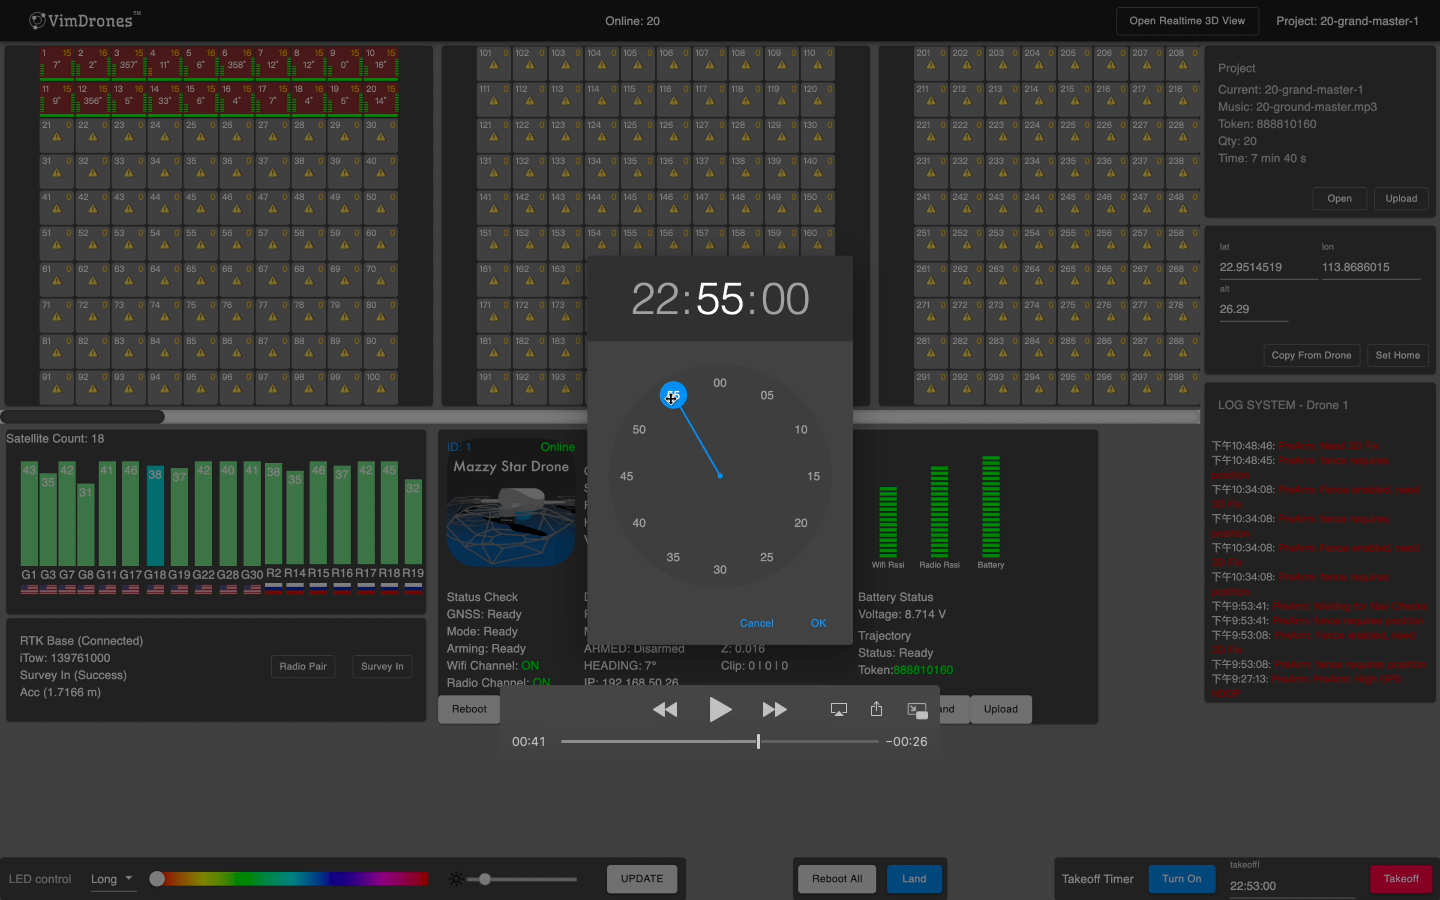
- Click the time to set the takeoff time
- Click the Turn On button, then it begin to countdown. Drones will takeoff when reach the set time
- If the set time is less than now, it will give you a notice.
- You could Turn Off the countdown before the set time to takeoff
Operation Video
Settings
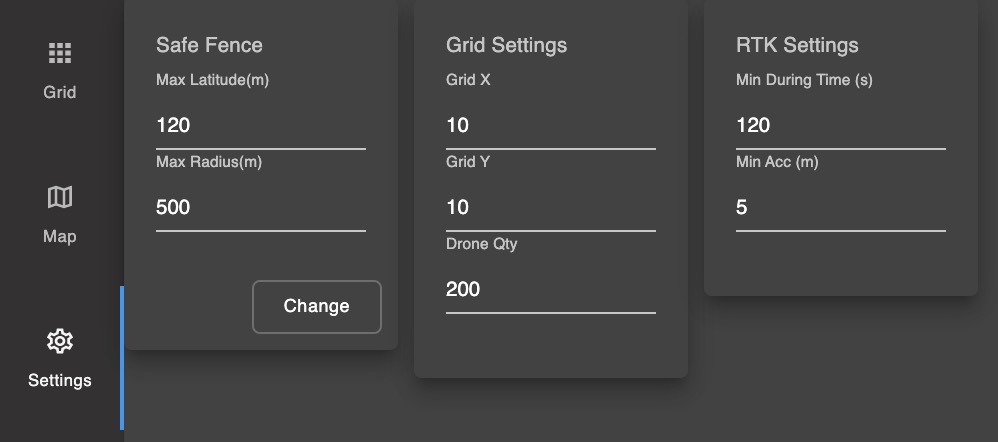
-
Safe Fence
When the drones are online, we could set the Max latitude(m) and Max radius(m) of the drone geo-fence. The default value is Max latitude(m) for 120 meters, Max radius(m) for 500 meters. -
Grid Settings
We could set the number of rows(Grid X), columns (Grid Y) and drone quantity(Drone Qty) for drone grid. -
RTK Settings
The RTK base needs to reach the Min During Time(s) and Min Acc(m) could Survey in (success).
3D Map view
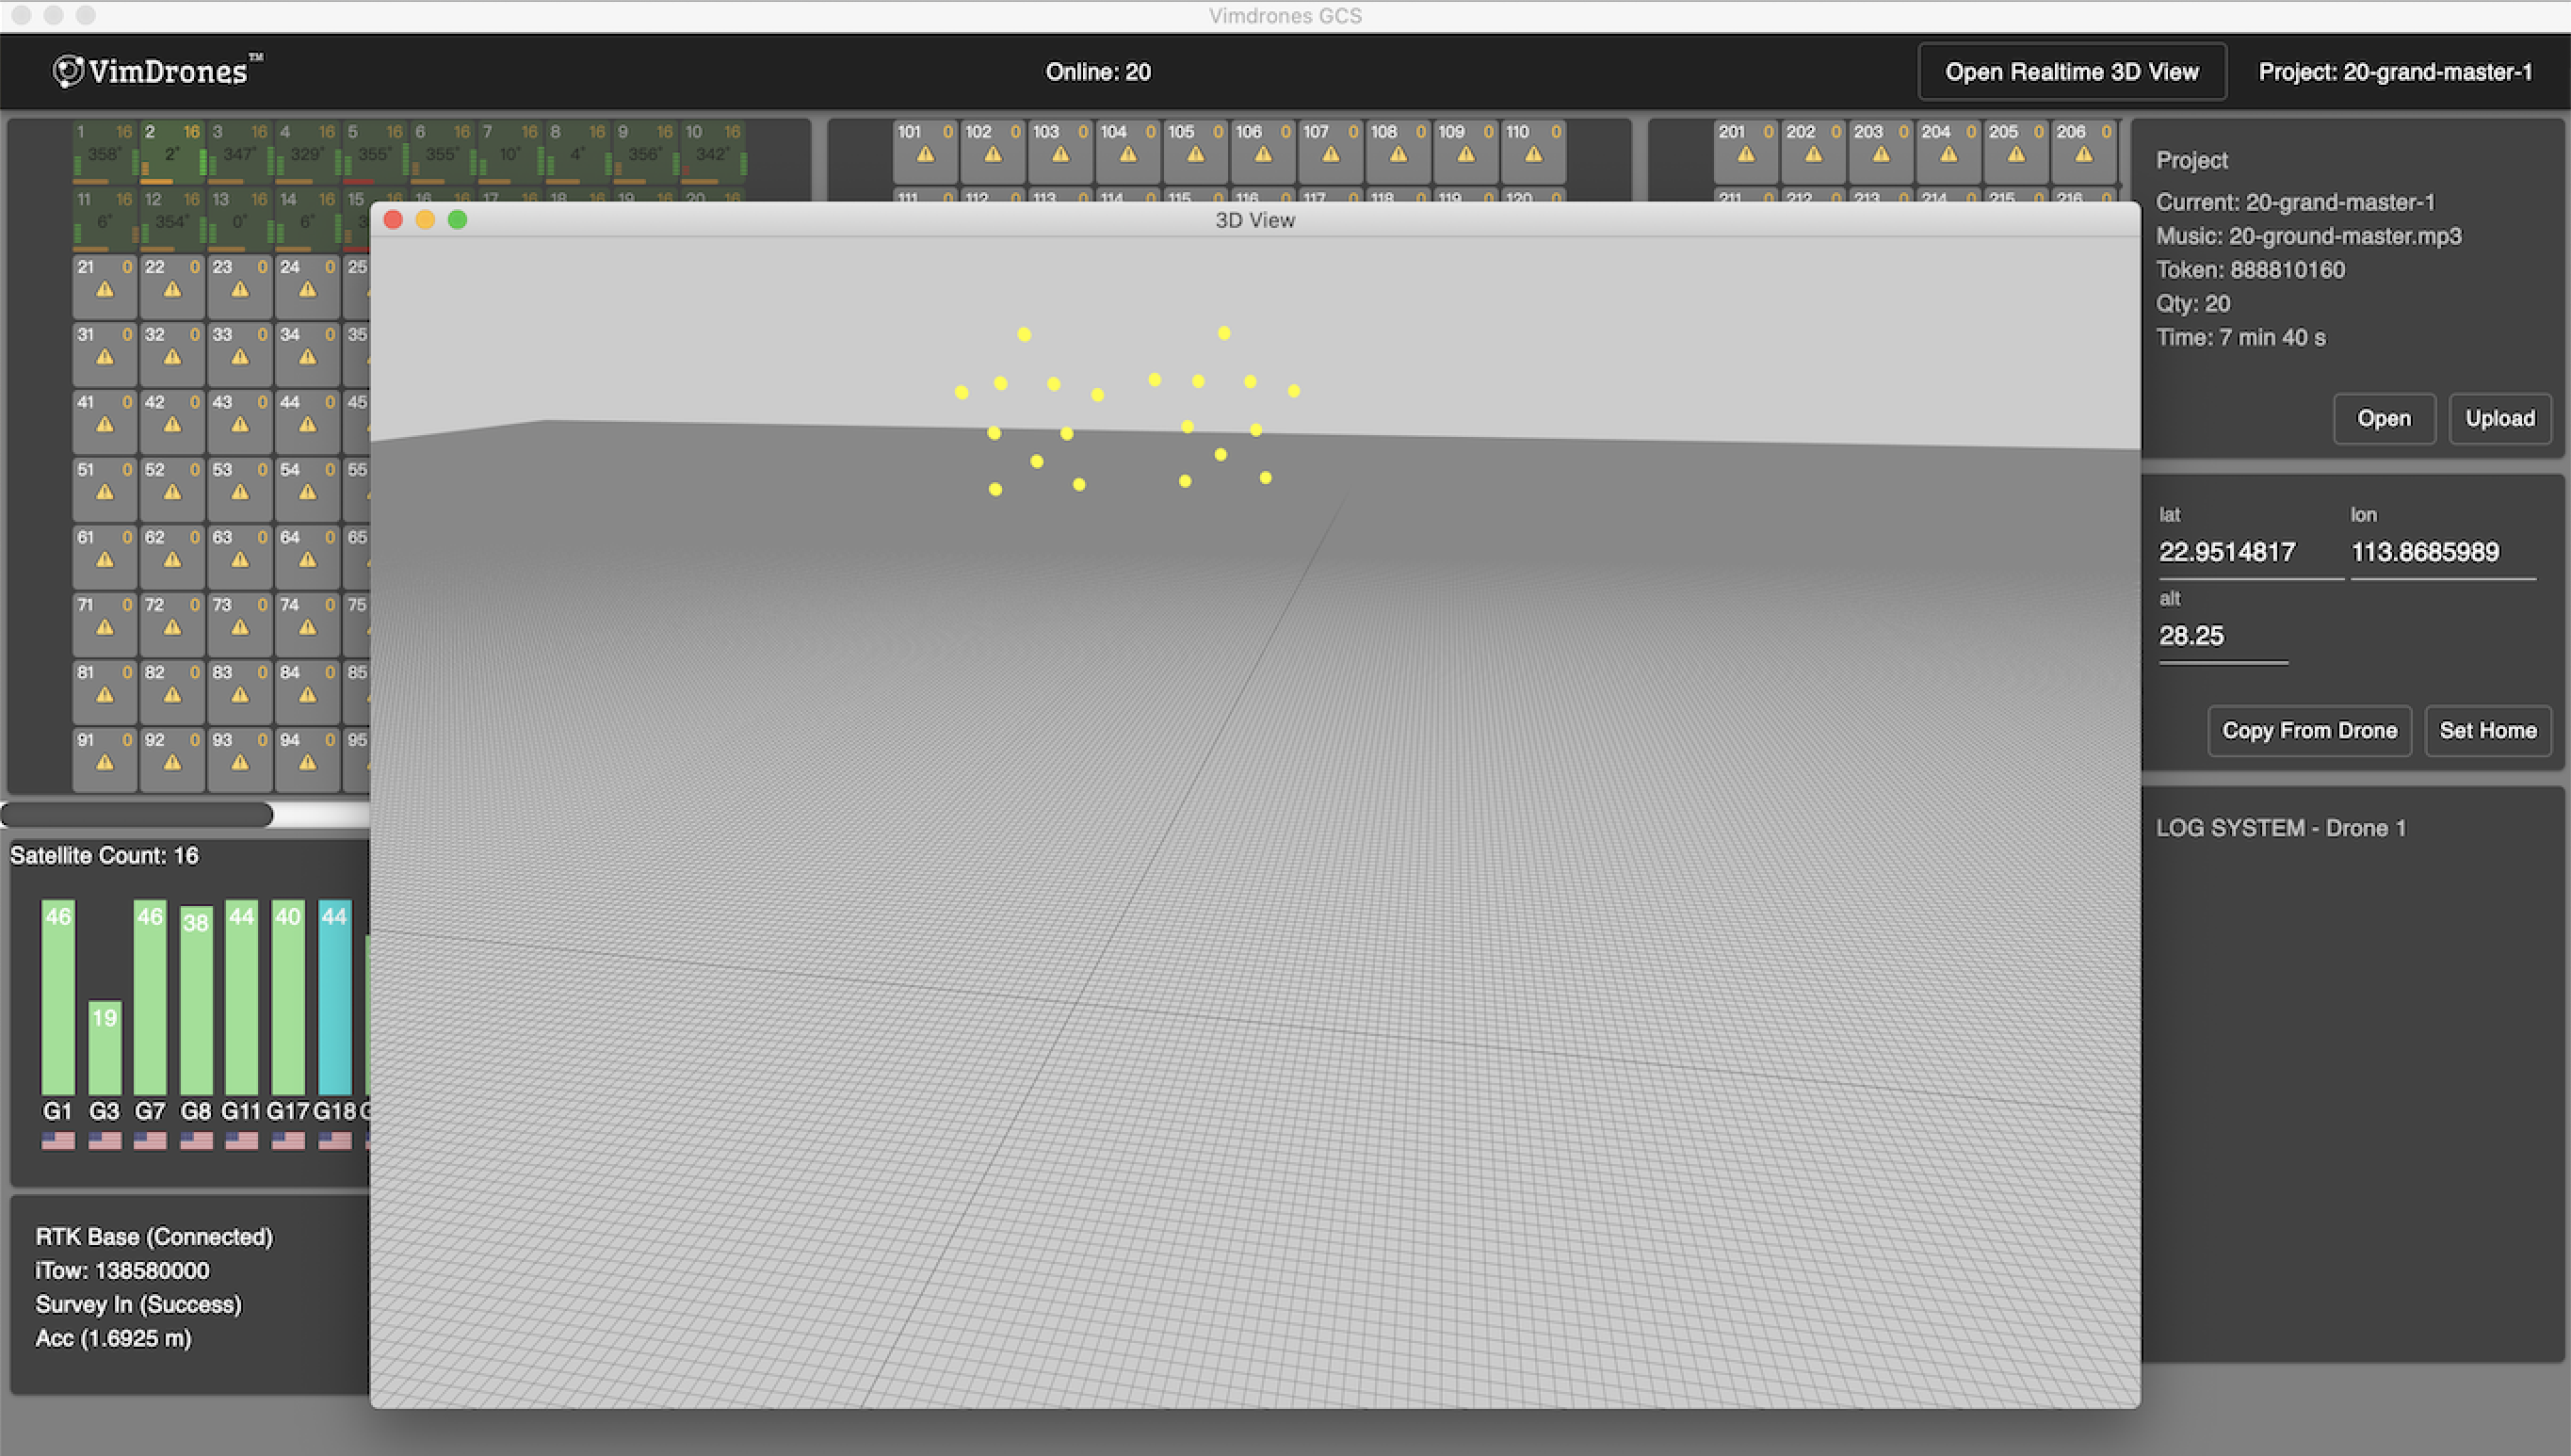
Click 3D to view drone's real time 3D position.
Tools
Team Control
We could realtime control the drones to Pause, Continue or Move in the GCS software.
Tool -> Team Control
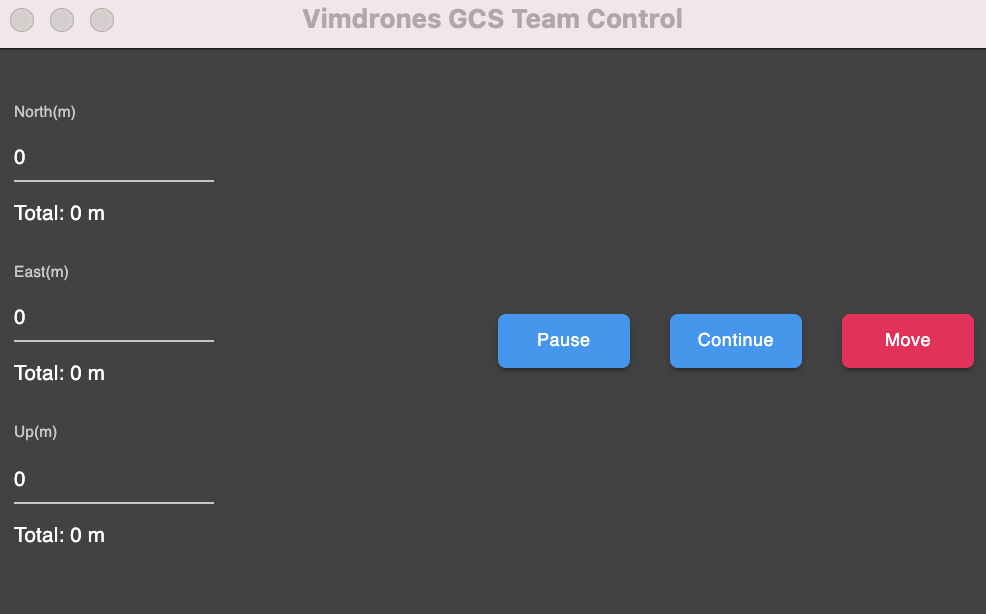
- Purse: Purse the show
- Continue: Continue the show (make sure that the the value should be 0 in the North, East and Up columns)
- Move: Move all drones according the value of North, East and Up columns
Note
- A value that is negative indicates the opposite direction. For example, if you enter 5 in the North column and click the Move button, all drones will move 5 meters to the north; if you enter -5, all drones will move 5 meters to the south
- Please note that when performing Team Control operations, there will be a delay in execution.
Firmware Manager
We could though the Firmware Manager Tool to manage and the version of the drone.
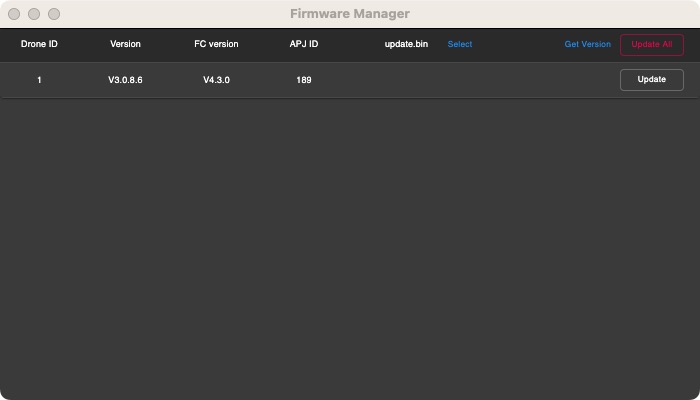
- Version: drone control system version
- FC Version: flight control version
How to update the firmware of Mazzy Star Drone?
Before the update, please set up the router and the RTK base. Connected to router's Wi-Fi of your computer. Open the GCS and wait for the connect with the RTK base. You could do this work indoor.
- Power on the drone(s) and wait the drone(s) online.
-
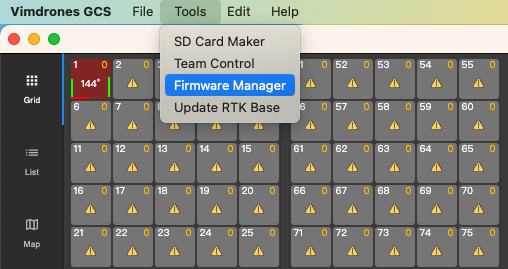
Open Tool -> Firmware Manager in Vimdrones GCS.
-
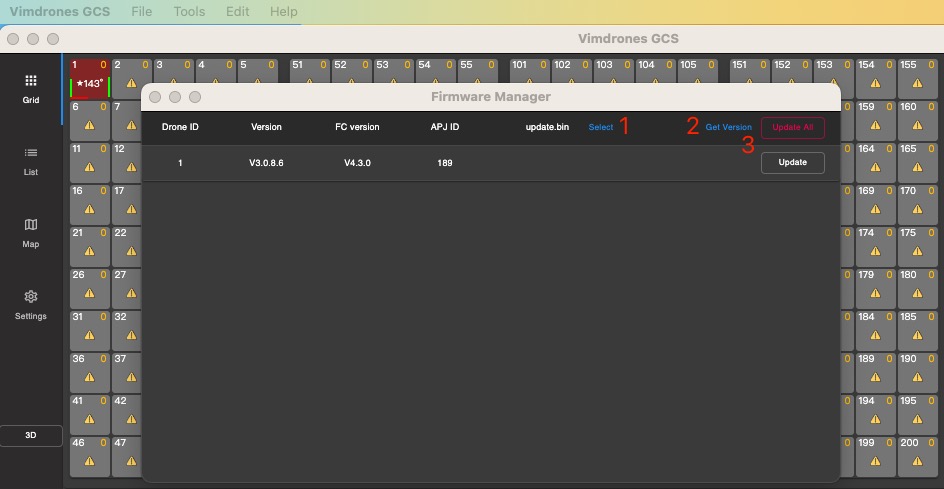
1.Click Select to choose the update.bin file
- 2.Click Get Version of the drone(s)
- 3.Click Update all or Update Button, the drone(s) will flash white light.
- After the drone update and reboot, please click Get Version and confirm the new version of drone(s)
Update RTK Base
Before the update, please set up the router and the RTK base. Connected to router's Wi-Fi of your computer. Open the GCS and wait for the connect with the RTK base. You could do this work indoor.
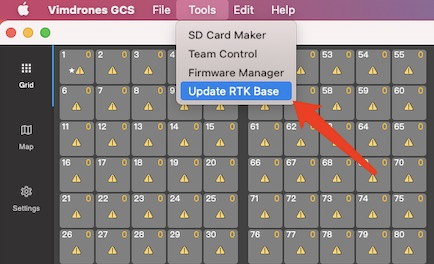
- Open Tool → Update RTK Base in Vimdrones GCS.
- Select the file: vimdrones_light_show_base
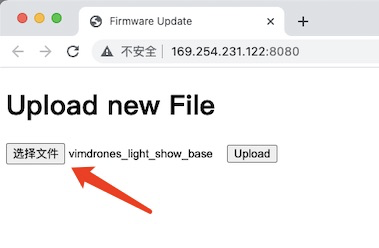
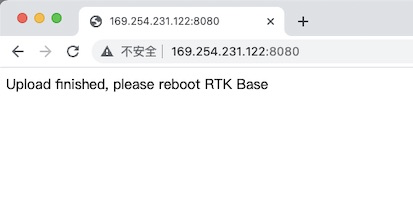
- Click the Upload button and finish the update. Please Reboot the RTK base.
