Drone Light Show Designer
Introduction
The Vimdrones Designer is an Add-on of Blender that uses for Drone Light Show Flight Path Design. It could create any figures, like 2D or 3D animation, even with music beats. For its efficiently handling the transformation between drone formations and lighting effects, we could focus more on the drone light show design itself.
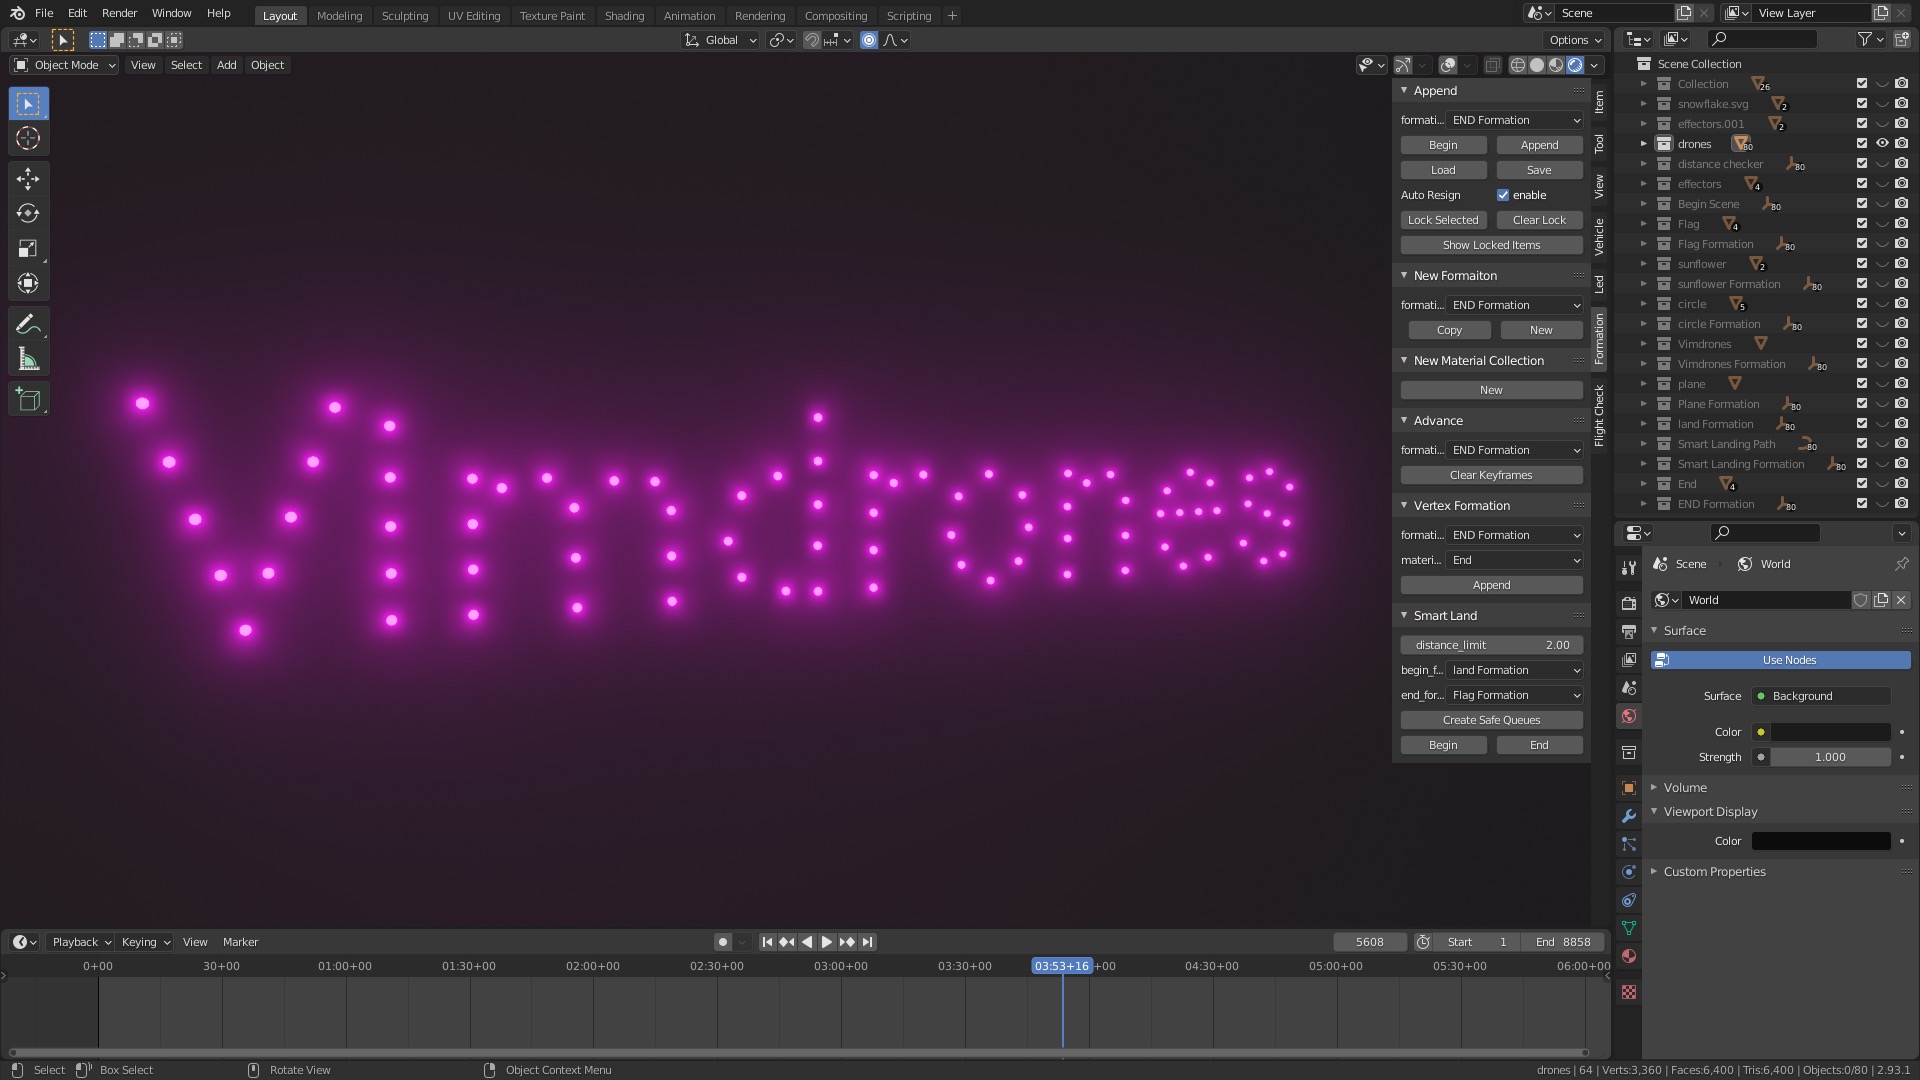
Feature Highlights
- One-click Formation
- Smart Formation Transform
- Auto Resign Lock Selected
- Flight Check to Avoid Collision
- 3D Animation
- Rich Color Design
- Support Multiple file formats Import
- With Sound Track System to Synchronize
- Music and Light
- Easy Marketing Design
System requirements
System requirements for Vimdrones Designer Software:
- Operating system: Windows 10/11; Mac OS
- CPU: Intel Core i7 or better
- Memory: Minimum 8 GB of RAM or more
- Hard drive: SSD 120GB. Recommended 256GB or more
- Graphics hardware: Graphics card
- Network: TCP/IPv4 network stack, WiFi, or Ethernet. Recommended Ethernet
- Screen resolution: Full HD screen
Installation
- Install Blender 2.8 Series or above on your computer, Mac OS or Windows
Download Any Blender - Please contact Vimdrones to Get the Designer Software
Download
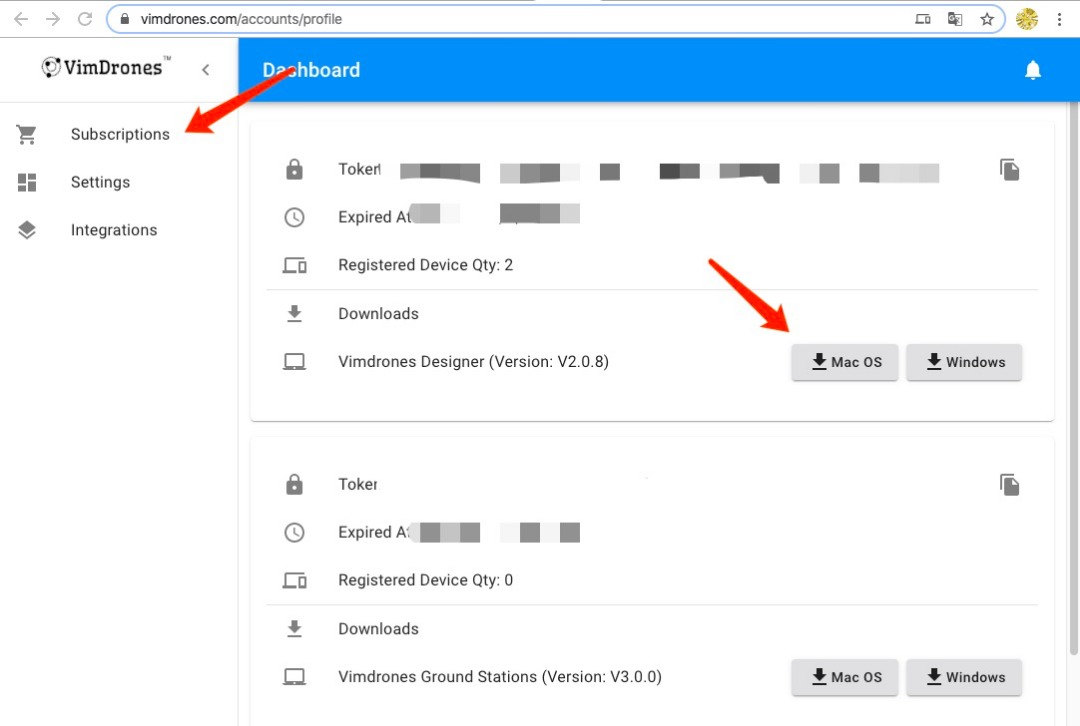
- Open our website Vimdrones, click Login
-
Already has an account, please Sign In
Don't have an account, please Sign Up and then Sign In
-
Select the version Mac Os or Windows to download the software
Mac
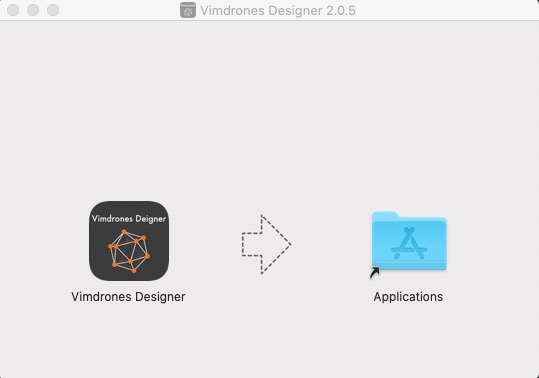
- Double click the [Vimdrones Designer-x.x.x.dmg], pull the Vimdrones Designer icon to the Applications file
- Double click the icon to open the Vimdrones Designer
Windows
- Right click the [Vimdrones Designer-x.x.x-win] to Unzip all
- Double Click the Vimdrones Designer.exe
- Click More Information to Run the software
- Allow the software through firewall to open the Vimdrones Designer
Active License
-
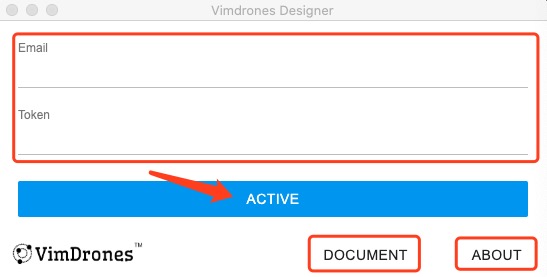
Type your emaiL and token, click Active Button
-
Click the file icon on the Upper right corner to open the Blender Path where you installation
-
Then click OPEN BLENDER Button
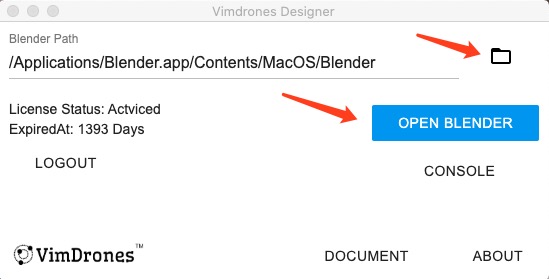
- Click LOGOUT to logout
- Click CONSOLE to open the flight check console
-
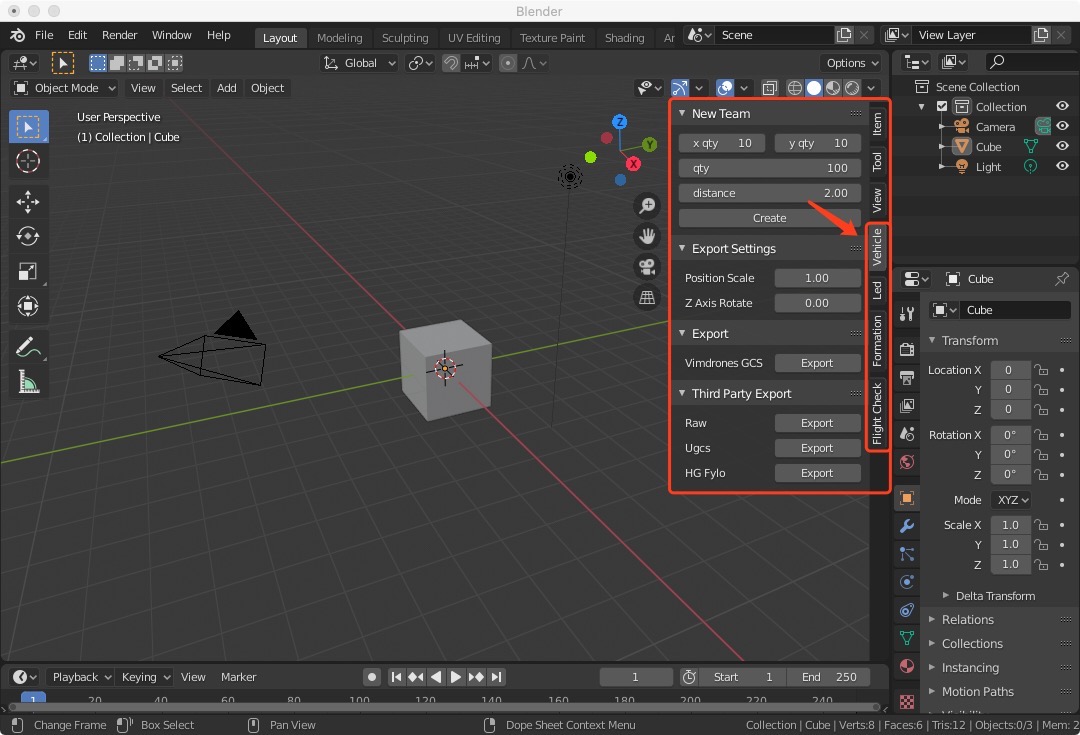
Press N to show/hide Properties, it will shows the Designer tabs(Vehicle, Led, Formation, Flight Check)
Note
- Please make sure your device is connected to the network when using Vimdrones Designer
- It needs to click OPEN BLENDER Button in Vimdrones Designer interface to open Blender
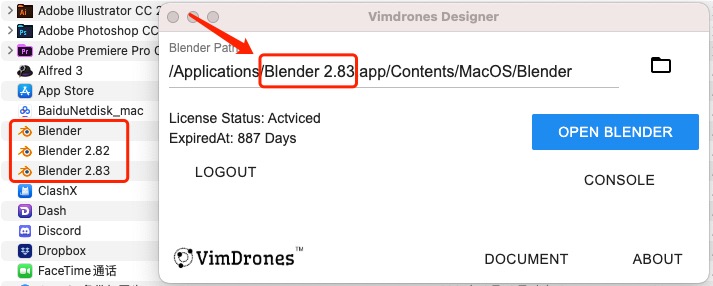
- If you have multiple versions of Blender, please add the its name in Blender path
Getting Started
- Open Blender, New File -> General
- Press A to select all the objects in the 3D Viewport, then press X, D to delete the objects
More details about Keymap
From Blender To Real World
-
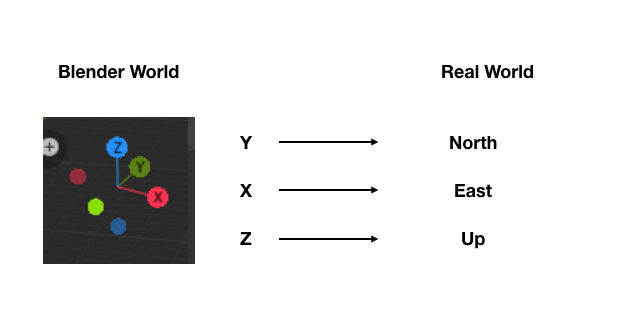
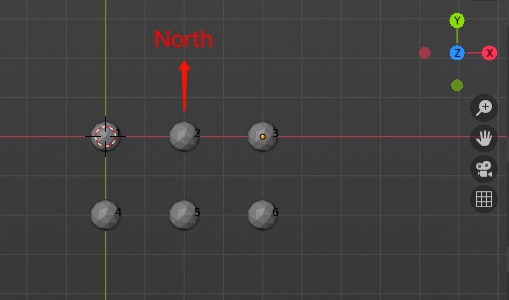
Blender and Real World axis relationship shown as below
-
drone light show design is based on 24 FPS which means 1s run 24 frames, this value should not be changed unless you know what you are doing
Create Drone Team
- Vehicle -> New Team -> Create
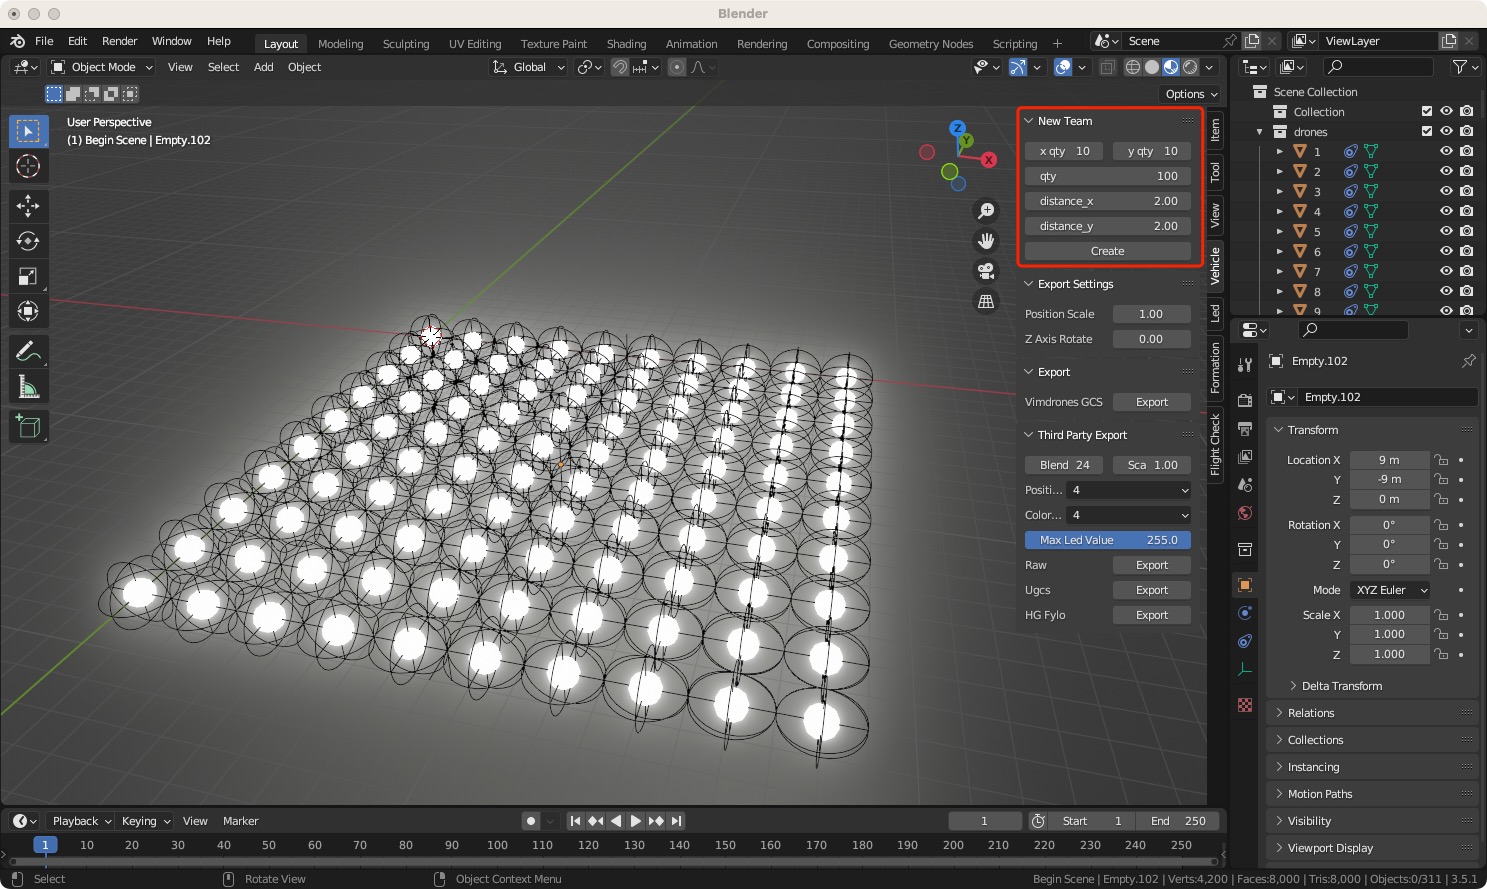
What is x qty, y qty, qty mean?
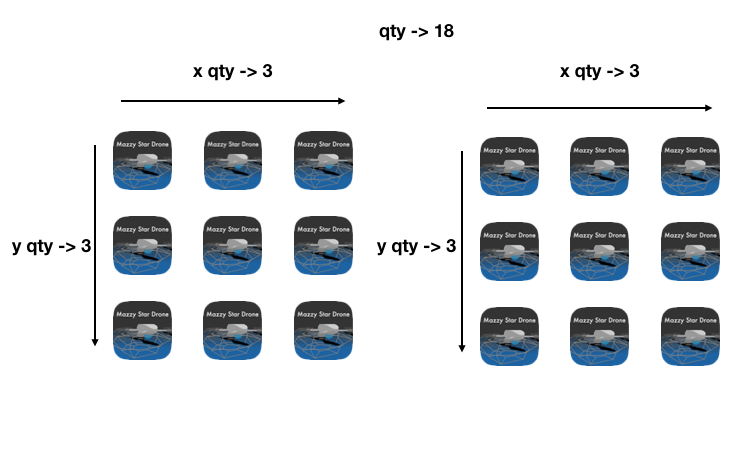
- qty represent the total quantity of your drone team
- x qty and y qty define your a single block shape in ground, as the image shown below
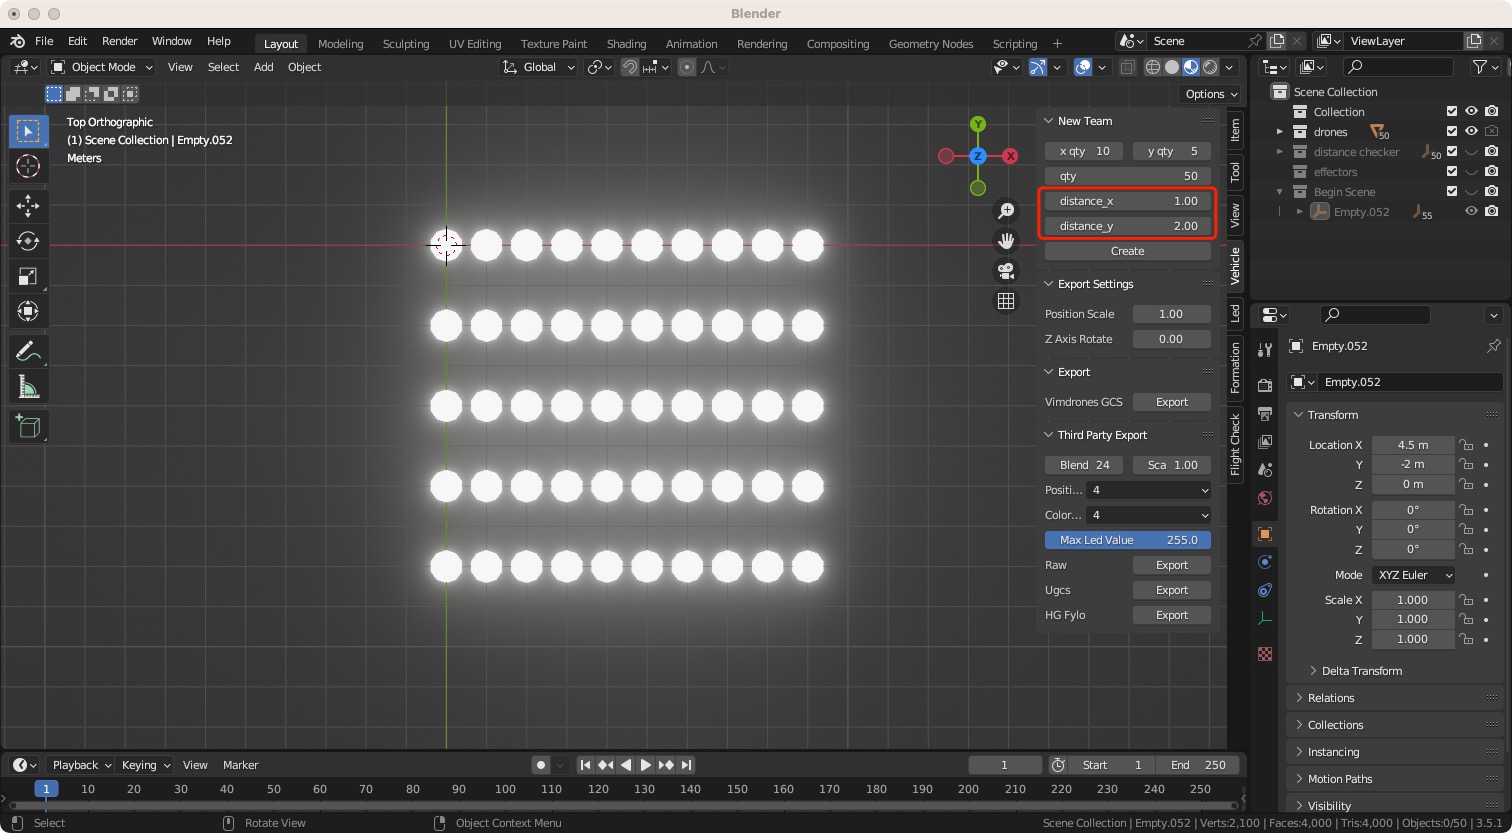
What is the distance
- Distance between two drones, the default value is 2m
- The Values can be set individually of distance of the X & Y
What do we have after create drone team?
- drones (What is Collection?)
- effectors
- Begin Scene
- Safety Check
Note
Please keep the Collection name & Object name in default
How to set the LED glow strength?
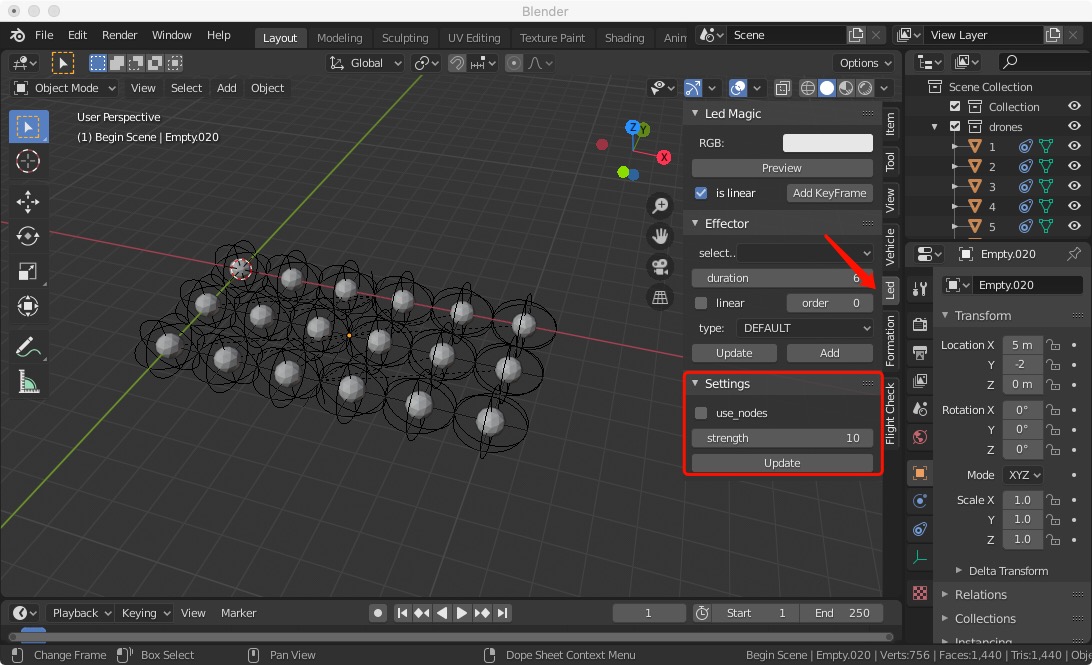
- Led -> Settings, set the strength value, click update. The higher the value, the stronger the glow
How to remove the LED glow?
- If your computer configuration is not high, we suggest you to remove LED glow effect
- Led -> Settings, remove the "√" in from of use_nodes, then click update
Warning
- Once you select use_nodes to start a project, don't change it to no use_nodes.
- Similarly, once you select no use_nodes, don't change it to use_nodes.
- These two modes are not compatible in a same project.
Operation Video
Takeoff
- In the Timeline window, Current Frame -> 0
Formation -> Append, select formations Begin Scene, click Begin Button - Current Frame -> 1
Formation -> Append, select formations Begin Scene, click Append Button
(the drones are reach the location of the Empty Objects, and they will follow the animation of the Empty Objects) - Select Empty Objects in the Begin Scene Collection, insert keyframe
- Set the Current Frame -> 600 (for example; 600 means 25s, press Ctrl/Command T to change time form)
Move the Empty Objects to Z:50m (for example), insert keyframe
What is Begin and Append?
- Begin: The frame that the drones begin to change the formation
- Append: The frame that the drones reach the location of the new formation(Empty Objects collection)
Operation Video
Change Drone Formation
Create Drones Vertex Group
- Formation -> New Material Collection -> New, create New Material Collection in the outline Editor. Double-click the collect to rename it(E.g Cube Material)
-
Add the Mesh Object/Objects(E.g Cube) in the Material Collection(E.g Cube Material)
- We could add more Mesh Objects into the Material Collection. So we can add animation to each object separately that make the scene more lively and interesting
- File -> Append/Import
We can append/import the objects from other files and use them as the Material of drone scene. For example, if we import svg. files, we should convert them to Mesh(Object -> Convert to -> Mesh from Curve/Meta/Surf/Text in the Menu bar)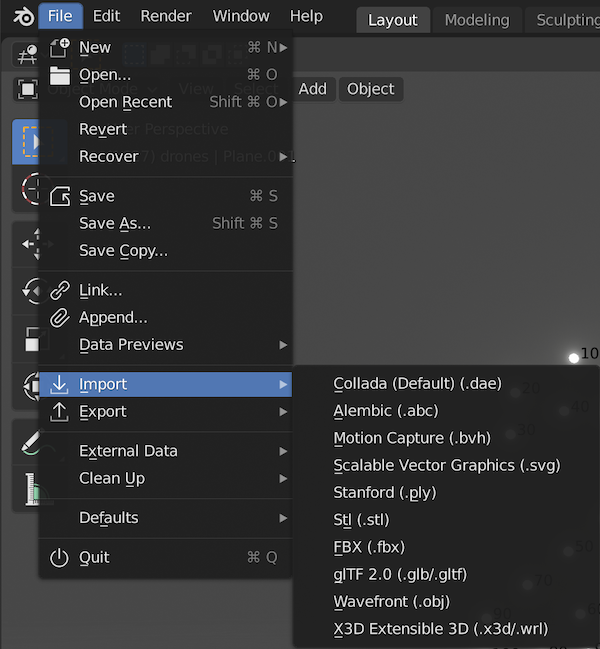
-
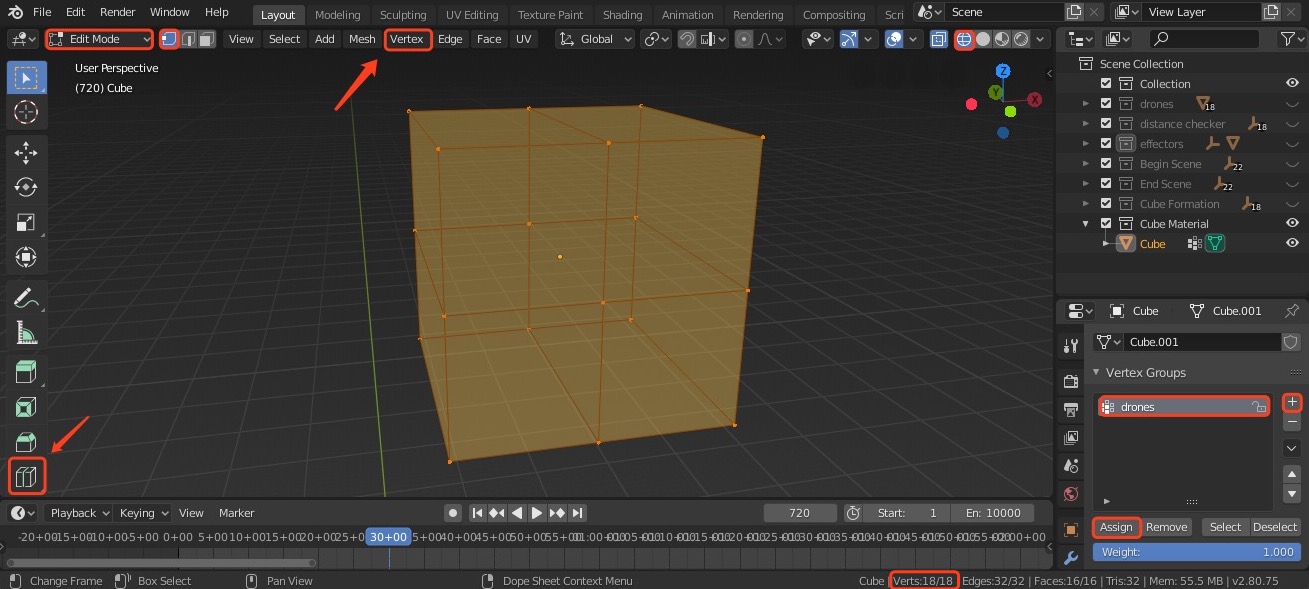
Select the Mesh Object/Objects(E.g Cube),change Object Mode to Edit Mode
- In the Properties Editor, click Object Date tab, click the Button "+" on the right Panel border to add a Vertex Group.
- Double-click the "Group" name and edit to "drones" (It matches the drones collection, do not change to other name, like Drone or Drones)
-
Select the vertices of the Mesh Object (one vertex represents one drone), click Assign Button below the Panel
-
We could use the tools on the left to edit the vertices. Or from the Menu Bar Vertex to edit the vertices.
Add the vertices:Loop Cut is a very useful tool.
Delete the vertices: Select the vertices, press X key to Delete or Dissolve the vertices. -
We could know how many vertices have been Assigned on the Status Bar(lower right corner)
Make a "√" in from of window -> Show Status Bar

-
In the Vertex Group Panel, we could click the Remove Button to remove the vertices which have been Assigned. And we could click the Select/Deselect Button to check which vertices have been Assigned.
Note
Please make sure the total number of the selected Vertices (in the Material Collection) is the same as the number of the drones(Meshes in drones collection).
-
-
Change Edit Mode to Object Mode
Change the Drone Scene
-
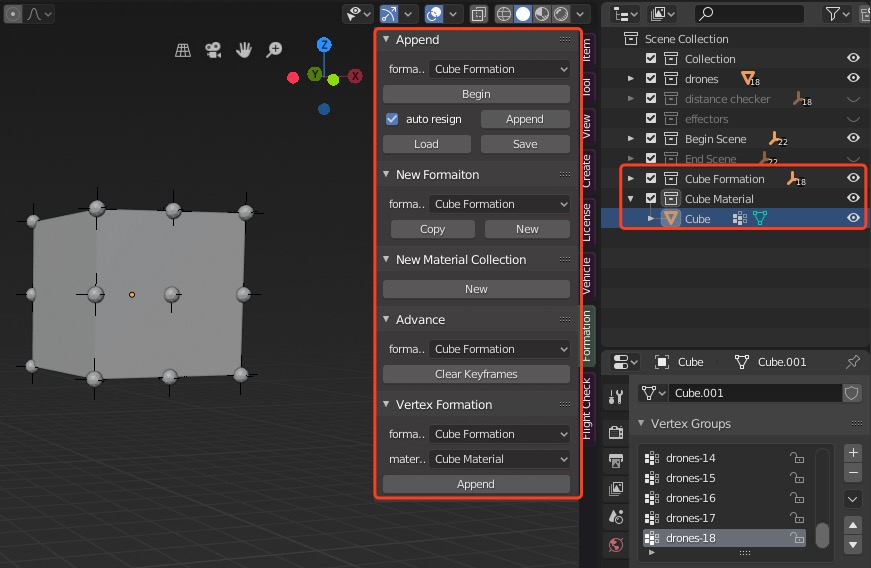
Formation -> New Formation, select the Formations Scene(E.g Begin Scene) which need to be changed, then click the Copy Button to copy a New Formation at in same location. Double-click the New Formation in the outline Editor to edit the name(E.g Cube Formation)
-
Formation -> Vertex Formation, select the formation(E.g Cube Formation) and its corresponding material_collections(E.g Cube Material). Click the Append Button. The Empty Objects in the formation will reach the location of the "drones" Vertex Group
What's the Append mean in here?
The Empty Objects in the select formation will copy the location of the vertices in the "drones" group of the select Material
- In the Timeline Editor, set up the Current Frame to begin the new scene
Formation -> Append, select formations(E.g Cube Formation) , click Begin Button - In the Timeline Editor, set up the Current Frame to finish the new scene changing
Formation -> Append, click Append Button. Move the Playhead, we could see how the drone scene change(make sure the auto resign have been "√")
What's the auto resign mean in here?
Through the algorithm, the drone will be automatically assigned to a suitable position in the next formation, making the overall distance of movement the shortest.
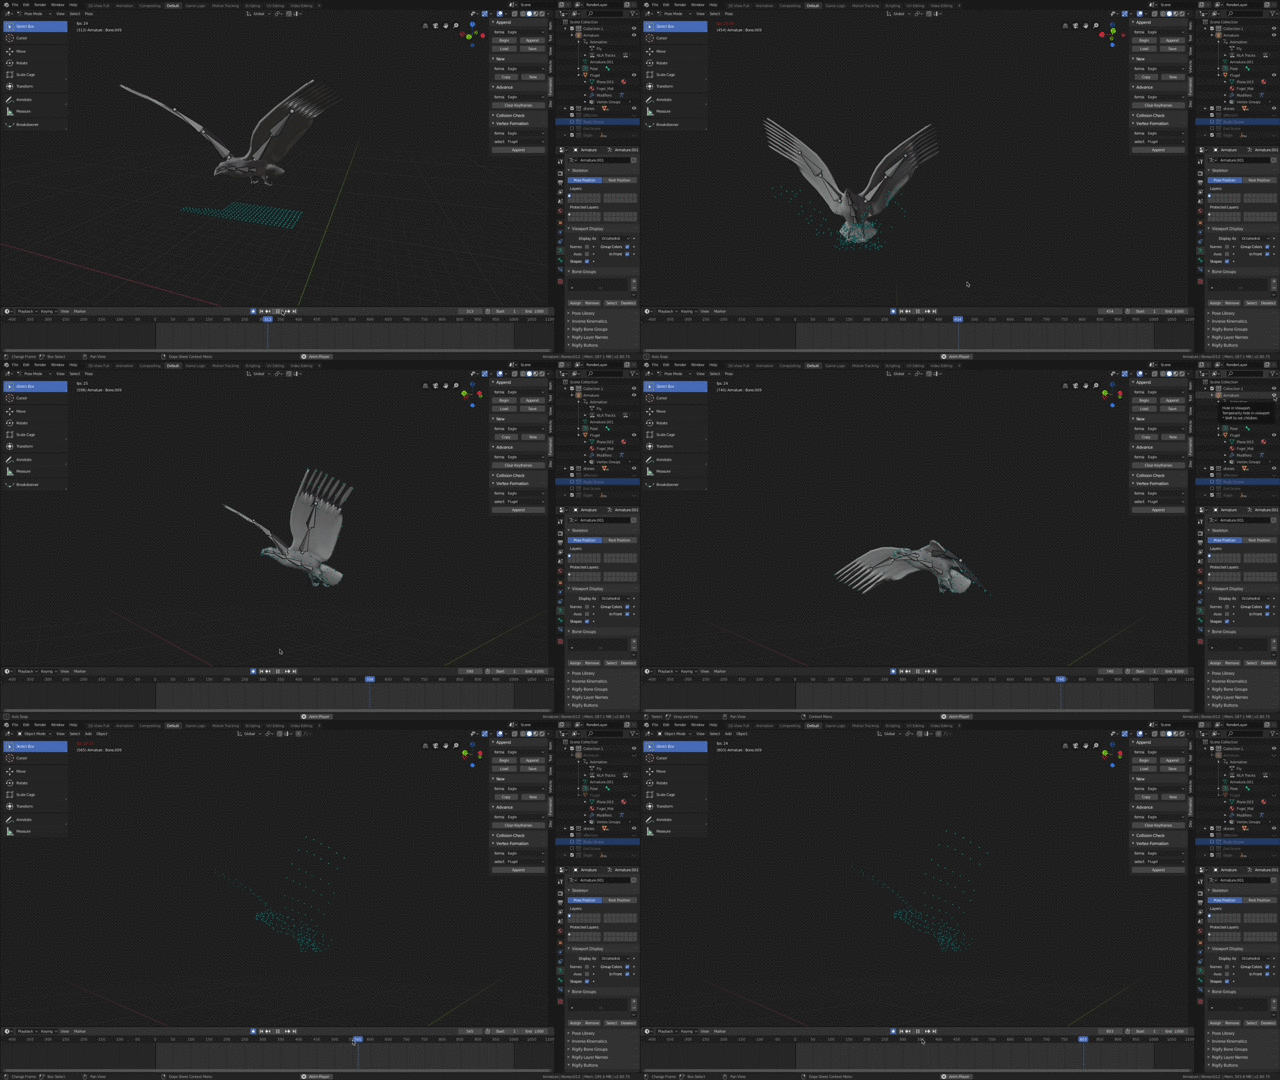
Transform the Drone Scene
- Select the Mesh Object in the material collections, Item -> Transform. You could add keyframe of Location, Rotation or Scale to add animation of teh Mesh Object, so the Drone Scene can be transformed.
- You could also deform the Object vertices or control points, or add Inherited animation(E.g armature) to the Object to make the animation. The Object has the animation, then the Drones have the animation.
More details about Animation
Operation Video
About drone formation management
We use empties (Copy New Formation) and material (New Material Collection) to manage the drone formation.
The keyframe is added on the empties when Takeoff and land, others are suggested to add on the Material objects.
-
Keyframe:
- On drone:
Formation -> Append -> Begin and Append. After Append, the drone will follow movement of the empty(New Formation).
Led -> Led Magic -> Preview -> Add keyframe - On Empty:
Begin Scene & Smart Landing Formation - On material Object: After Vertex Formation -> Append, the empty will follow movement of the material.
So each formation is individually added with keyframe. When you want to adjust the formation, you can reuse the material(file -> Append). It is quickly to redo the project. Otherwise, if all keyframes are added on the drones, it is hard to when you want to re-edit. Maybe it needs to restart the project.
- On drone:
Auto Resign Lock Selected
Auto Resign Lock Selected: enables partial object locking when paths are Auto assigned
Lock Selected: Lock items and it will not resign in auto resign process
Clear Lock: claer all auto resign locked items
Show Locked Items: show auto resign locked items
How to use Auto Resign Lock Selected function?
-
Copy from the current formation
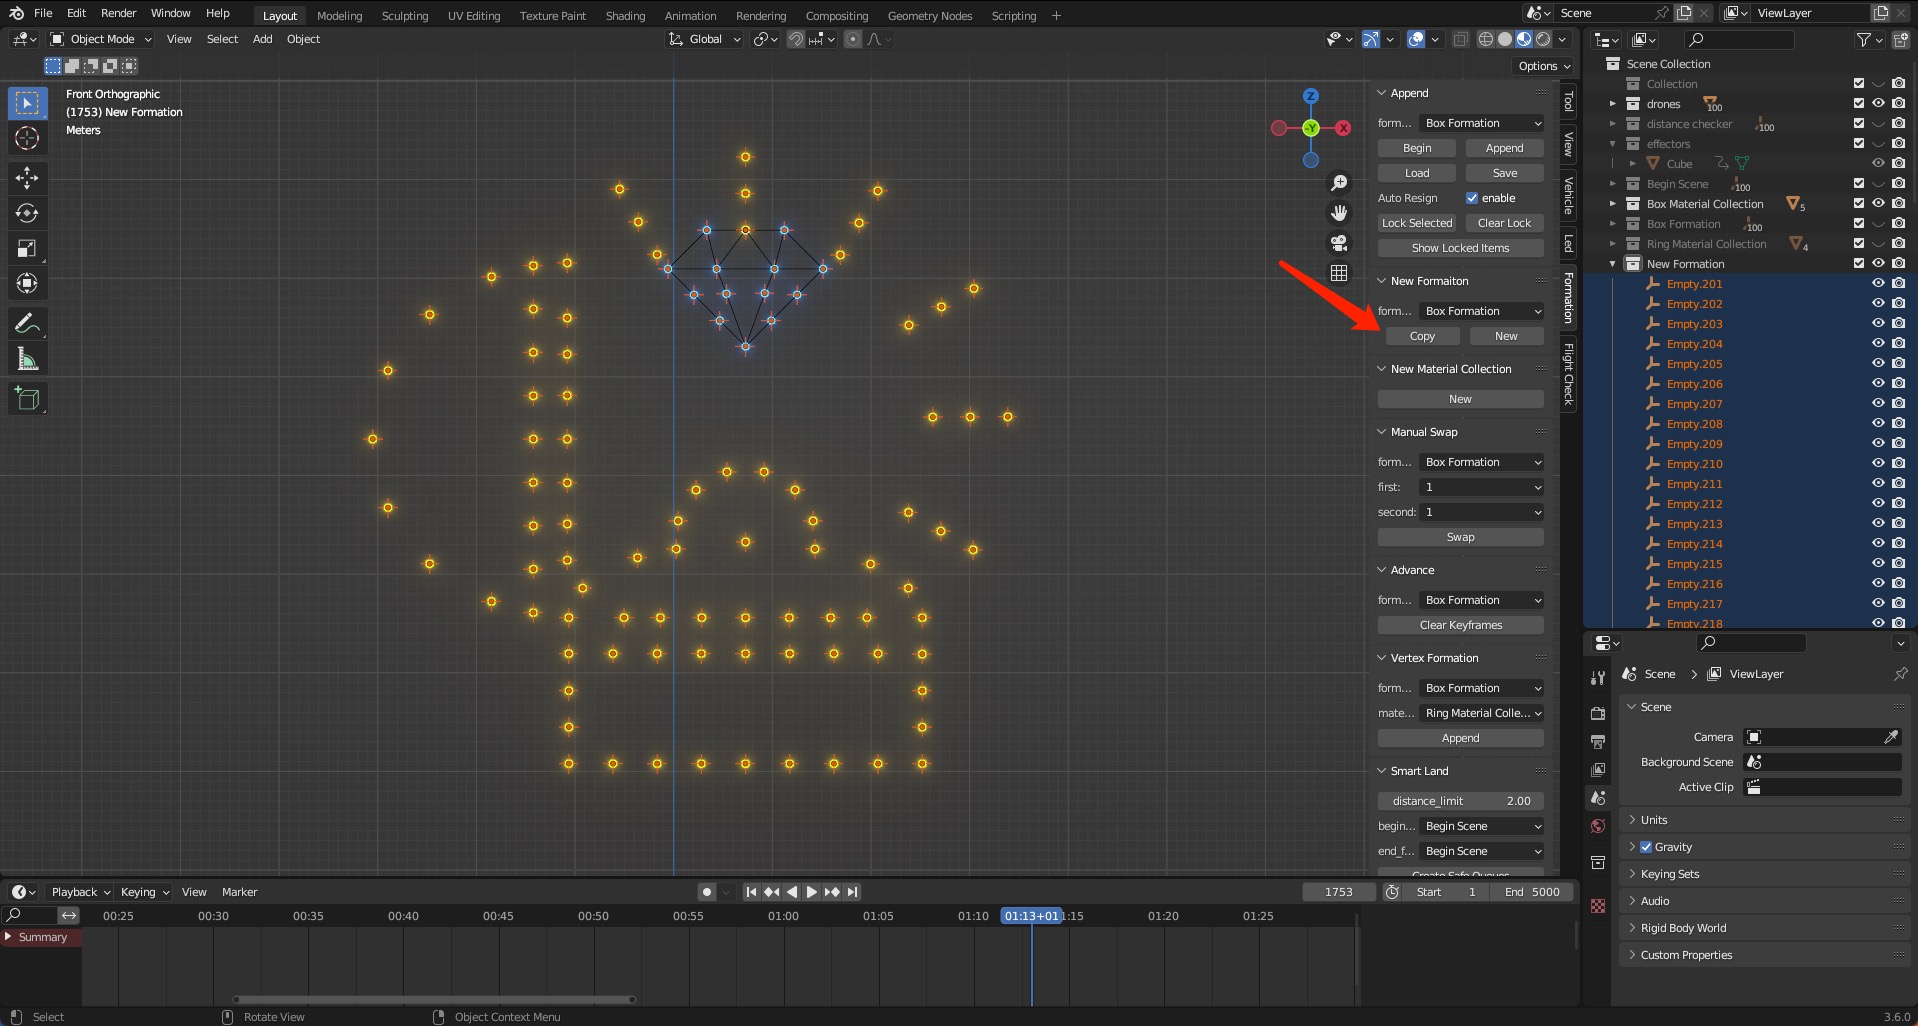
-
Please select the empties of New Formation that you don't want to move. Click the Lock Selected button.
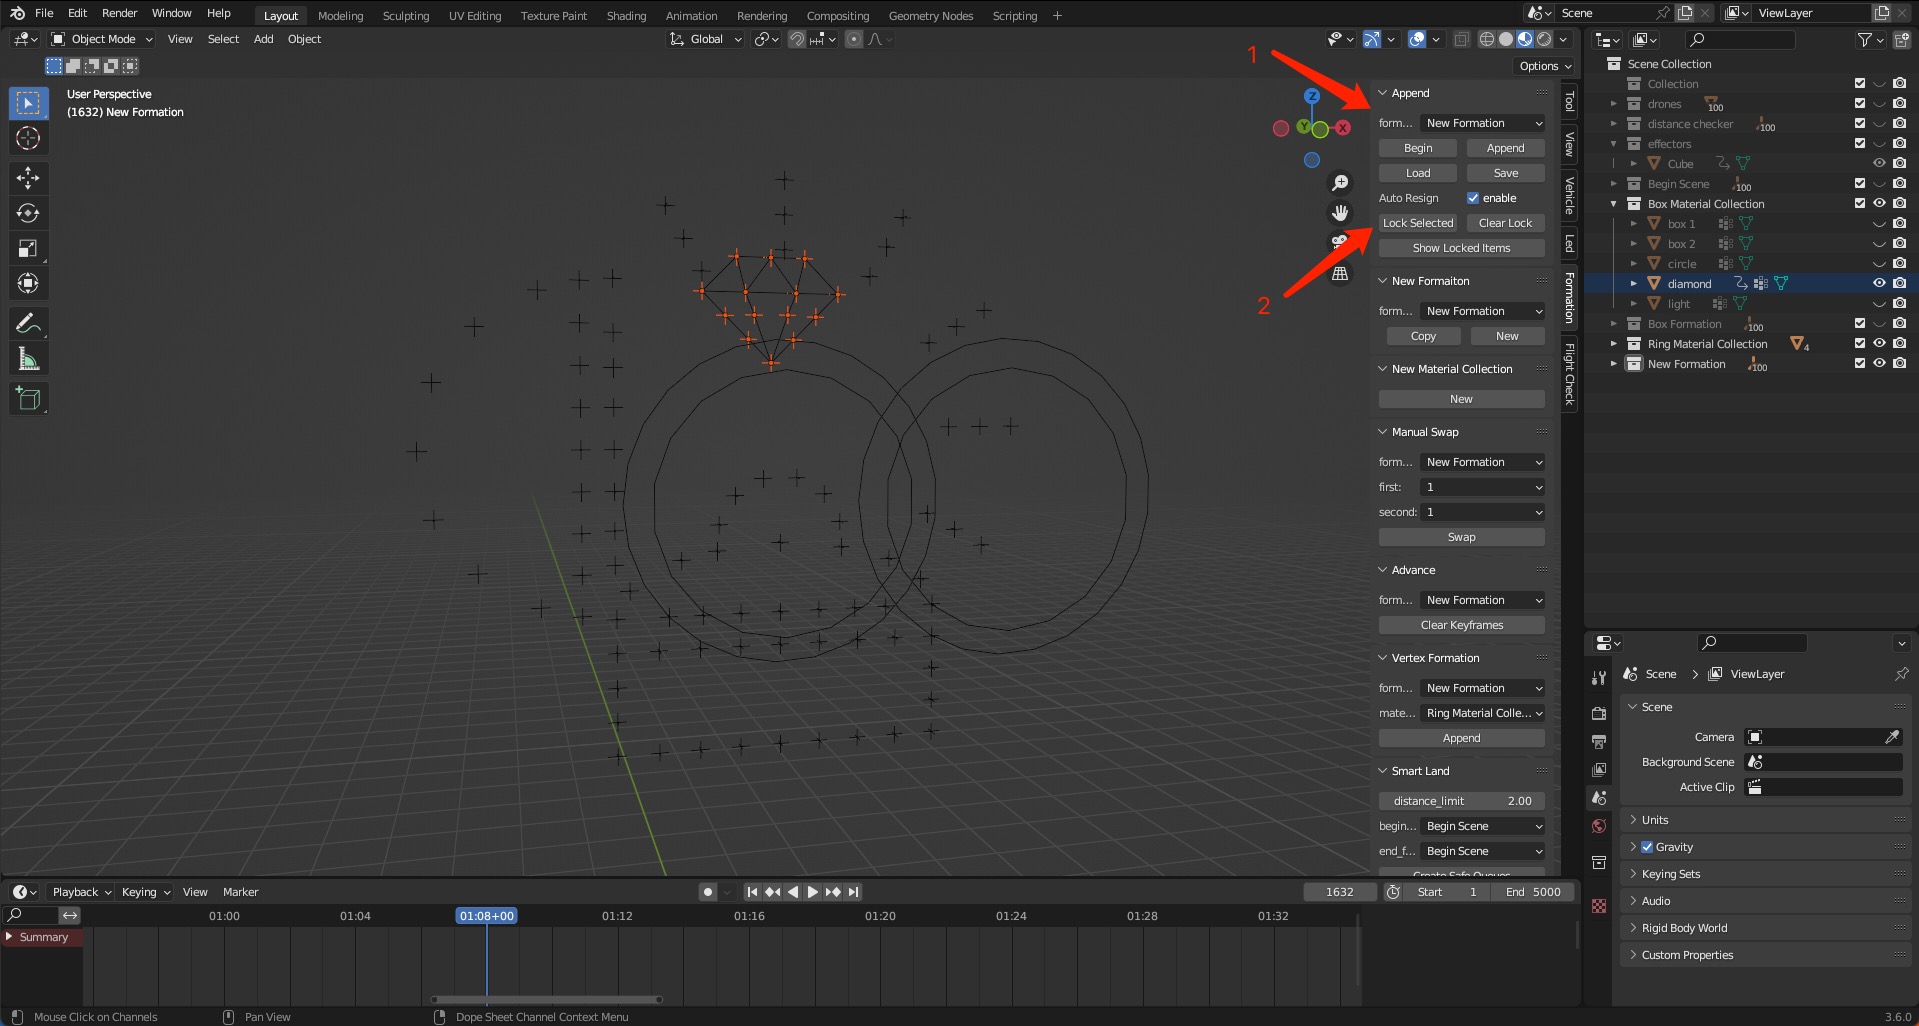
-
Then in the Vertex Formation, click Append button. Only the vertex without lock will make the transfer.
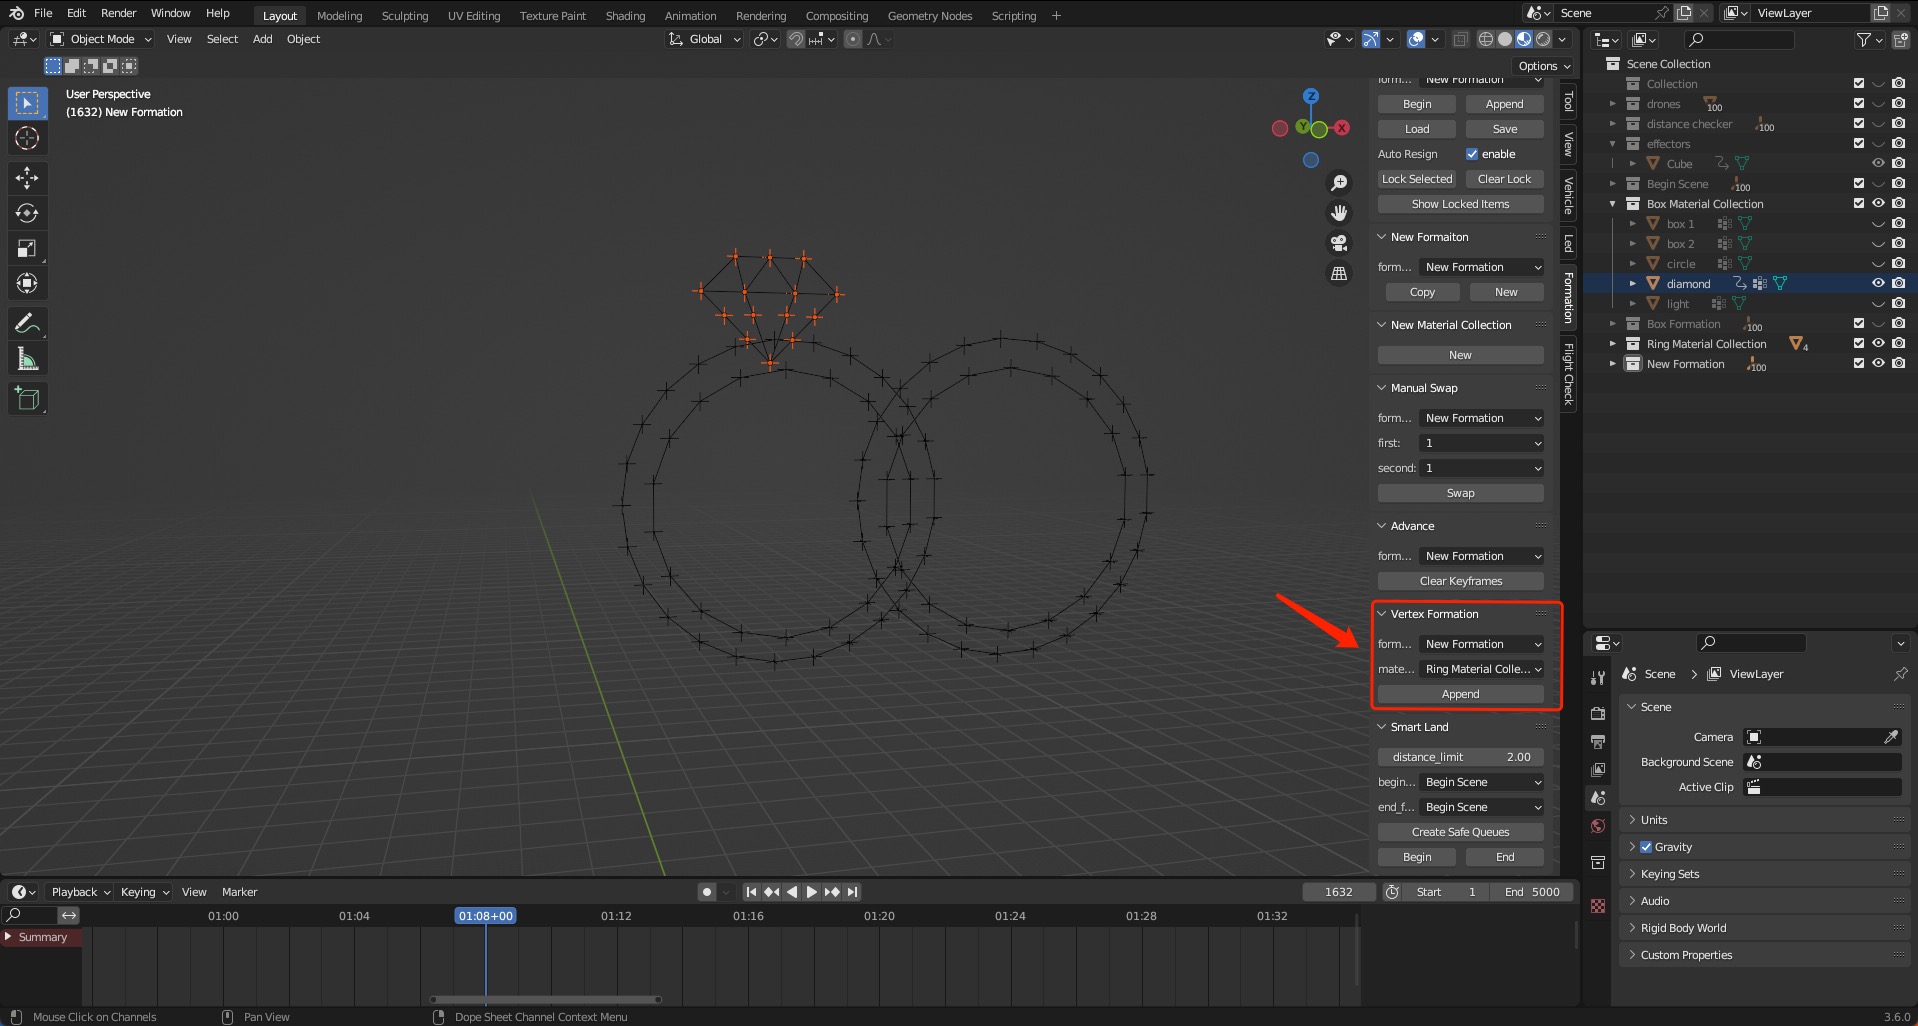
-
Finish the transfer of the Begin and Append the drones in the New Formation

Tips
- Click the window and cancel the selected. Click the Show selected Items for check.
Select the empties that you don't want to Lock, please click the Clear Lock button. - The empties number without lock should be the same as the assign vertex number of the new material object(s).
Operation Video
Smart Land
- Formation -> New Formation
Copy the Begin Scene as the End Formation. If we don’t set the time frame, it will copy its last status. Adjust the location and Scale of the End Formation. It needs below the last scene in the view. - Formation -> Smart land
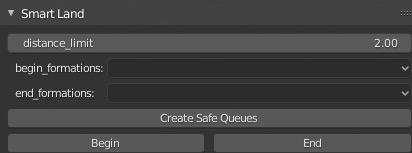
Select the begin_formations as the last scene of the show. Select the End_formations as the End Formation. Click Create Safe Queues Button. When the calculation is finish, it shows the INFO: “xx safe queues create(xx means the Quantity)” and “Calculation processing. It will take a while”. The larger the Scale of End Formation, the smaller of the quantity of safe queues create. It also create two new Collections: Smart Landing Path(show the path of landing) and Smart Landing Formation(copy the location of last scene). Set the time frame to Begin and End the Smart Landing Formation. The Empties of the Smart Landing Formation will follow the path to the End Formation. - Formation -> Append
Before begin Smart Landing Formation, set the time frame to Begin and Append the Smart Landing Formation. We must remove the “√” on from of auto resign. So the drones will append the The Empties in order. Now the drones will follow the path to the End Formation. We could still adjust the Smart Landing Formation in Timeline. - Finally, we copy the Begin Scene at frame 1 as Land Formation. Formation -> Append, set the time frame to Begin and Append the Land Formation.
Operation Video
Add Color
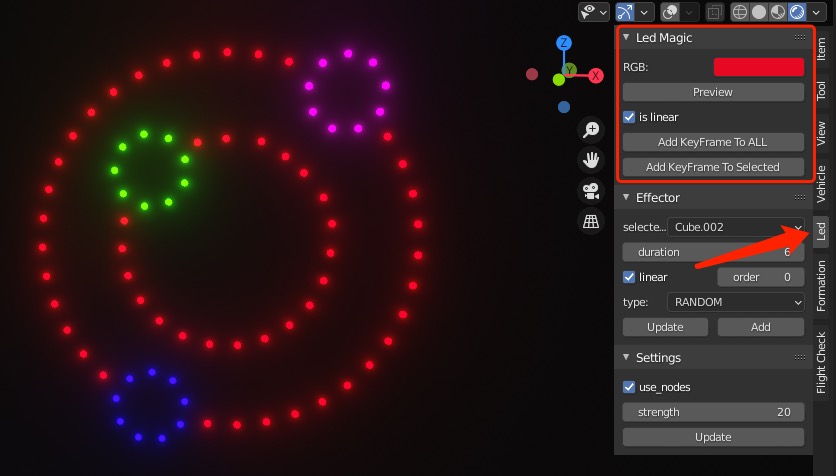
- Led -> Led Magic -> Preview
Select your target drones, select the color you like in color picker, click Preview Button, the drones color will be changed. (Select other drones, same operation as above) -
Make a "√" in from of the is linear, click Add KeyFrame To All Button to add keyframe to all drones.We will the drone led color linear change
-
If we click Add KeyFrame To Selected Button, only the selected drones will add the keyframe
-
remove "√" in from of the is linear, then Add Keyframe. In the Timeline, we can see we have inserted two keyframes, it means that the color of drones suddenly change.
Operation Video
Add Effector
Add Effector Color
- Click the effectors Collection in the Outliner. In the 3D Viewport, select Menu Bar Add -> Mesh, select the effector shape you like.
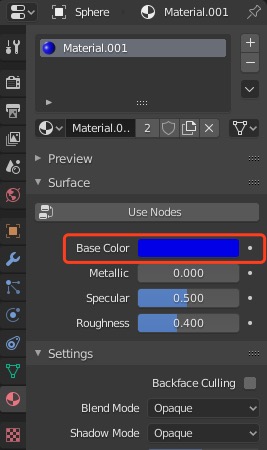
- In the Properties Editor, select Materials tab, click + New Button to Add a new material.
In the Surface Panel, click Use Nodes to remove the property(gary background means unselect). Then we could choose any effector color you like.
Add An Empty Object to Parent with effector shape Mesh
(This part could be skipped, it isn't affect the final effect)
- Led -> Effector -> Add
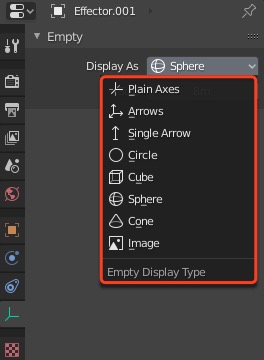
We add a Empty in the effectors Collection. In the Properties Editor, select Object Data tab, we can change the Display of the Empty. Usually, we make the same shape and size of the Empty and the Mesh.
- First select the Mesh, then select the Empty.
In the 3D Viewport, select Menu Bar Add -> Object -> Parent -> Object (Shift + P ). We can click the eye of the Mesh in the effector Collection to Hide the it.
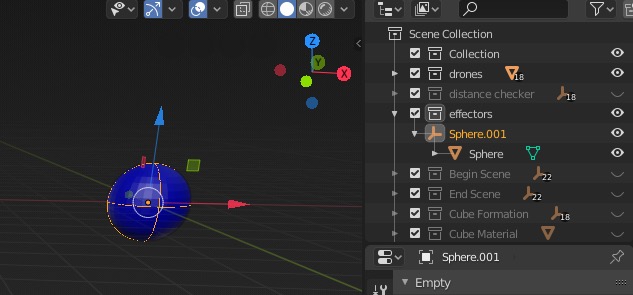
Transform Effector
-
When we transform the Empty Effector, so the Mesh transform. Now we can add some animations to the Empty Effector. When the drones inside the Empty, the color of these drones will be changed to the color of the Mesh.
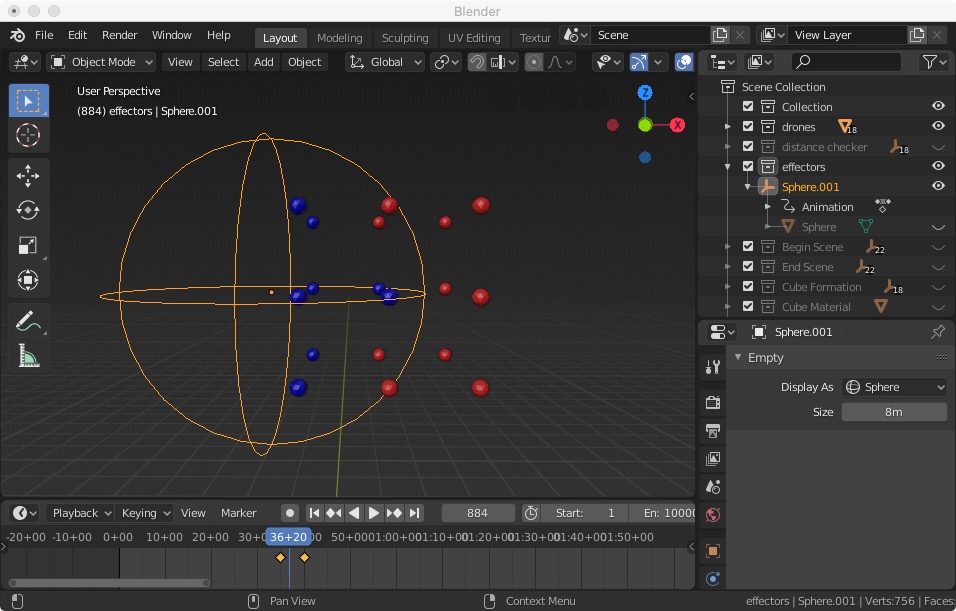
-
If we add more Effectors to the drones at the same time, the color of drones will depend on the latest Effector
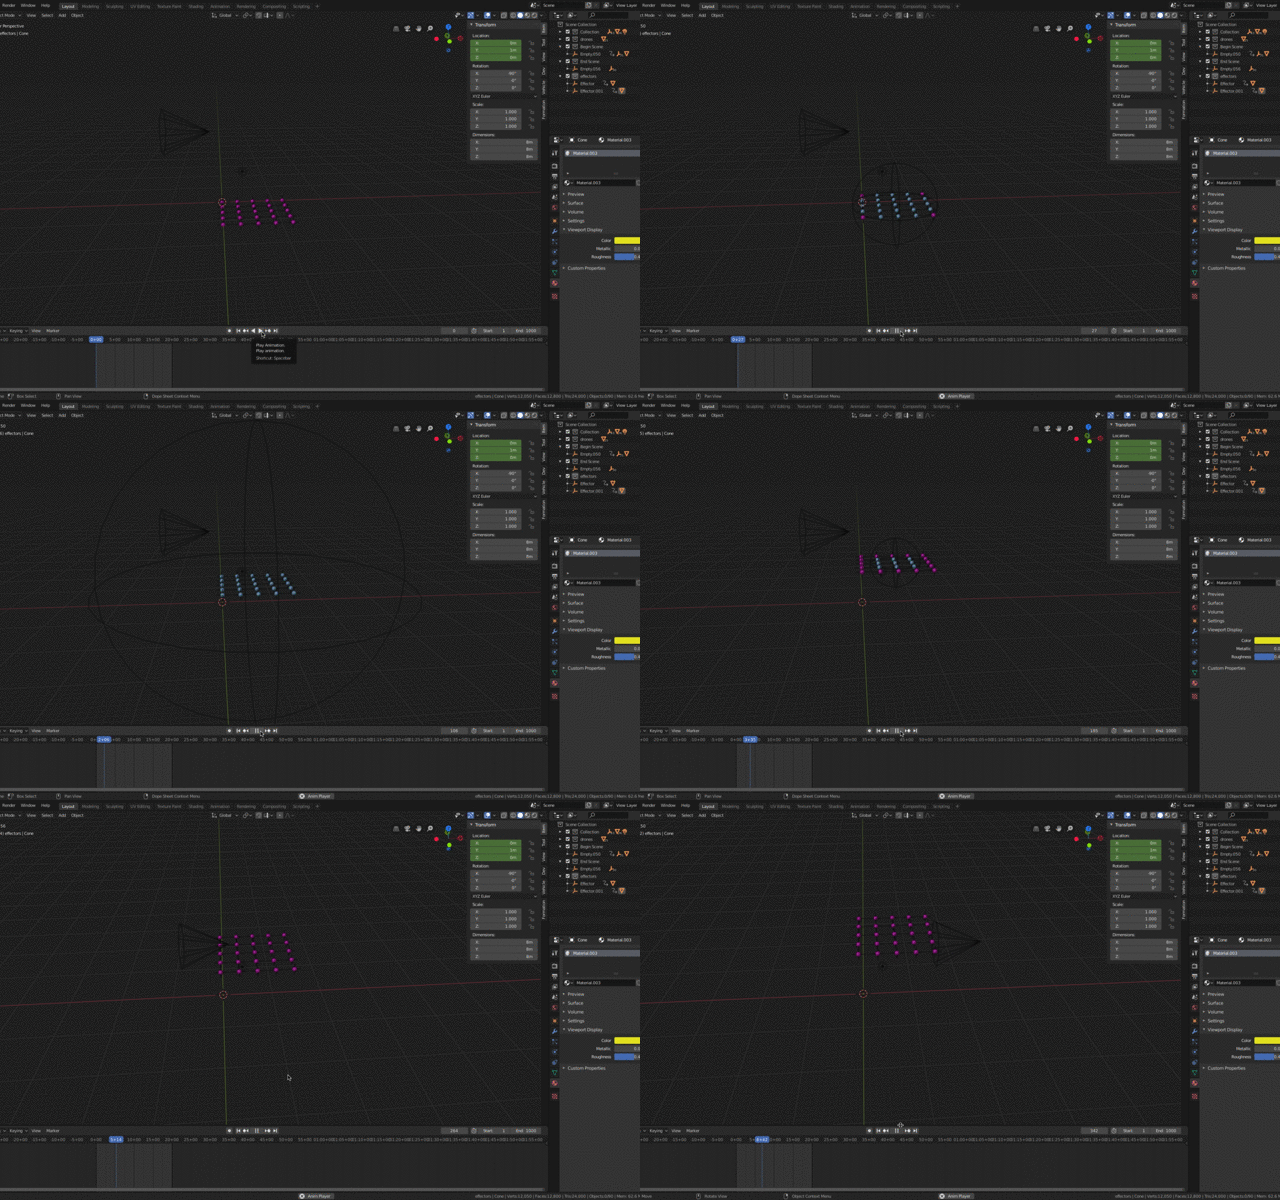
Operation Video
Set the Effector LED Type
-
What are the types of the Effector LED?
- DEFAULT: one color
- RANDOM: two or more different colors change randomly
- ORDERED: two or more different colors change in order
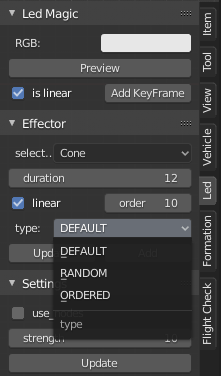
- duration: the higher the value, the faster the color changes
- linear: two color change gradual,if remove the "√" ,two colors change suddenly
- order: if the drones are inside two or more Effectors at the same time, we could set the valve to change the effector order. The higher the value, the higher the priority is to affect the color of the drone.
-
Select the effector mesh, add one or more material and set the colors
- Led -> Effector
- Choose selected_effector, set the duration, if linear, set the order, choose effector type
- Click update
- Play the animation
Operation Video
About the drone color
-
The LED light could be off (black) when the drones take off. Also, it needs to add a color keyframe to the drones at the beginning. Otherwise, if you add an effector, it will directly affect the color of the drones at the beginning.
-
Add color
- Led -> Led Magic -> Preview -> Add keyframe
The color keyframe is on the drones. We could check the keyframe on the Timeline. The drones will store the color material of the Base Color. - Add Effector Color These is no color keyframe on the drones, but the Effector object will store the color material of the Base Color, also the animation keyframe. In a new project, you could use file -> Append to import the Effector objects.
- Led -> Led Magic -> Preview -> Add keyframe
Keep Effect
This function enables the drones to keep the effector color even when the effector object has been passed by. So we can use this function to draw a picture or write some words.
Example 1:
-
Select all drones. Add a keyframe to all drones with a color, for example, “Black”.
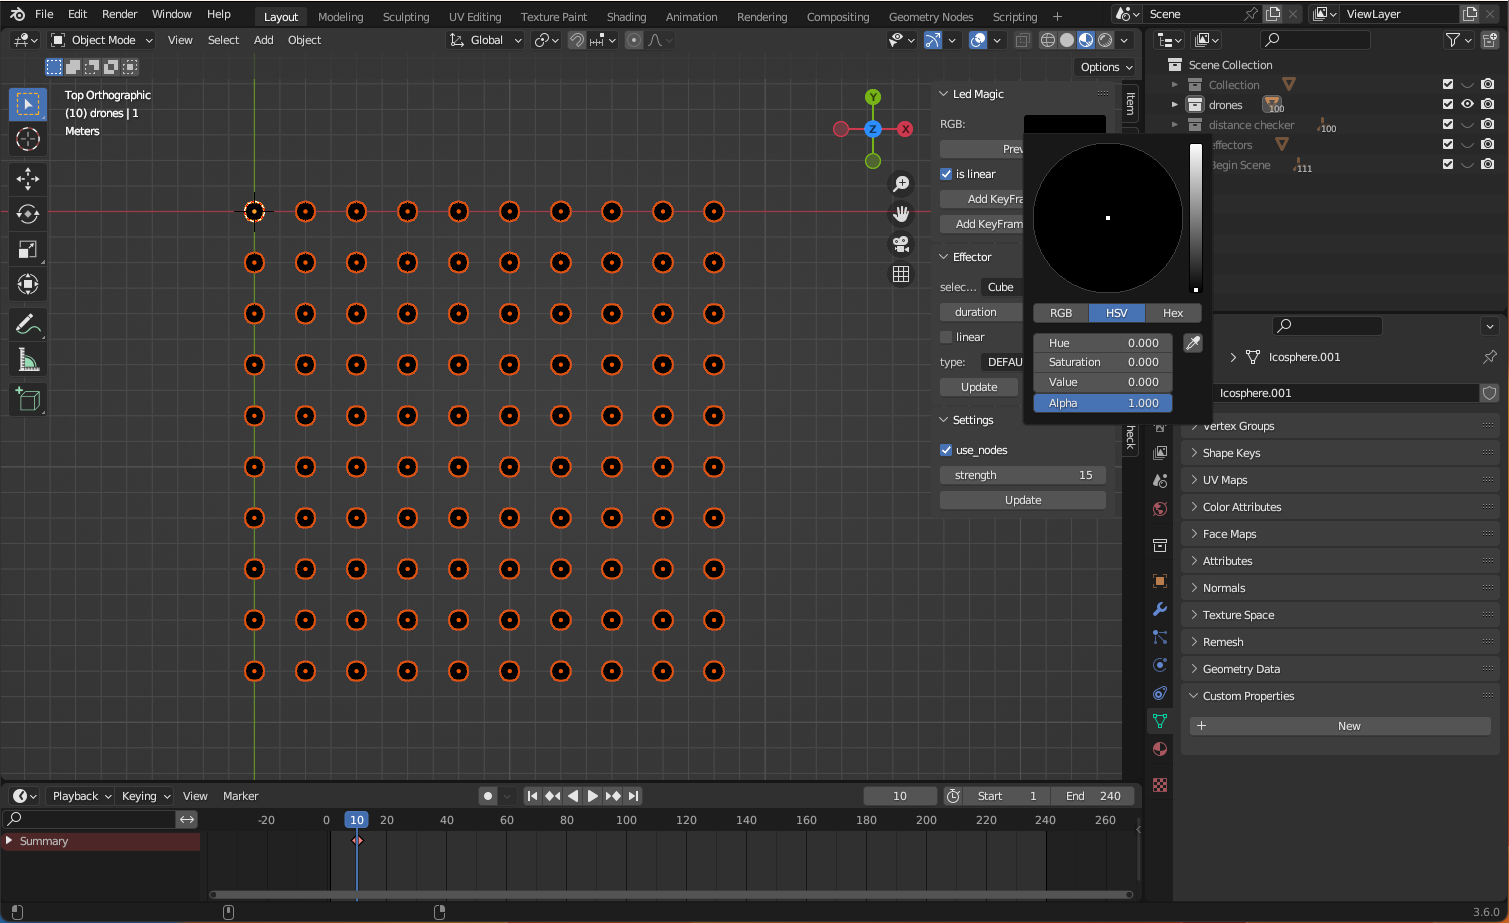
-
Add a Cube to the effectors collection and make a “z” animation. In the Material Properties, add a base color to the cube. The drone will have the effector color only when it intersects with the cube.
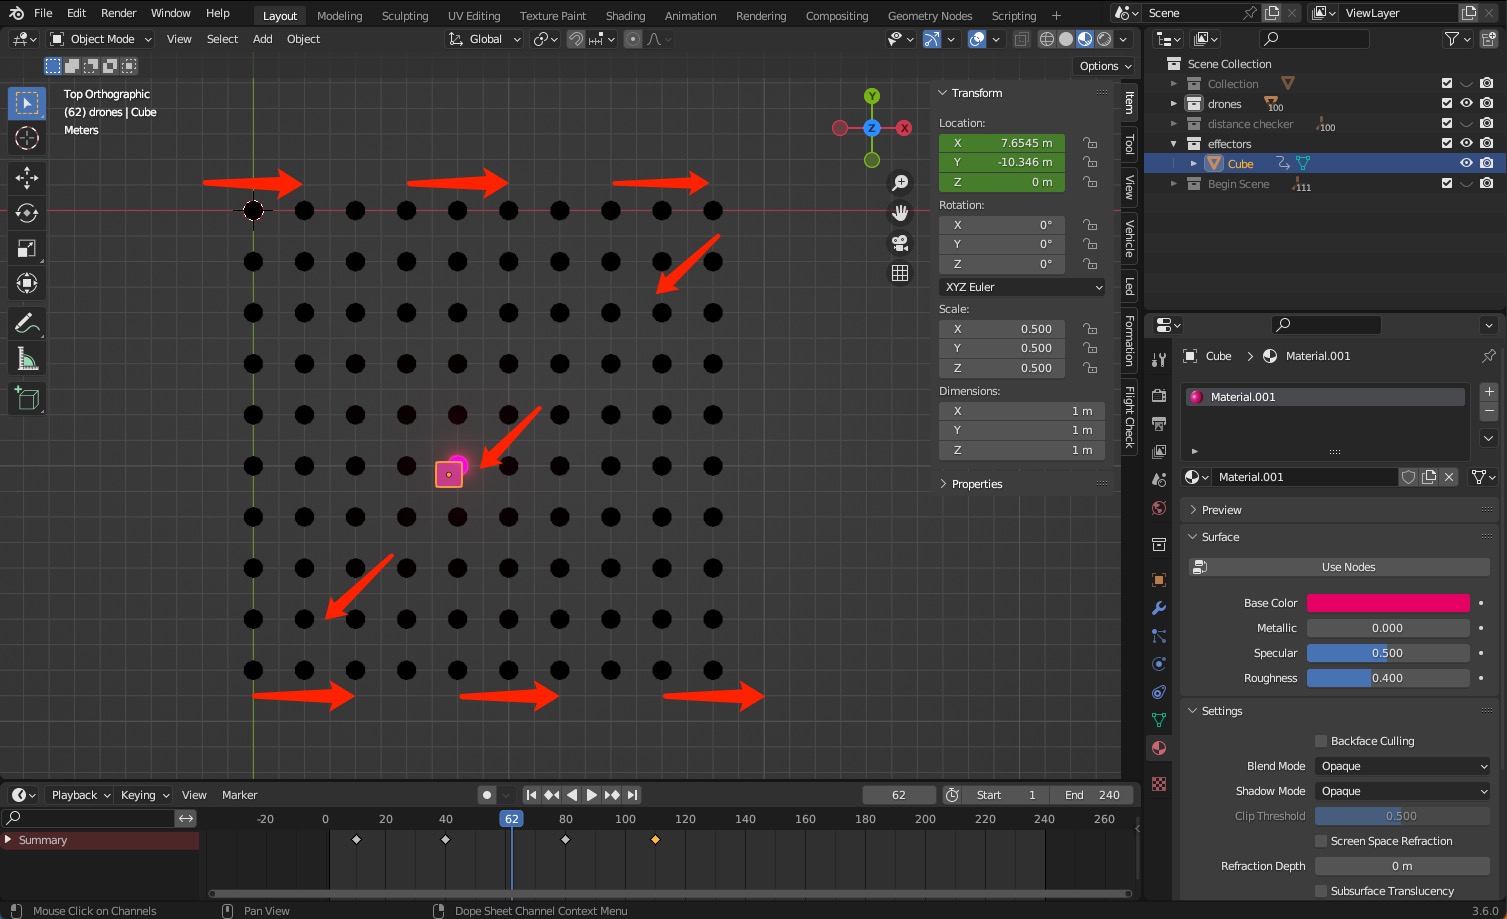
-
Click Date Properties, and make a “✓” with the keep_effect. Play the animation, the drone will leave color traces when the effector cube passes by.
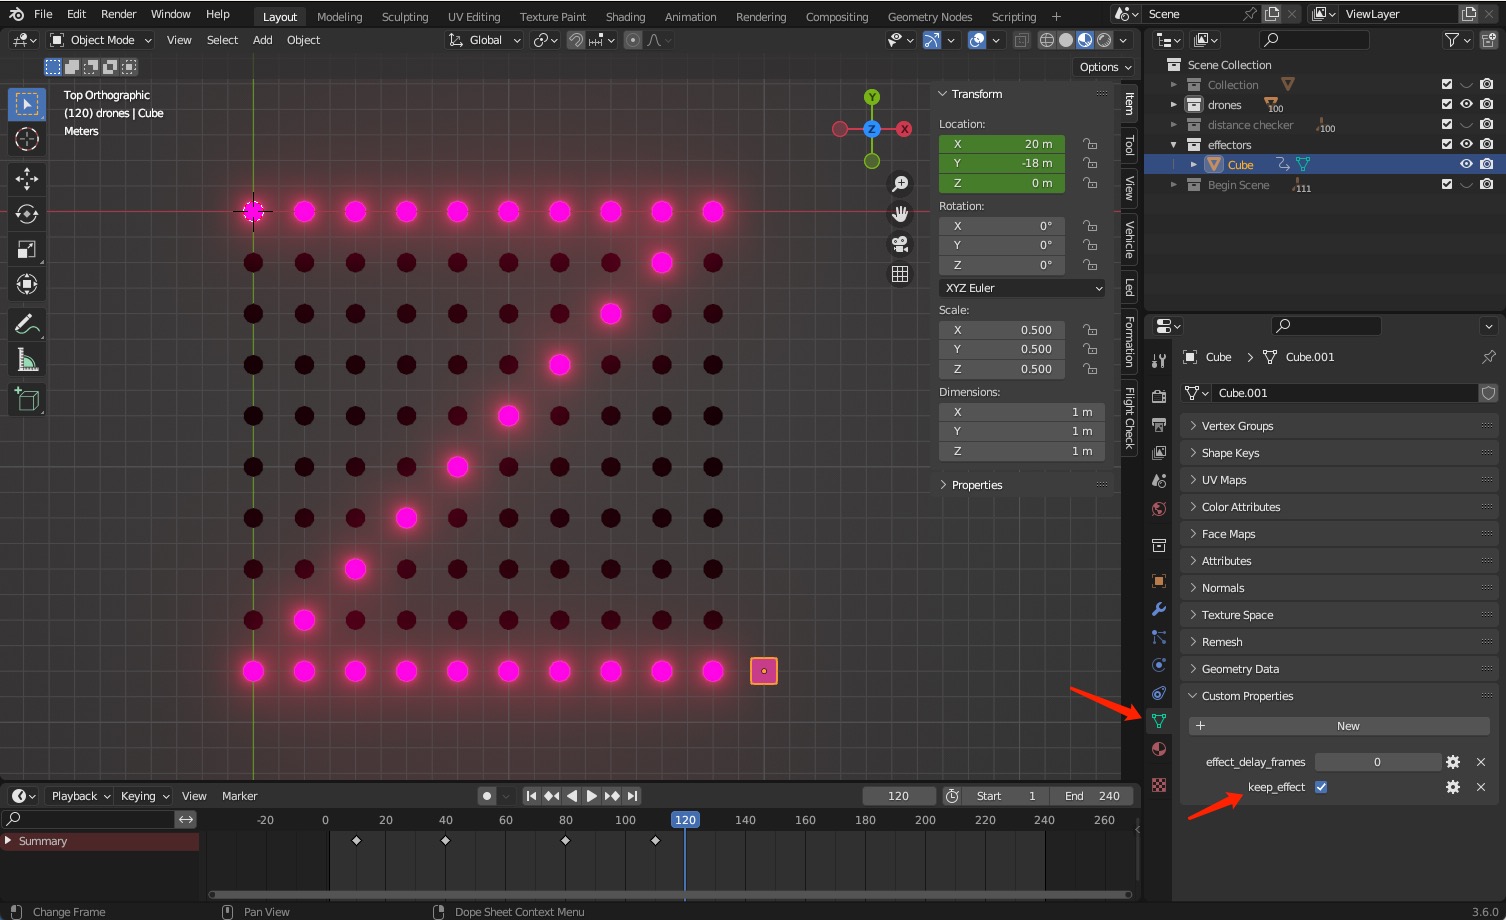
-
Set the keyframes to Keep effect and not Keep effect. Right-click on the box to select Insect Keyframe, or Press “I”.
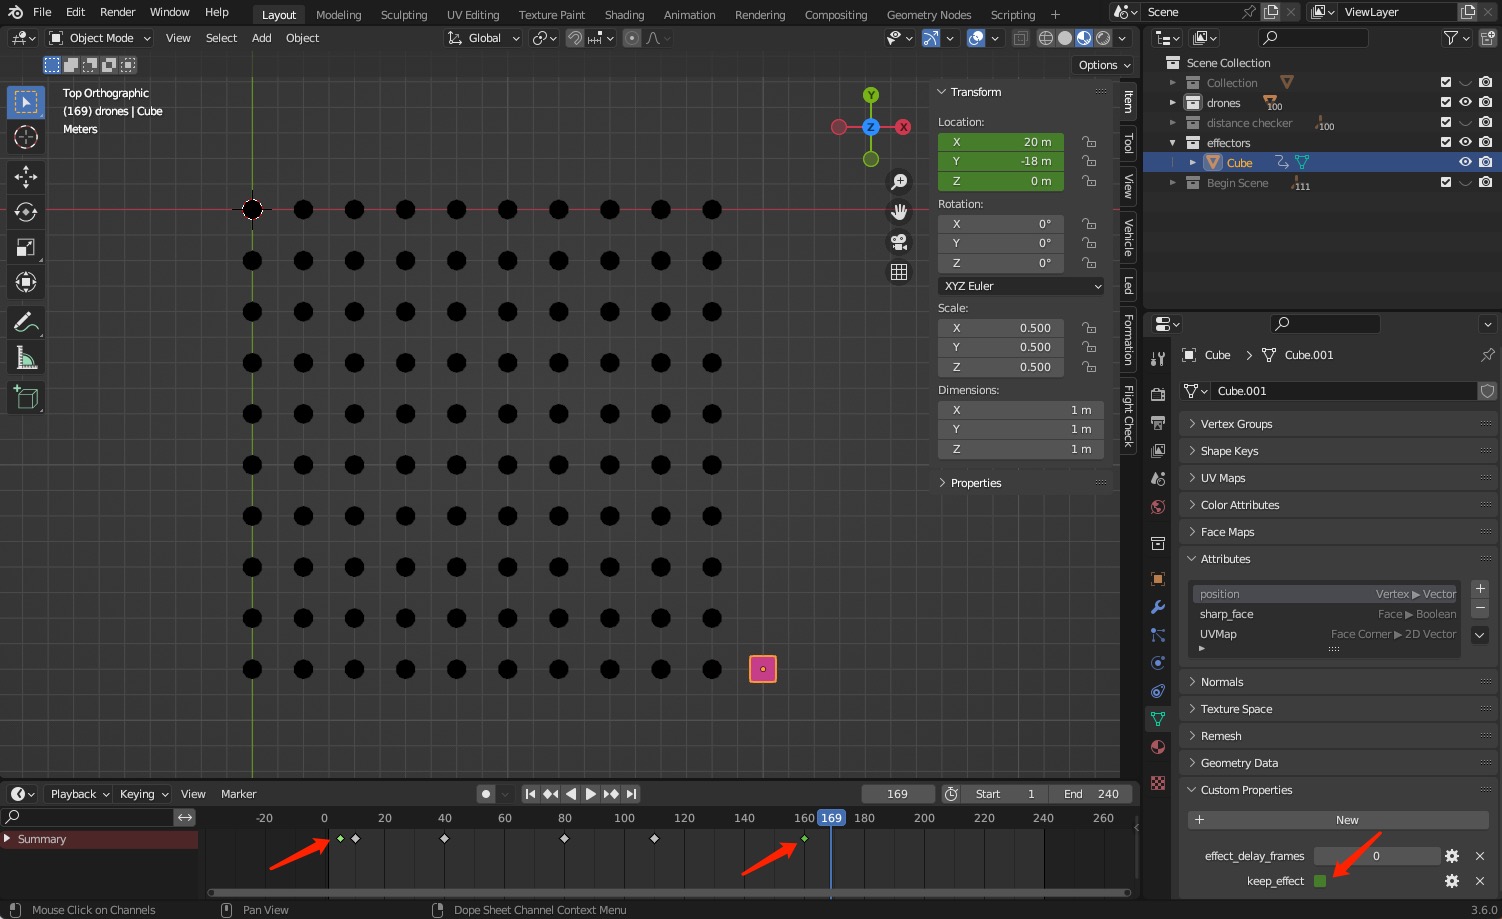
-
If we set a value for effect delay frames, for example 150, that means the drone will keep the color when the effector cube passes by for 150 frames, and then it will change the current color of the effector cube.
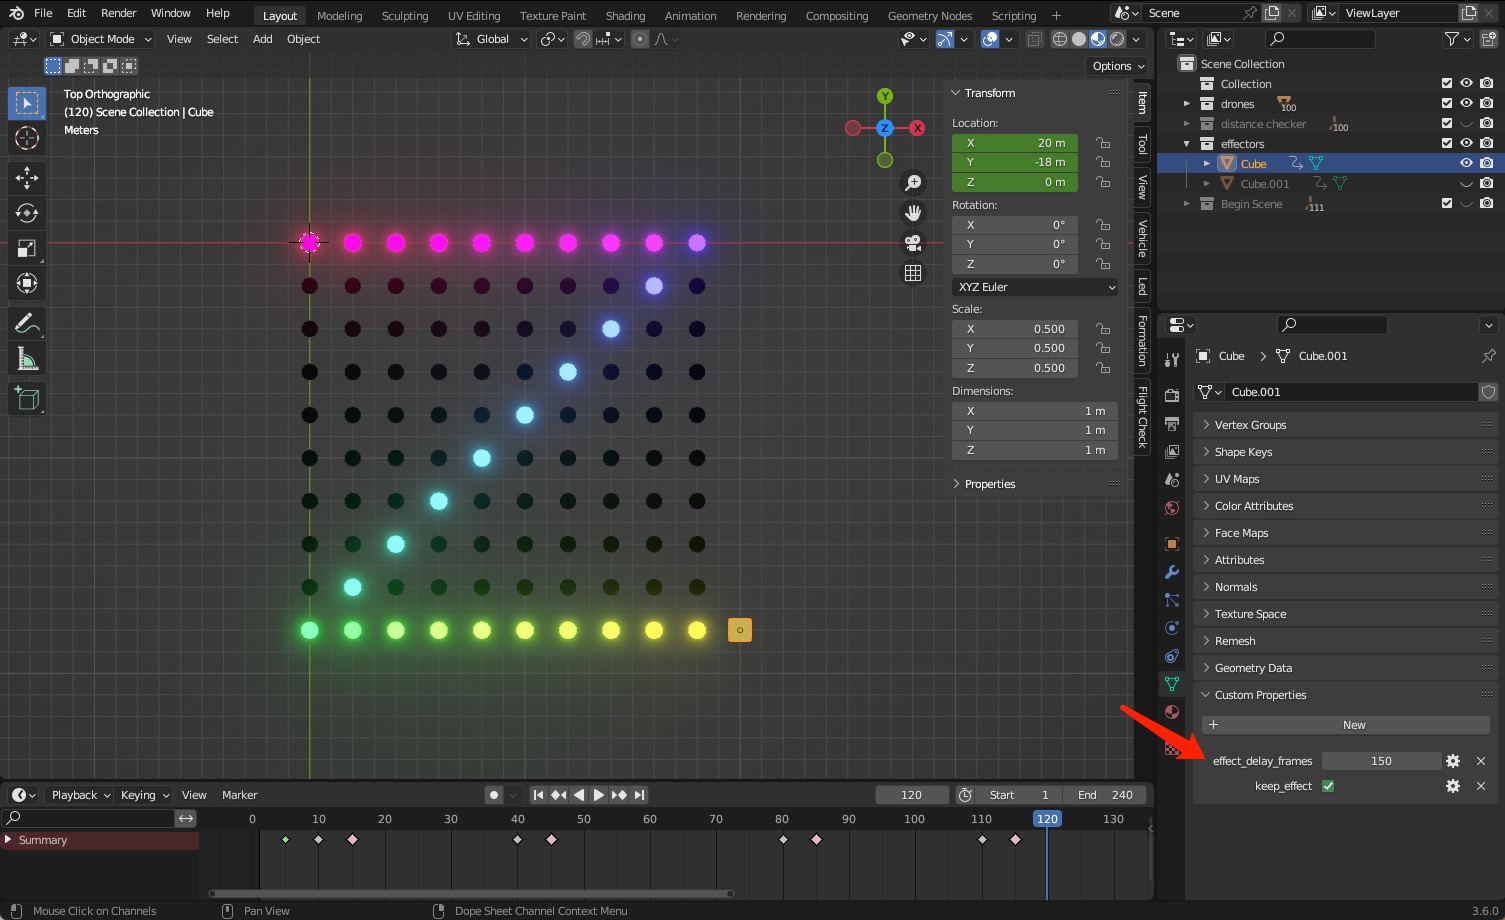
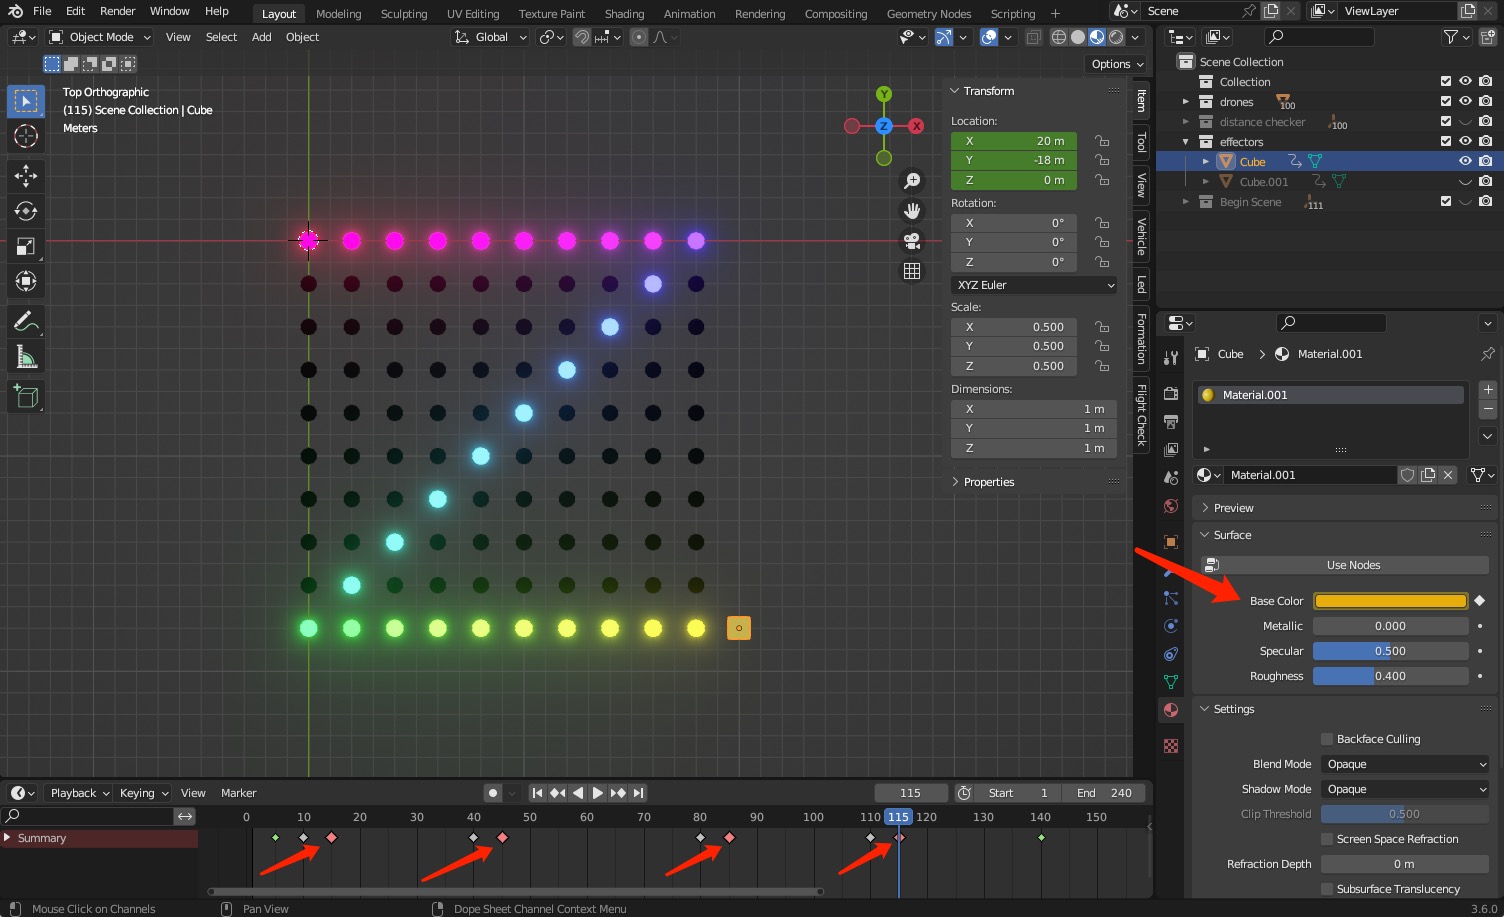
Example 2:
Note
- The effector object cannot move too fast, otherwise the color may not be displayed correctly after passing by the drone.
- Moving the timeline, colors are not displayed correctly. Please play animation at the start frame.
- The effector object can’t add two Material colors with the effector linear function.
- Please pay attention that the effector should be moved away or disappear after the scene. So it could not affect the other formation.
- If there isn't have the Check box with the Keep_Effect, please input "1" means open the Keep_Effect, input "0" to turnoff the Keep_Effect.
Flight Check
Vehicle -> Flight Check, make a "√" in from of the enable
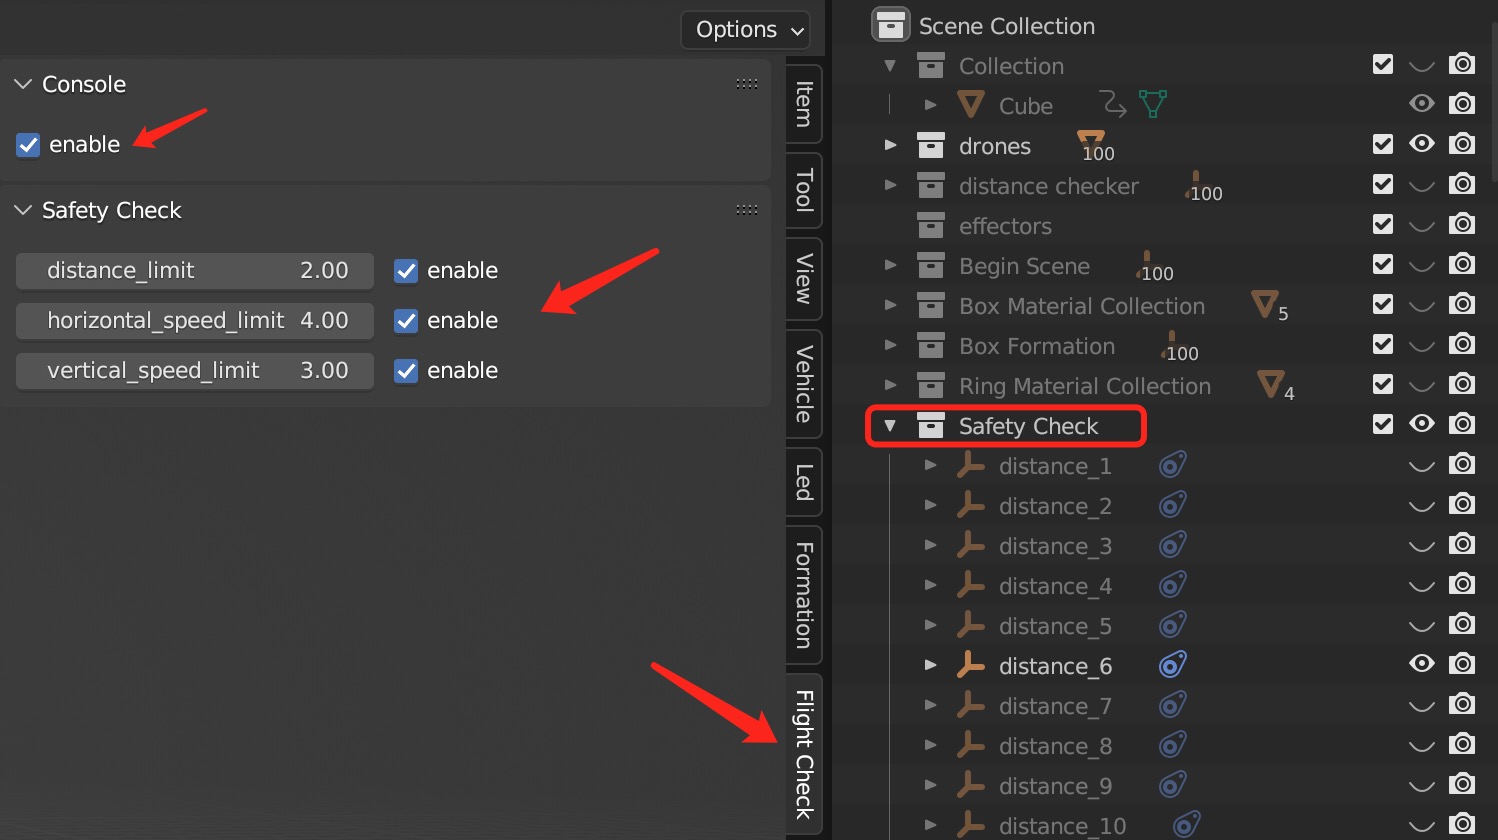
Safety Check
- When we open a project, there is a Safety Check collection.
- We could set the value of the distance Limit, horizontal speed limit and vertical speed limit.
- Play the animation, if the drone's distance and speed reach the limit, it will appear empty object(s) of this drone.
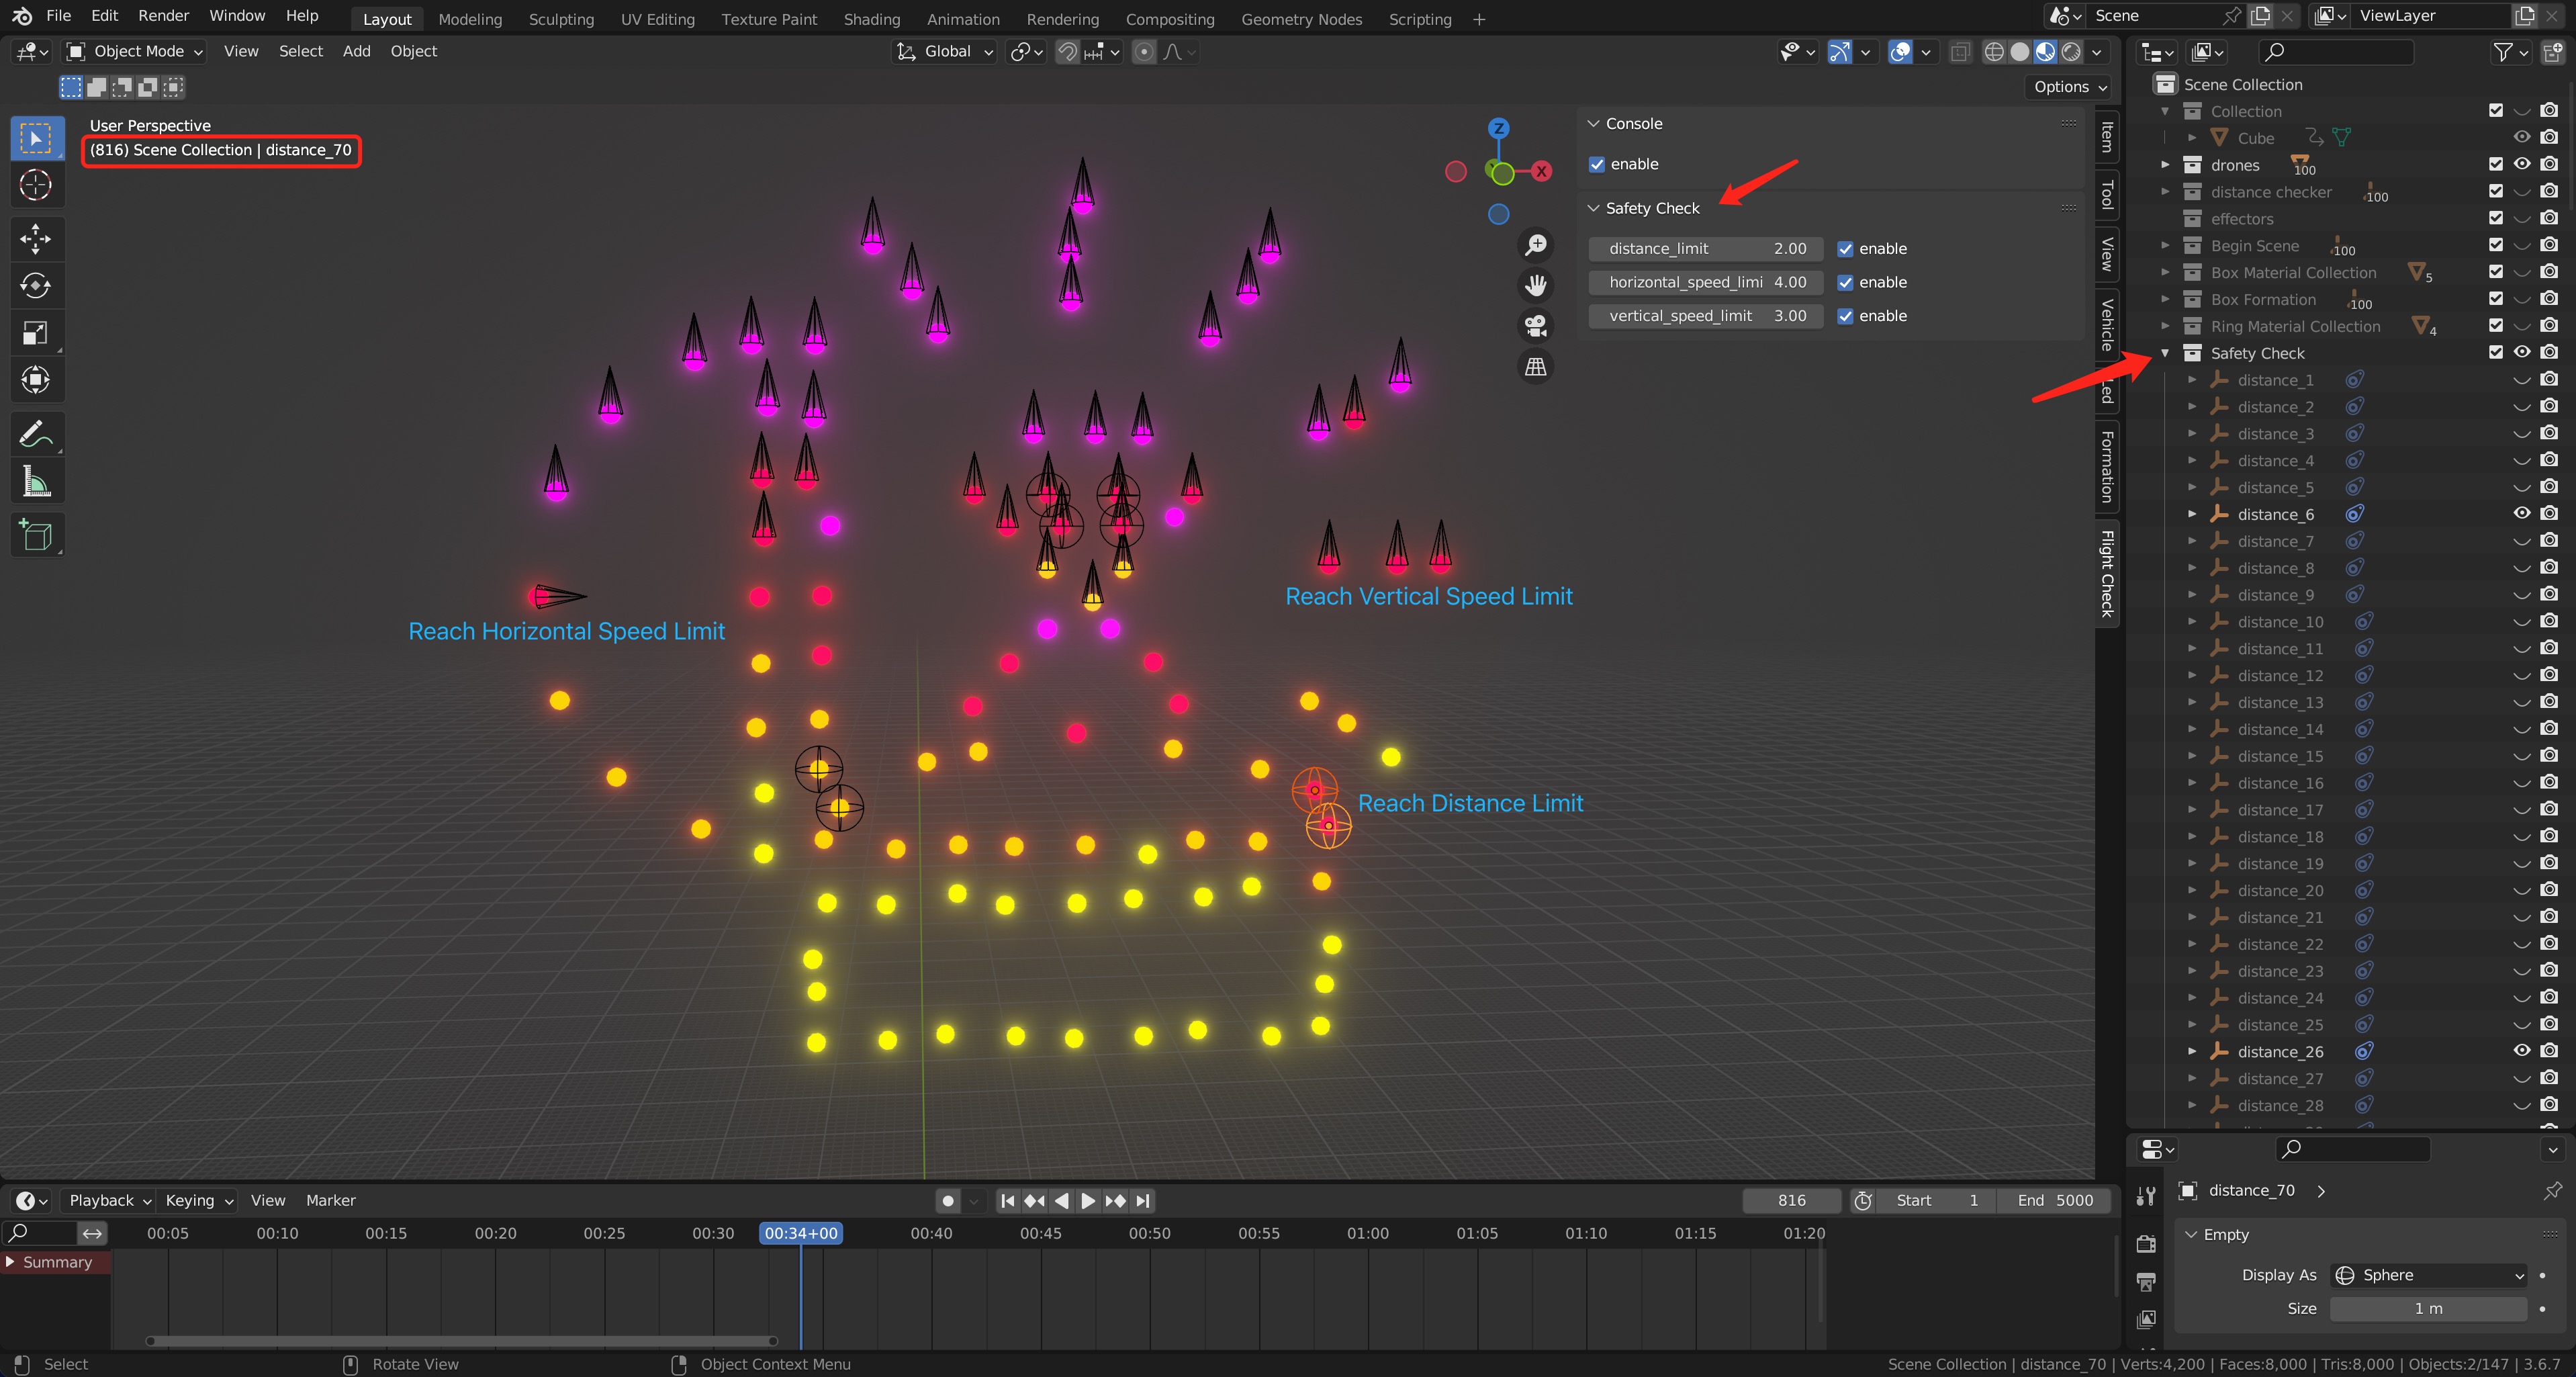
Empty Sphere: Reach Distance Limit
(The dimension of the sphere is same as the distance limit value)
Empty horizon Cone: Reach Horizontal Speed Limit
Empty vertical Cone: Reach Vertical Speed Limit
- If we want to know the drones' specify value details of the distance and speed, we could open the Console
Console
-
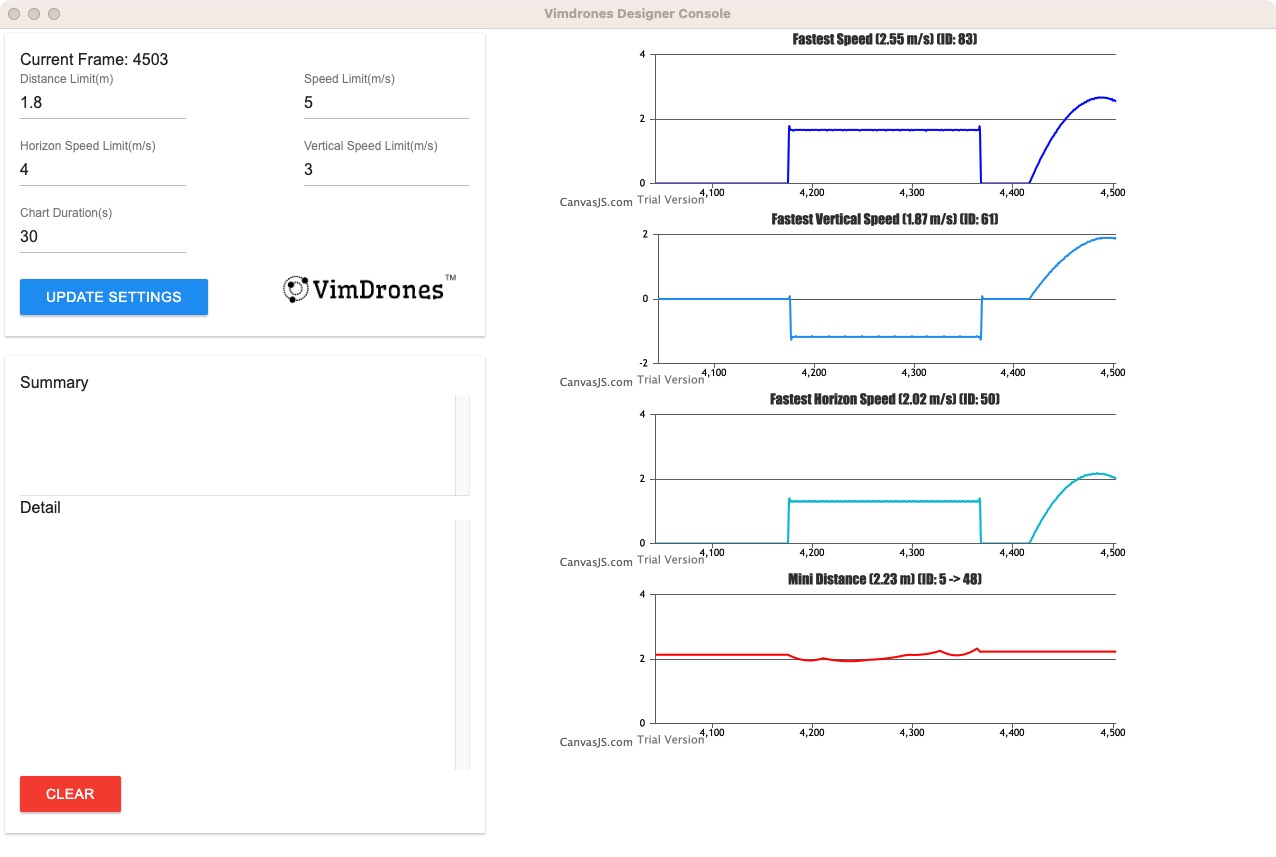
Open Vimdrones Designer, Click CONSOLE, open the Vimdrones Designer Console
-
We could set the Distance Limit, Speed Limit, Horizon Speed Limit, Vertical Speed Limit and Chart Duration, then click the Update Settings Button
-
Play the animation in Blender, we will see those Limits realtime. When the value reach the Limits, it will appears in the window. It shows that two drones reach the limit at that frame
When we don't need those information, we could click the Clear Button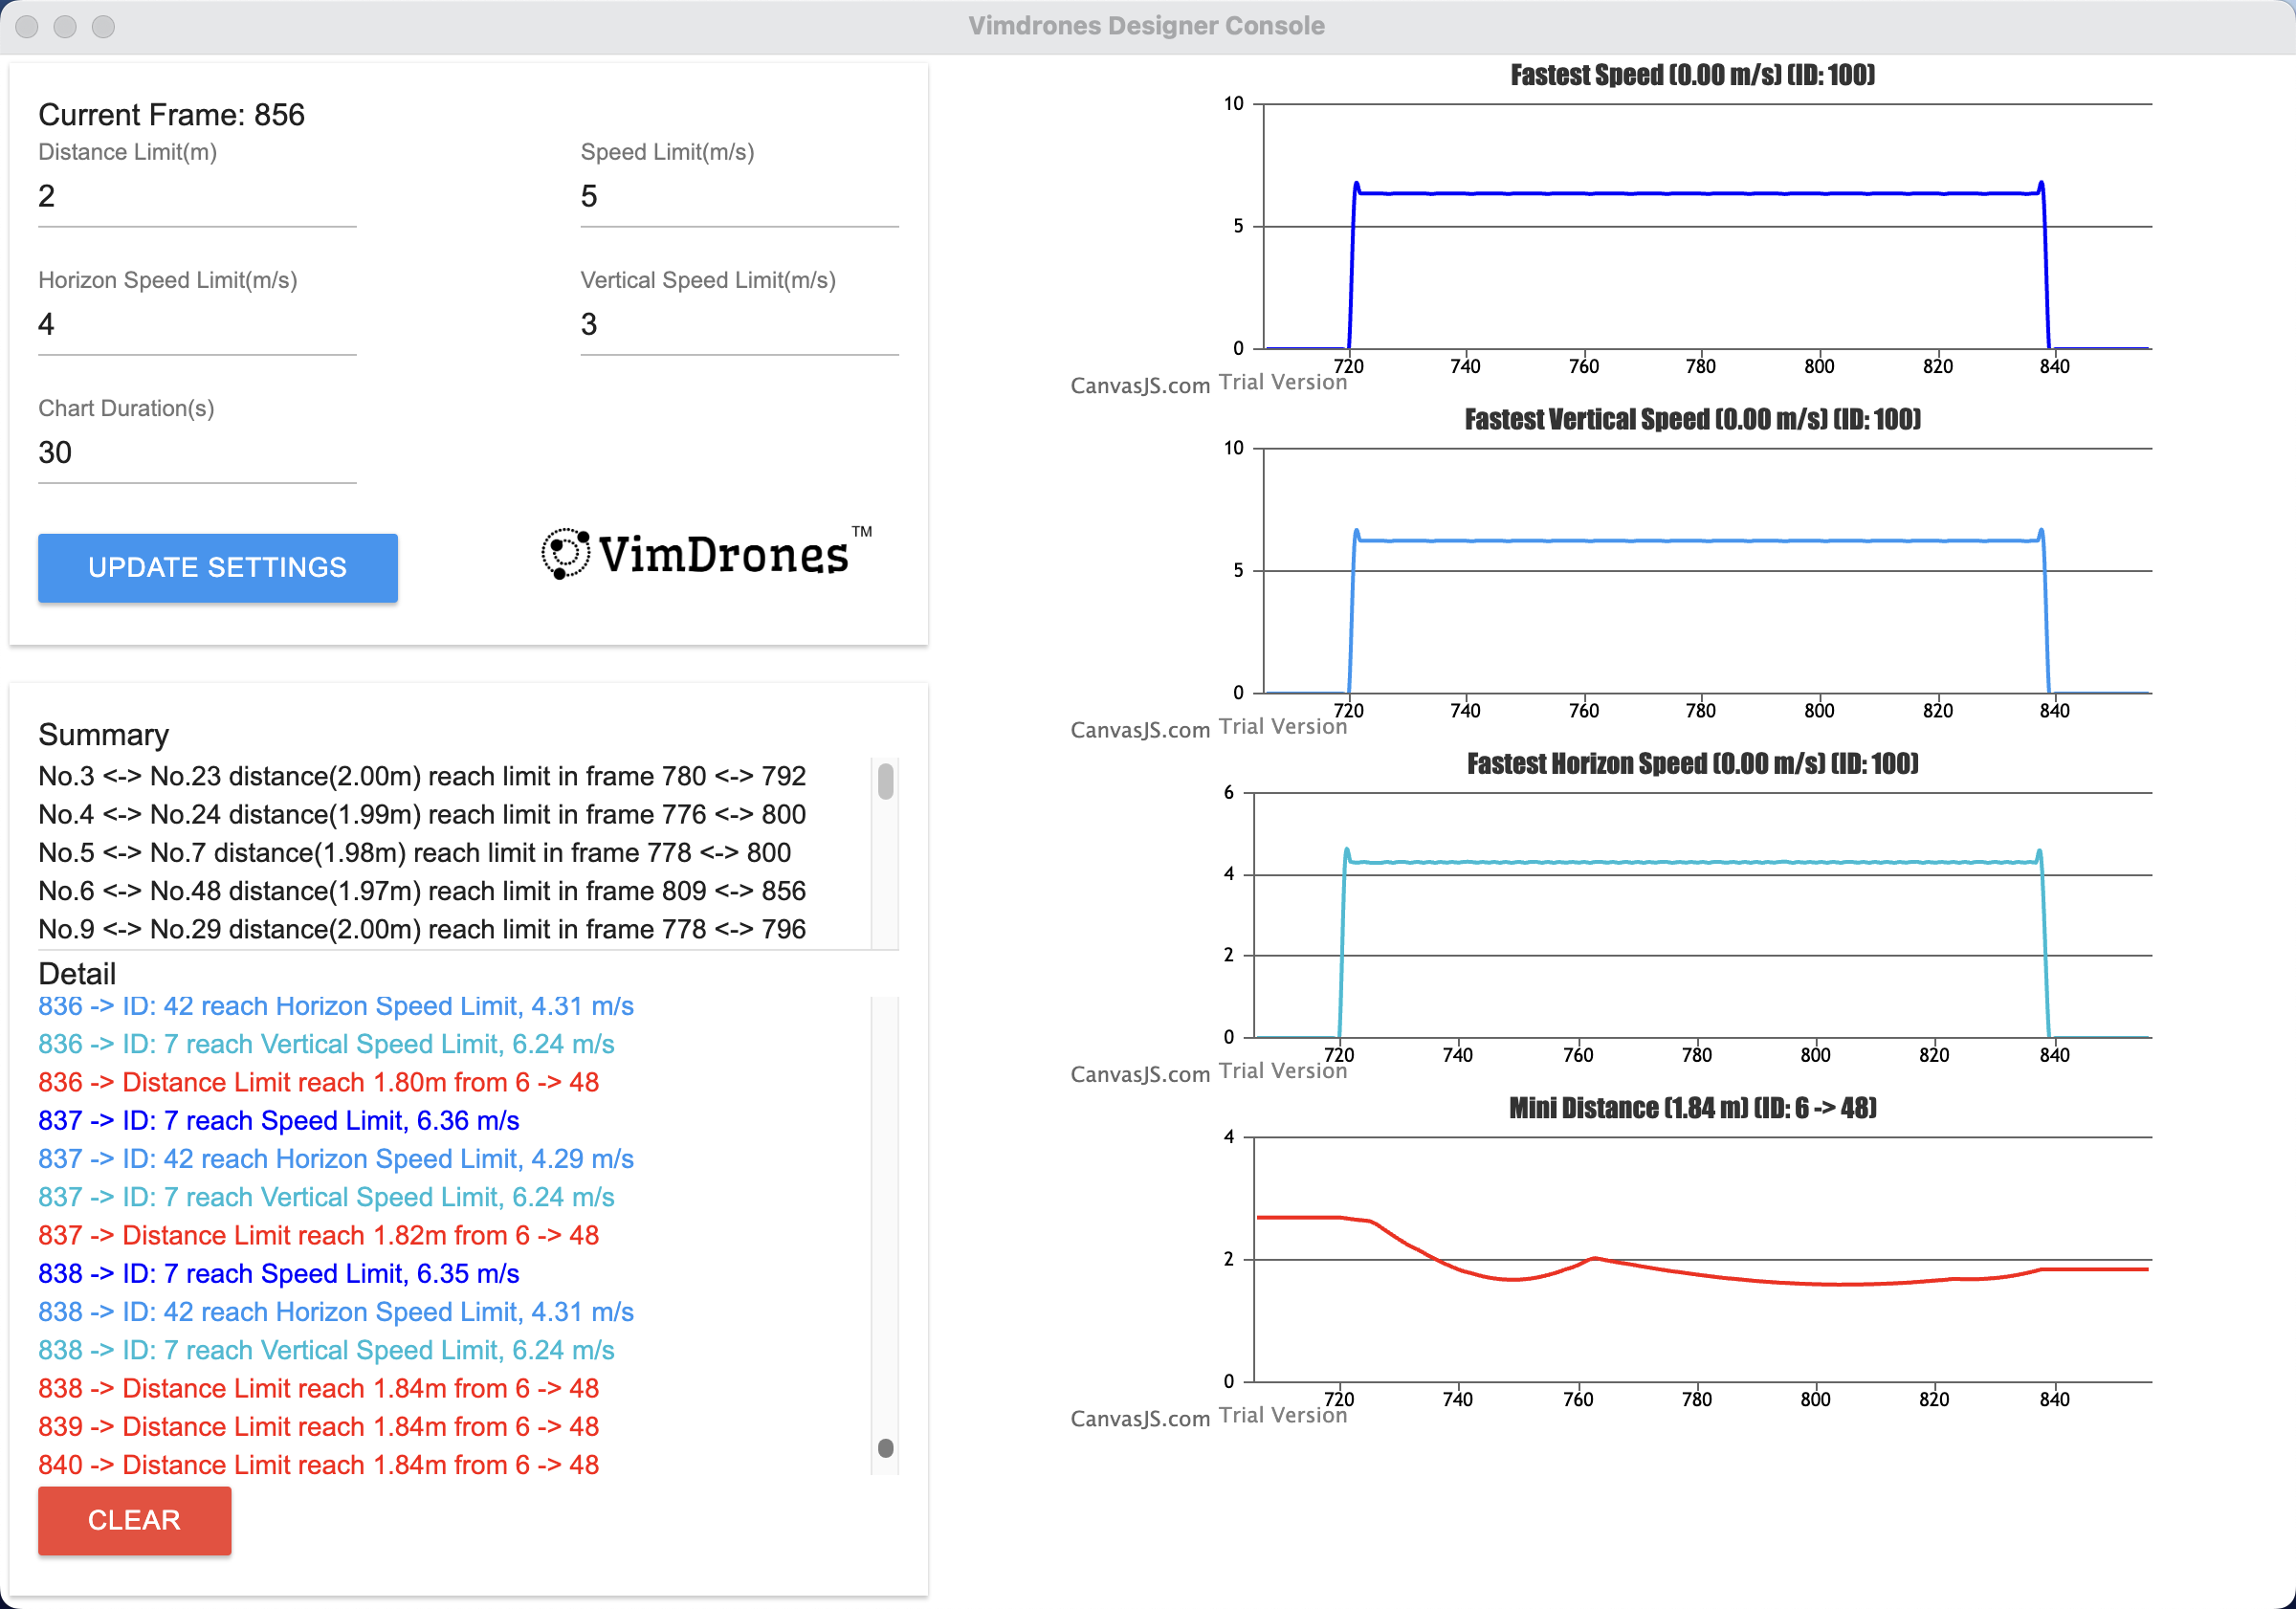
What to do when the drone reach the distance and speed limit?
- Try to make the material figure larger if the drone reaches the distance limit.
- Try to swap the positions of two vertices if the two drones will go cross to each other. See Manual Swap
- Try to avoid converting the horizontal formation to the vertical formation, or vertical formation to horizontal formation.
- Adjust the keyframe of the drone.
What to do when the drone reach the speed limit?
- Try to extend the time of the transform.
- Try to change the Interpolation Mode of the F-curve, it wil also effect the distance of the drones.
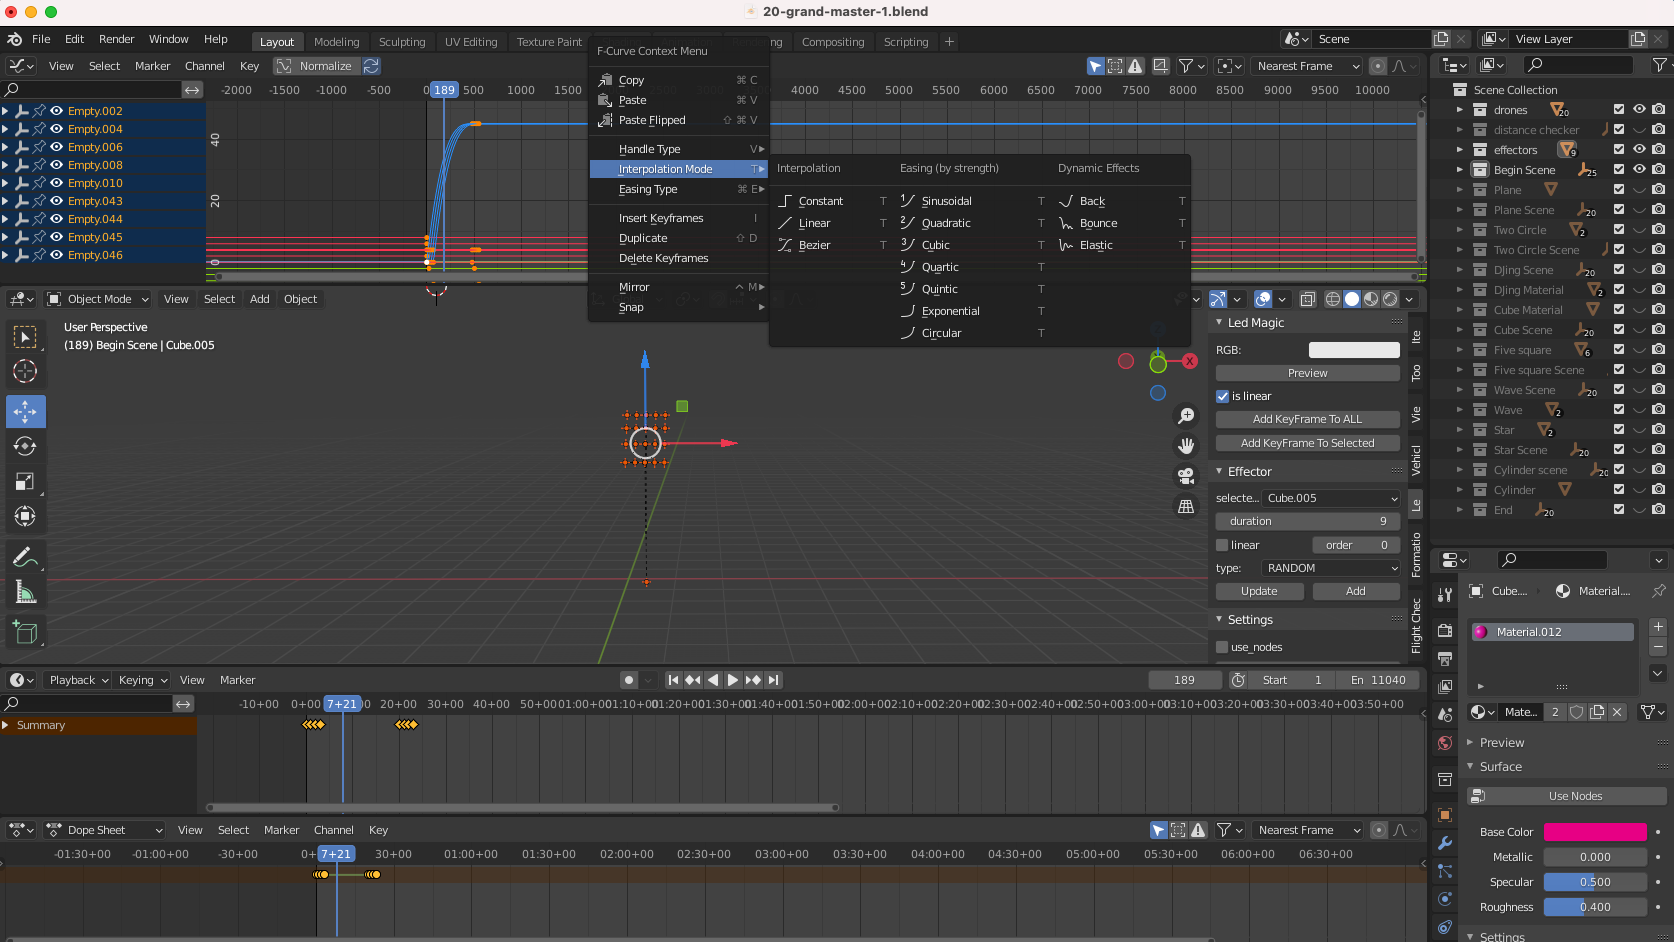
Tips
- Open the Console and Safety Check when you do the design and check the speed and distance real time. So you can adjust the speed and distance at any time based on the feedback from the Console and Safety Check
- If the distance is larger, the formation looks more stable. If the distance is close, the airflow generated by the drone will affect each other. It is recommended that the distance between two drones be 3 meters or more of the formation figure.
Operation Video
Manual Swap
What should we do when the distance between two drones reaches the distance limit?
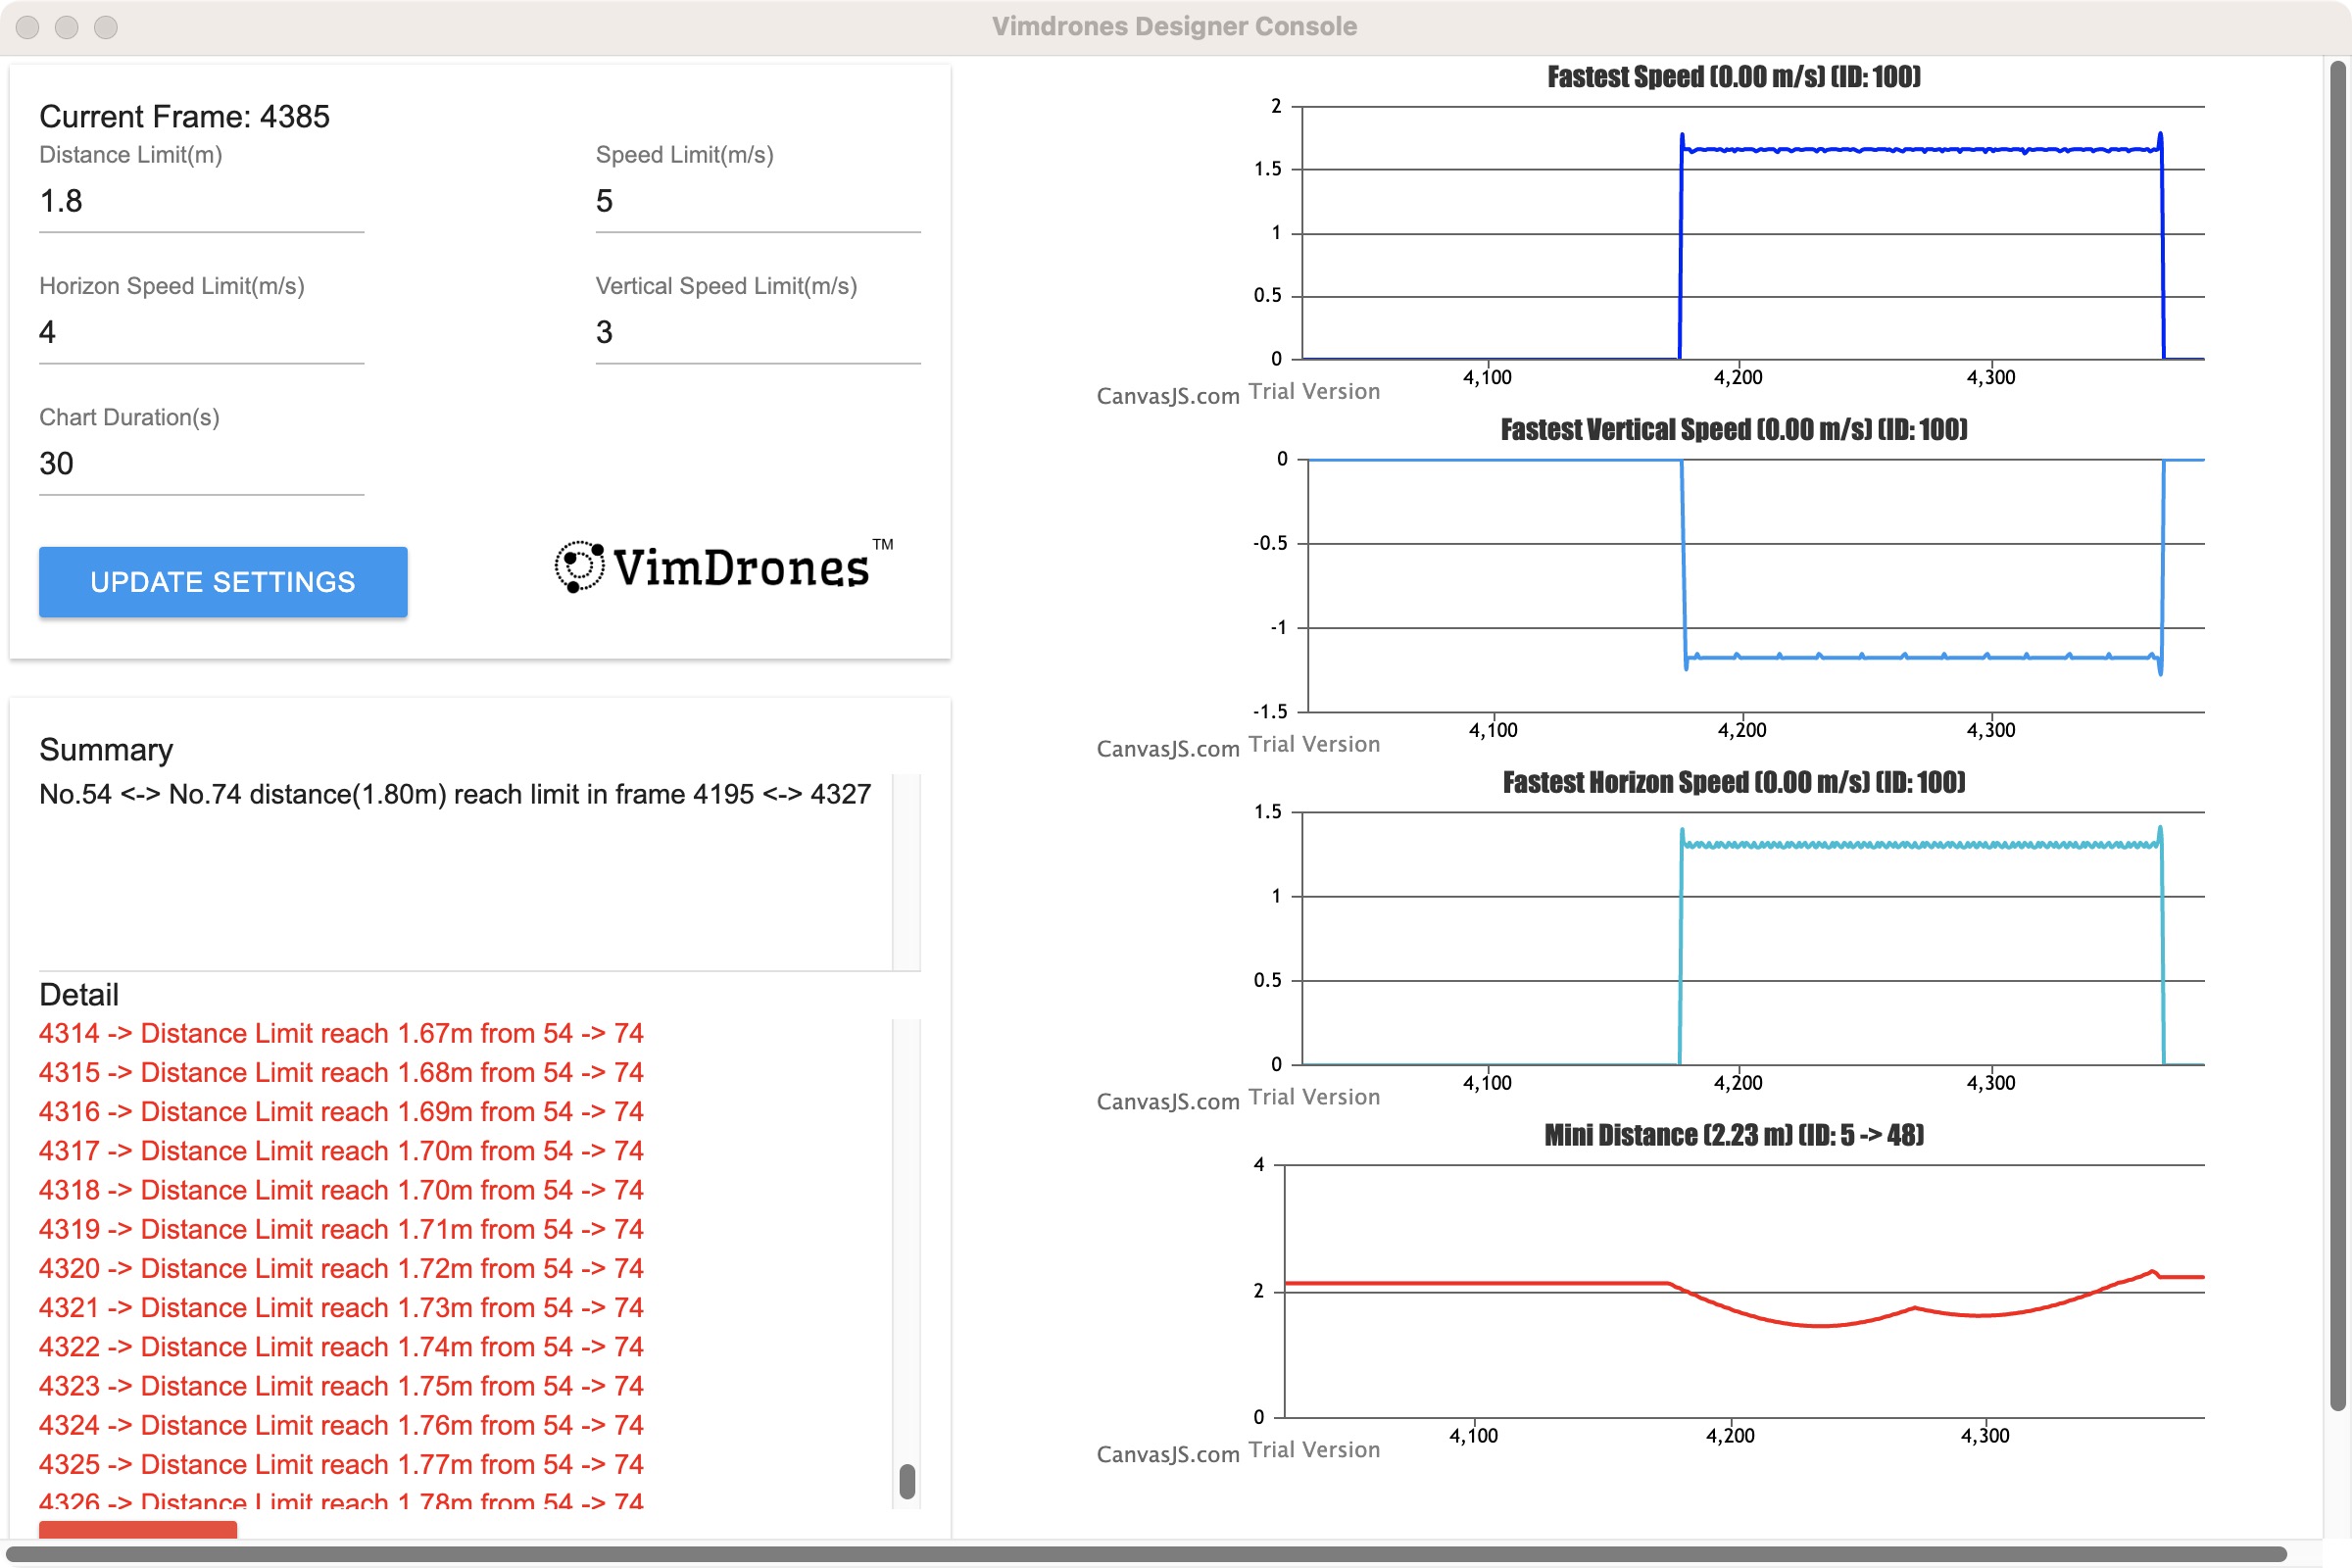
We could use the Manual Swap function to quickly handle two drones reaching the distance limit.
- Click Formation -> Manual Swap
- Select the formations that need to swap the drones
- Choose the first and the second drone
- Click Swap button, so these two drones location will be swapped
-
Play the animation and check into console to see if there any other drones reach the distance limit
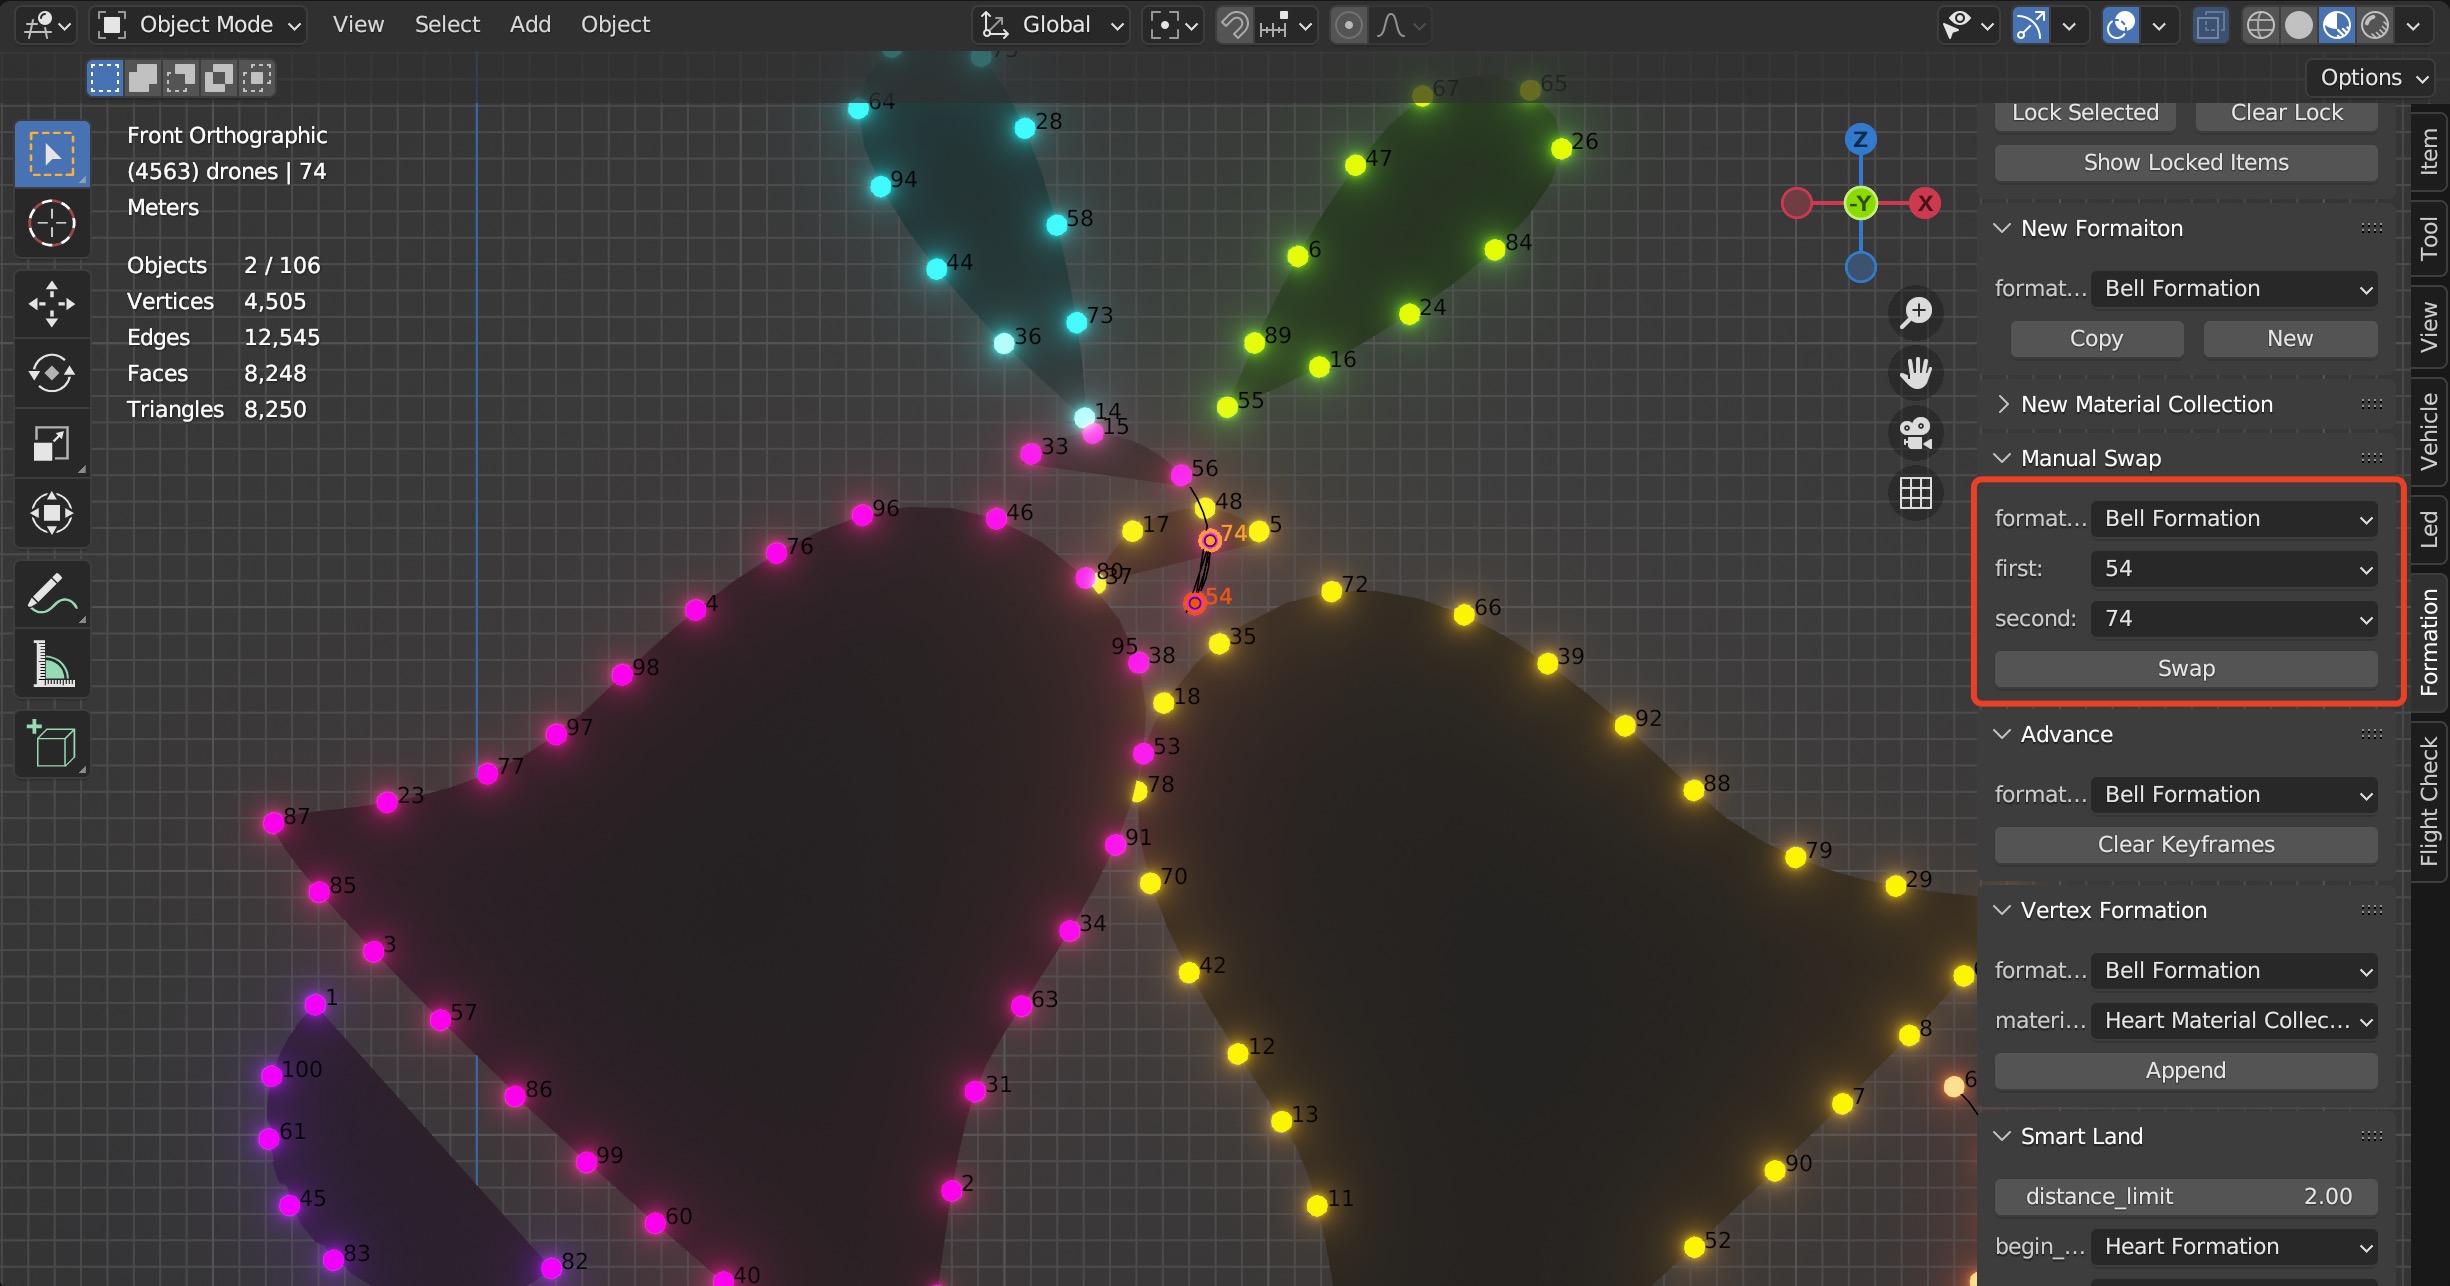
-
After swapping the two drones, they don't reach the distance limit in the console
Warning
- If the position of the drones are swapped in the middle formation, the positions of the two drones in the subsequent formation will also be swapped, which may cause a collision or reach the distance limit, so the subsequent formation needs to be re-detected in the console.
- Manual Swap cannot swap the two drones' colors, only change their positions. Please confirm that there is no problem with the transformation before adding colors.
Render Animation
How to render a image or video?
Method 1
1. Increase LED Brightness
 Set a higher value for the LED strength.
 Set the world color to black in World Properties in Rendered View.
 Hide overlays to remove the floor and other distractions.
- Set Output Properties
Adjust the Frame Range for start and end frames.
Choose a save location and set the File Format to FFmpeg Video with MPEG-4 container and constant Bitrate. - Render Preview Use View -> Viewport Render Image to preview. Adjust the 3D view if needed.
- Render Animation
Click Viewport Render Animation to start rendering. Make sure only the drones collection is visible in the Outliner. - Save and Edit After rendering, find the saved video, then import it into video editing software for final edits.
Operation Video
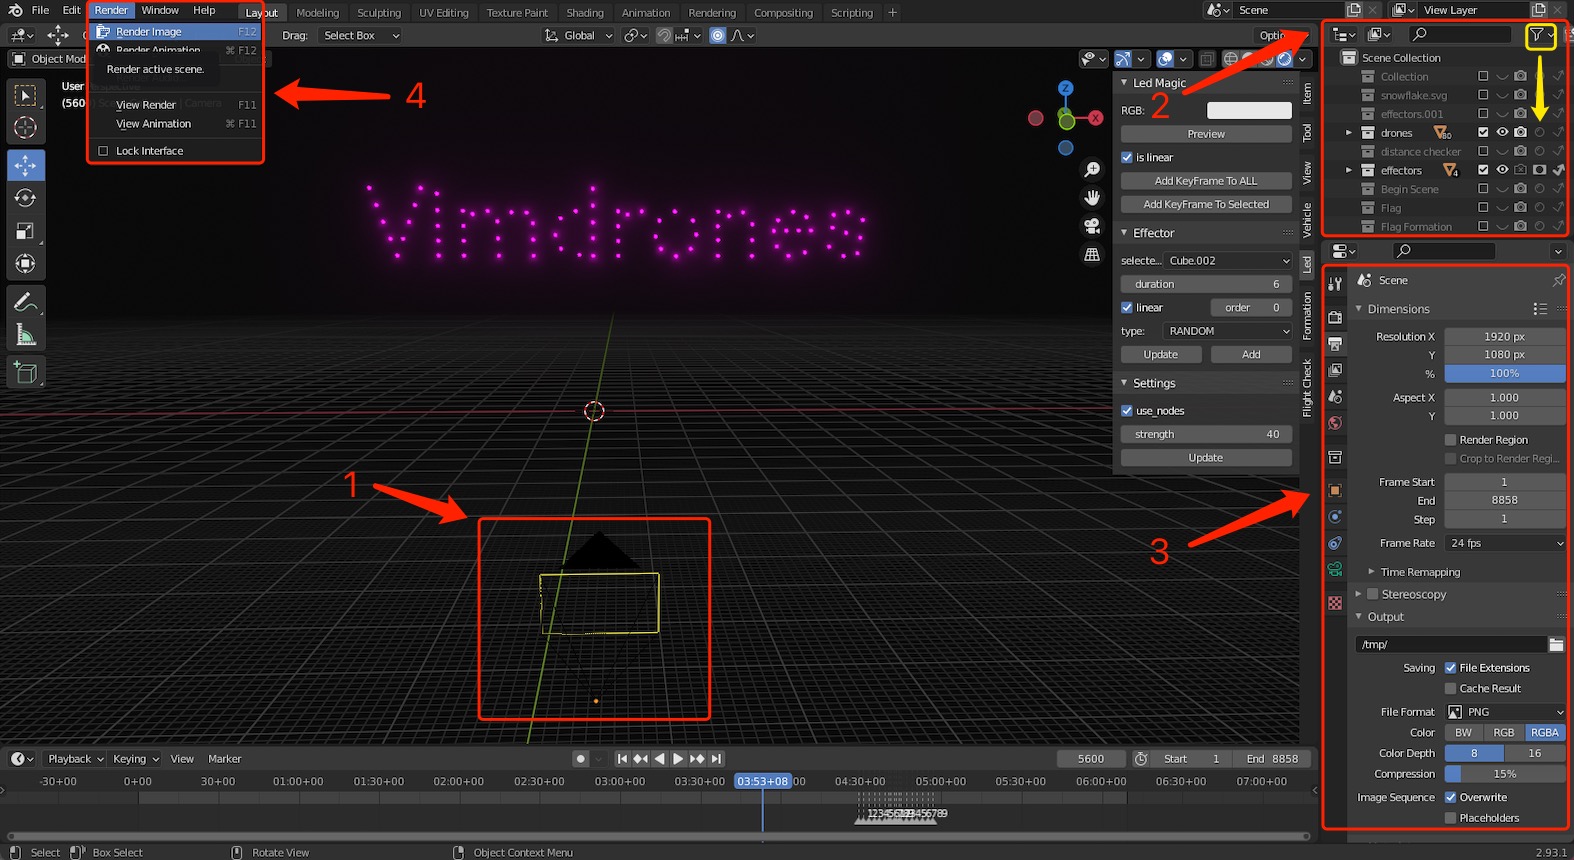
Method 1
1. Add the Camera
2. Set Restriction Toggles: Holdout and Indirect only on
3. Click Output Properties, set the Frame Range, choose the Output file location and the File Format
4. Click Render, choose Render Image or Render Animation
Note
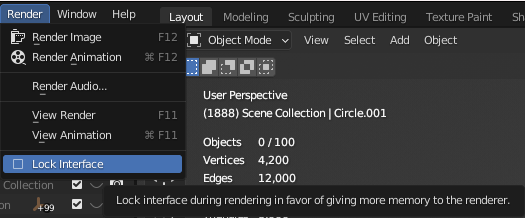
Render must uncheck Lock Interface. Do not export the files when rendering.
Export Animation
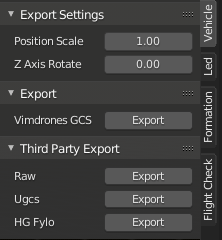
Export Settings
- Position Scale: scale factor to coordinate, default is 1, if you want to change the pattern size this would help (do not change it unless you know what it is!)
- Z Axis Rotate: rotate degree in clockwise to coordinate, default is 0, if your flight field direction is different from your design, this would help (do not change it unless you know what it is!)
Export To Vimdrones GCS
- Vehicle -> Export click Export button and select the your folder to save
Export To Third Party Fly System
-
Vehicle -> Third Party Export button and select the your folder to save
-
Support List
| Company | Name | Scene | Sample Path |
|---|---|---|---|
| None | Raw Format | Custom | Download |
| Ugcs | Drone Show Software | Outdoor | Download |
| High Great | Fylo | Indoor | Download |
How to add your system to the list? Please contact us
Raw Data Format
1.txt -> drone id 1, fps equal blender settings
1 0.000 0.000 0.000 204 194 40
2 0.000 0.000 0.094 204 194 40
3 0.000 0.000 0.188 204 194 40
Ugcs Format
- Please make sure that the order of drones in the last formation is the same as the begin scene.
- Please do not change the output frame rate in default(24 fps). Keep the Export Settings -> Frame rate to 4 or less
- Format revision
- Choose Beta to export PATH3 format.
- Choose Currency to export PATH format which the total design should be limited to 12,000 FPS (approximately 8 mins and 20s for show time). It depends the drone system that you use
Operation Video
Drone Show Design Process
-
Conceptualize and Storyboard the Show
- Start with a clear creative vision: Create a storyboard or concept sketch to outline the narrative, key formations, and transitions.
- Define the show’s purpose (e.g., celebration, advertisement, storytelling) and duration.
-
Set Up the Drone Show Team
- Configure the number of drones and launchpad layout using Vimdrones Designer to establish the drone formation team.
- Import a map or 3D venue model for precise spatial planning.
-
Create and Import Objects
- Model 2D/3D objects (e.g., shapes, logos) in Blender or import pre-built assets (e.g., SVG, OBJ, FBX).
- Assign drones to object vertices in Blender for accurate formation mapping.
-
Transfer and Add Animation to Drone Formations
- Use Vimdrones Designer to smart transfer drone formations, minimizing travel distance and avoiding collisions.
- Animate objects with keyframes for smooth transitions (e.g., position, scale, rotation changes).
- Add dynamic elements (e.g., spirals, waves) for visual appeal.
-
Finalize Timing and Landing
- Use Vimdrones Designer’s smart land function for an automated, orderly landing, or customize landing formations (e.g., heart, star).
- Optionally extend the end frame to keep LEDs on after landing.
- Ensure landing paths are efficient and battery life supports any extensions.
-
Flight Check
- Use Flight Check to ensure drones stay within distance and speed limits.
- Use Control to monitor drone distance and speed in real-time.
- Optimize paths use Manual Swap function or via the timeline editor.
-
Add Lighting and Effects
- Add LED colors to drones and sync lighting with keyframes or music for dramatic impact.
- Apply special effectors and the Keep effect function for enhanced visuals.
-
Export Drone Show Path
- Export the show path in a format compatible with the ground control station.
- Test the upload on a small drone batch first to ensure accuracy.
Tips
- Remember to save a few more backups when designing
- If we select a music for the drone light show background music at first, we can create drone light effects based on the beat of the music. The music data could influences the size or color of the Effector Object. So, it is very easy to grab every beat of music and let sound, light and electricity blend together perfectly.
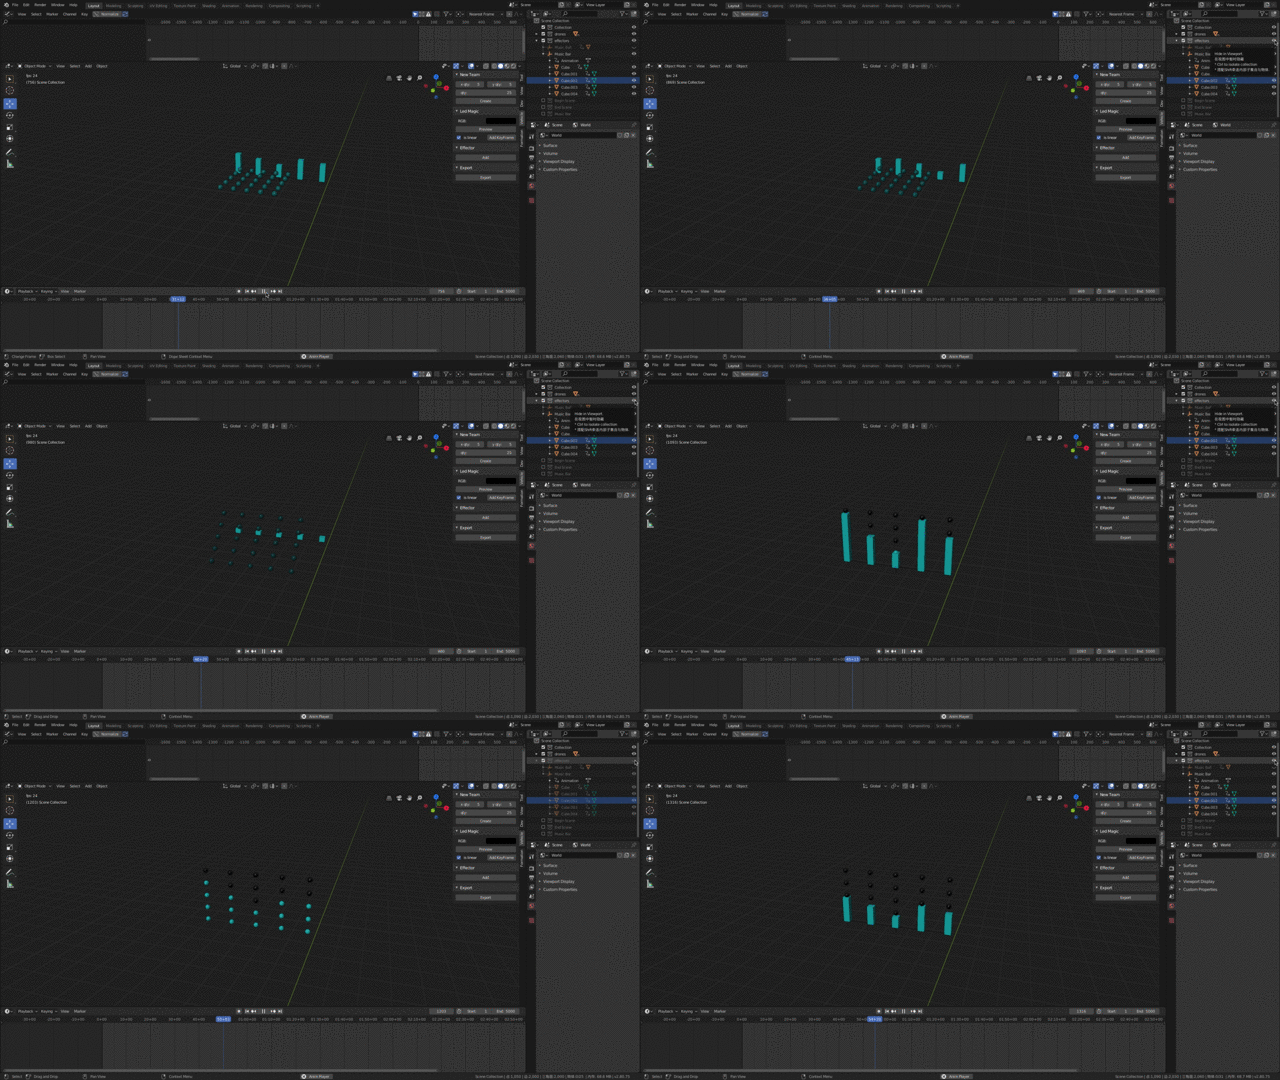
Example
Add Line Font Text
Installation
- Download blenderstrokefont.zip
- Open Blender and select File->User Preferences
- Click install Add-ons tab and then Install Add-on from File
- Select the downloaded file
- Make a “√” in front of the Add-on
- Check the ‘Add Stroke Font Text’ option in the add-ons dialog
Add line font text
- Add a Curve
- Select ‘Add Input Text’ option in the ‘Action’ drop-down
- Input the text to be rendered in the text box
- Select the font
- Set Font Size
- Select the Curve in the properties of box
- Select the font and click ‘Add Stroke Font Text
Operation Video
Add Text
- Open Blender through Vimdrones Designer. A -> X -> D, delete all the objects
- Add -> Text, we could see Text in the 3D view. R -> X -> 90 (Rotate 90 ° along the X axis)
- Change to Edit mode, delete and enter text
- Click Object Data Properties tab, Font -> Open Font, open the file to set the font. Geometry -> Extrude. Font -> Transform -> Size
- Change to Object mode, Object -> Convert to -> Mesh from Text
- Click Modifier Properties tab, Add Modifier -> Remesh. Remove the “√” of Remove Disconnected Pieces. We could set the Octree Depth & Scale. Click Apply the Modifier
Operation Video
Add QR code
- Online Generate the QR code. Download the QR code image.
QR Code generator - Open Blender in Vimdrones Designer. Add -> Empty -> Image. Click Object Data tab in the Properties window. Open and browse to your image
- Add -> Mesh -> Plane. Choose Display the Object as wire edges. Scaling the QR code makes it as big as Plane. Press tab to Edit Mode. Loop Cut the Plane and make one edge correspond to a row/column of dots
- Now we could add a drones Vertex Group. Select those vertices on the QR code dots and Assign the vertices to the drones Vertex Group. Add a New Material Collection and rename it as QR code. Drag the Plane to the QR code Collection. Save the Blender file.
- File -> Append, append the QR code Collection to Blender which it’s designing the show. We to start to make the QR code drone formation.
Operation Video
Matrix display
Steps:
1️⃣ Make a matrix of 10x10 drones
2️⃣ Set the color black for all drones and add Text. Convert the text to a Mesh object and Put it like an effector.
3️⃣ Move/slide the text through the matrix. You see this effect
Text setting:
🔸 Select Font with Bold San Serif font
🔸 Set the size fix the size of the drone matrix
🔸 Make extrude: 0.5cm

